You are using an out of date browser. It may not display this or other websites correctly.
You should upgrade or use an alternative browser.
You should upgrade or use an alternative browser.
Obi-Wan Kenobi - Ultimate Weathering Project
- Thread starter cwoodreplicas
- Start date
Grenade:
The real grenades are in a variety of conditions. Some are very heavily pitted, rusted and relics. Some are pristine. As the goal of this project is a ‘good condition real parts’ the weathering I’ll do will be fairly light but aim to represent what I can see on the real parts.
The key features are:
- Light dings and dents across the body
- Texture across the surface, created from rust.
- Many real grenades have the top ring painted red
- The V-cuts among the body often clip the top ring.
- Blue finish, but worn.
To achieve this finish I first had to ding up the body (which was easy to do using my trusty hammer) and filed in the extra V-cuts to the body . I then had to start to build up rust on the surface. So I suspended the grenade in a sealed tub of ‘vinegar vapour’, and left it for a few hours in a warm place. This is a really effective way of generating rust and surface pitting and texture. I then cleaned the rust off with a wire brush and began the repetitive process of blueing, taking back with a 3M pad and then re-bluing. To finish off the grenade, I painted the top ring red and then removed 99% of the paint to leave a few red streaks. An oil and a scrub with a a toothbrush created the final appearance.
The finish created has a lovely surface patina, and a nice, clean and blued finish. To me, it could easily pass a vintage piece.
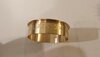
Initial vane ring off the lathe today and being sent to me. Came out very nicely. The text is physically engraved into the surface as opposed to laser engraved. Geometry has a little more angle to the flange.
Attachments
PrinceZip
Master Member
Initial vane ring off the lathe today and being sent to me. Came out very nicely. The text is physically engraved into the surface as opposed to laser engraved. Geometry has a little more angle to the flange.
Very nice.
A note of suggestion would be to make the text thinner and shallow.
Even on clean Hales rings, the letterings are barely visible.
Very nice.
A note of suggestion would be to make the text thinner and shallow.
Even on clean Hales rings, the letterings are barely visible.
I considered thinner, but from what I could see the text was pretty varied across all different versions. Some is thinner, some is like this.
Brass is relatively soft and so it’s likely that the surface just wears over the past 100 years. I’ll be giving this a light sand to de-burr and take the sharpness off the letters certainly. You can’t do this with a CNC.
I've seen a lot of grenade examples and from my view it's fairly split on shallow vs deeper lettering. Seems like it might depend on the factory.
This looks a lot better than the laser etched ones. The letter thickness might be just a tiny bit more bold than the originals but overall it should be fine especially with a bit of weathering.
This looks a lot better than the laser etched ones. The letter thickness might be just a tiny bit more bold than the originals but overall it should be fine especially with a bit of weathering.
I've seen a lot of grenade examples and from my view it's fairly split on shallow vs deeper lettering. Seems like it might depend on the factory.
This looks a lot better than the laser etched ones. The letter thickness might be just a tiny bit more bold than the originals but overall it should be fine.
Certainly agree and I might ask the machinist just to lift it off a tad to thin up the letters some more, but I’ll see how it comes out when I’ve done a weathering pass on it.
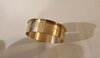
Grenade Vane Ring
The grenade vane ring came through today. I lightly sanded it to debur the letters and then gave it a vinegar vapour bath to age it and applied brass black.
The ring really finishes the prop well


The grenade vane ring came through today. I lightly sanded it to debur the letters and then gave it a vinegar vapour bath to age it and applied brass black.
The ring really finishes the prop well
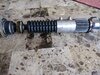
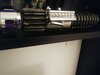
FINISHED-ish
After the last part, I’ve assembled the saber! The booster is a RussRep (I prefer the thinner vanes).
I think it looks good (much better in person) but there’s still more to do somehow, somewhere.
What do people think? Remember the look is a ‘good condition real parts’


After the last part, I’ve assembled the saber! The booster is a RussRep (I prefer the thinner vanes).
I think it looks good (much better in person) but there’s still more to do somehow, somewhere.
What do people think? Remember the look is a ‘good condition real parts’
Obi1Kenobi
Member
Grenade Vane Ring
The grenade vane ring came through today. I lightly sanded it to debur the letters and then gave it a vinegar vapour bath to age it and applied brass black.
The ring really finishes the prop well
View attachment 1322990
View attachment 1322991
View attachment 1322992
View attachment 1322993
View attachment 1322994
View attachment 1322995
View attachment 1322996
If you decide to offer a run of these rings, I'm very interested.
Initial vane ring off the lathe today and being sent to me. Came out very nicely. The text is physically engraved into the surface as opposed to laser engraved. Geometry has a little more angle to the flange.
That’s dedication
FINISHED-ish
After the last part, I’ve assembled the saber! The booster is a RussRep (I prefer the thinner vanes).
I think it looks good (much better in person) but there’s still more to do somehow, somewhere.
What do people think? Remember the look is a ‘good condition real parts’
View attachment 1322998
View attachment 1322999
View attachment 1323000
View attachment 1323001
View attachment 1323002
Job well done!
If you decide to offer a run of these rings, I'm very interested.
I think there is a good market for that
Peacefrog35
Sr Member
I did something similar, added fake weld, put the balance pipe in a fire for an hour, and on amd on. Real transistors and I lrft on the blue ring ans c end cap even though we aren't sure either were on the saber.
Attachments

the rust treatment I gave my grenade and booster was to take metal shavings, bleach, and salt. Pack all that into the grooves and and onto the surface then let it sit in a plastic bag for about 24 hours.
I just washed it off and lightly brushed it out (with a toothbrush) anything excessive. And then did a heavy coating of wax to seal it.
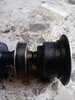
For the balance pipe I basically just used a ferriers’ horse-shoeing file to take some deep cuts and gouges out of the balance pipe walls. Then I’ve discovered I really like the way that Ebony tinted paste wax darkens and mattes the surface, without being painted it resembles inconel nicely and can be re-applied easily. I also use that anywhere I want to add just a ‘hint’ of depth
*edit* for the bleach, steel, salt bath I dropped everything in. That’s how I got some great color and chipping on the clamp too
russellsch
Master Member
The finished product looks brilliant! 
& I agree with others. If you were to do run of the rings, count me in.
& I agree with others. If you were to do run of the rings, count me in.
If you decide to offer a run of these rings, I'm very interested.
^ SAME!
Similar threads
- Replies
- 4
- Views
- 584
- Replies
- 2
- Views
- 452
- Replies
- 1
- Views
- 488
- Replies
- 14
- Views
- 1,617