ob1korobi

Member
RPF PREMIUM MEMBER
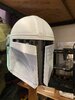
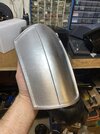
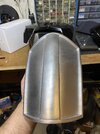
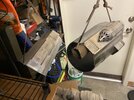
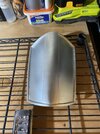
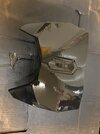
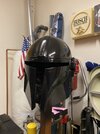
Because I am doing a whole Mando Build I figured I would just use this thread. Here we go. Blaster is done and I've Finished most of the armor. I've purchased a few pre printed pieces that I can't fit on my build area. For now it's just been sanding and filling. I'll update as I go.
1597471053319.jpeg

1597471137719.jpeg
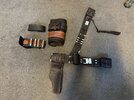
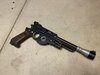
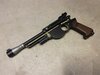
Thought I would finally post this build. I recently bought a 3D Printer and I am having a lot of fun with it. There is a treasure trove of files to make some really cool props I have always wanted. Thank you to Thingiverse user, Straeker, for making this model. I think it is probably one of the best out there in terms of screen accuracy but I base that off of just watching the show and not seeing many other shots of the blaster itself. I printed this in one piece with PLA and 50% infill and very little support. It came out really nice and clean but there was a lot of post process cleanup from the support I did have to use. I have not painted models since I was a kid and so I went down the rabbit hole with getting paints and materials to make this. I am really pleased with how it turned out. I am just waiting on some brass paint to finish the trigger and cleaning rod portions and then some more weathering touchups. Enjoy!
blaster1.jpg
image0.jpg
image0 (1).jpg

image0 (2).jpg
image1.jpg
image0 (3).jpg
 

Attachments

  • 1AAC87E2-8AE6-43C8-868D-674FFBE9C305.jpeg
    1AAC87E2-8AE6-43C8-868D-674FFBE9C305.jpeg
    3.7 MB · Views: 136
  • 8949256D-37C3-4B7C-AEA9-B7FC2F96596F.jpeg
    8949256D-37C3-4B7C-AEA9-B7FC2F96596F.jpeg
    3.5 MB · Views: 133
Last edited:
1CE93292-2C7B-4A69-972D-FBF0A3F861DB.jpeg
E8C129C3-6373-40E7-B17E-6512AE43A47A.jpeg

The paint on the grip was lifting and not adhering to the primer so I had to redo it. I used some darker leather color but it’s oil based and I am not sure how it will set.
I don’t like when things look new when they are being carried in the open and heavily used so I went overkill on the weathering.
 
I decided to try and polish it like I used to have to with my work boots. The paint was really tacky but I used some 2000 grit and took it down to one level and then busted out the T-shirt cloth and water. I just rubbed it and rubbed it until it was a nice fast finish. Totally sealed in and has sort of a wood effect lol. I also toned down the weathering a little.
FFF88736-71E4-4A6E-A9F8-C4416803F49B.jpeg
FF64B322-7400-42E0-B0E8-E2AD3C4CF97B.jpeg
 
0791226F-CA5B-45B9-AC48-D12CAE7386A7.jpeg
AEECC186-BF7C-4655-9190-6699A3EE9333.jpeg

Okay this is as good as I feel it can get to my ability. I need to get working on the rest of the armor. Anyone know if there is some sort of matte enamel to seal this up?
 
Took a while to print the helmet pieces. To get it full scale I needed to do it in 8 (well 7 because I learned how to join 3d models later). Most of the models online need to be scaled down and don't fit most adult male heads. Lots of glue and sanding followed.
96C78BB5-1B55-42F9-B2B0-A3D68A8DE042.jpeg
BB4FACFC-C903-49A8-BF0A-3A9E99FB797B.jpeg
5A0A5AD9-AE2C-4283-A720-F9BE80990F21.jpeg
 
Shoulders and vambraces done. I have some ideas for whistling birds but I think I'll print another set for that project. I am bothered by the keypad dots being the same size so another reason to print another one.
08B8708A-E71D-4850-BA87-A4CF5FFB2897.jpeg
F141CADA-E9EF-4D16-B4D2-5834F4C31BAF.jpeg
BF49196B-0DB0-450F-A6D3-6A9BFE2D774C.jpeg
 
I was having a lot of trouble with my printer and had almost a month of doing no printing. I was able to get it fixed, running better than ever and printed the rear vent and ear pieces over the weekend. Also testing out some brush on coating. I did zero post processing with these parts and I'm curious as to how they will turn out.
F4B8A554-0735-4970-A3E9-9B373901825A.jpeg
E99C5A43-D9B5-4359-9D48-6AE9CD76955A.jpeg
9BCEA9AA-4DDB-45F9-8531-2B26A396141B.jpeg
DD83DC8D-F2AE-4271-9A7E-BF5070F51C6A.jpeg
 
I kind of like this stuff but it sets up really fast. I like that it is so smoothe though. Hopefully it accepts the primer okay.
 
Can confirm. XTC-3D works great, and after a bit of sanding takes paint well.

SB

Good to know. Yea I also got some of the chest done. The earpieces I did are like glass but this chest needs probably another coat. I still hear the record scratch. lol.
chest.jpg

Bottom piece for comparison
 
Made some progress in the last week or two. Weathered my gloves from EndorProps and finished putting the helmet together.
IMG_7105.JPEG
IMG_7106.JPEG
62262053445__9989123E-3DBD-403A-949F-A5AE6C11BFA5.JPG
62262055137__D661AB59-5C20-43BD-84BE-6F366A5884F0.JPG


I had to reprint the ear pieces from before because they were actually the wrong models from another file. I for them mounted on and decided to try some green putty to try and smooth the layer lines this time. It works pretty well. I am going to use the coating on the entire helmet I decided. I'll be doing that tonight and then probably Sunday I will get the first coat of primer on.
62262057628__5B5FAF6C-B105-4A35-AE42-82E320808185.JPG


I used the coating on the rear vent a while ago to test and it has been my test part all along for the primer and now paint.
I don't have an airbrush and I am sure it would be way better but...
IMG_7175.JPEG
IMG_7176.JPEG


I'm not very happy how this turned out and I think I'll reprint the part and apply the coating again. I don't really want those uneven lines in the vent louvers showing up. I am using a Tamiya black underneath and Alclad II from a rattle can. I have only seen it mentioned it once in this forum but I have never seen it used from a can. It isn't terrible but it could be better (I'm not really a painter as you can tell)
IMG_7173.JPEG


I also got my visor from TVisors and I did a quick test fit. It actually matches up very well considering this is a 3d printed helmet and I just purchased the visor without really knowing the dimensions.
IMG_7155.JPEG
 

Attachments

  • 62268206819__DF6D4263-44F4-4A25-AC7D-06A0E9D5BACC.JPG
    62268206819__DF6D4263-44F4-4A25-AC7D-06A0E9D5BACC.JPG
    2.1 MB · Views: 111
  • IMG_7104.JPEG
    IMG_7104.JPEG
    997 KB · Views: 109
Wonderful job. I am thinking about printing my own Mando helmet at some point. Is this the thebrokennerd thingiverse version or did you purchase the STL's off a high quality modeler?

I'm about to grab an airbrush and I am unsure if I should go for aclad II or alumaluster.
 
Wonderful job. I am thinking about printing my own Mando helmet at some point. Is this the thebrokennerd thingiverse version or did you purchase the STL's off a high quality modeler?

I'm about to grab an airbrush and I am unsure if I should go for aclad II or alumaluster.

Yes I used the BrokenNerd files. I printed the bucket in 7 pieces. About half way through I learned how to join parts together so I printed the front top as one piece to eliminate the seam going up the middle. My advice is to do as big of pieces as you can or glue your parts near perfect. Or print more top layers. There isn’t a lot of material to work with and if you sane a seam down you have to be careful you don’t go too far down or you can hit infill. I had that happen in one spot on the top rear. The putty came in handy for that though.
 
So is the key to this particular finish on the helmet that you do a few primer coats and then hit it with one light even coat of chrome then polish? I decided to bust out my old combat boot polishing skills and got this with a wet, soft fabric and it started to get really smooth and then started to take some paint off. See my above before with just chrome then these. I kind of like it. Definitely need to practice though.
92C1F4E6-9FE4-4577-AF1C-C21A5CA468DD.jpeg
485945C2-D45E-4728-9E6A-BB17474EFF55.jpeg
672CFEC4-DE10-4A5C-9CE2-4EEEB17A7176.jpeg
DCBD59ED-418D-4317-9BC5-21CBA4770126.jpeg
 
Did the coating last night and hit it with 400 grit this afternoon. Then dove into the paint. Man I am nervous.
9B13CCD0-60A2-4642-A3FB-CB59D05B577B.jpeg
5105D5AC-7B75-402D-9B10-E85B261D4477.jpeg
42D82FFA-0FB3-4887-A536-D24A814E5FE2.jpeg
E8806EC9-1EFD-409F-ACC0-EC08DDC5BEAB.jpeg
 
Haven’t updated this in a while but I was able to get a lot more done. Had to rethink this whole rattle can thing and decided to learn how to airbrush. Man I am not good. I am trying to deal with fumes going into my house from my garage so I have to do all of this outside for the priming. The airbrush is not that noticeable inside the garage. The primer is wicked though. I still need to do the the battle damaged thigh and chest and the helmet I will do Monday. I also got a nice leather set from Sines so I am basically all in on this. I’m really excited. A quick trip to Joanne’s on my way home Sunday and I’ll have my cape materials done. The right leg armor is the only thing I can’t fit my printer so I’m hoping I can get it in a pinch. A note on the helmet. This is my third iteration on painting. I have painted and sanded and primed and I am just not happy with the finish. I have a gloss black primer drying over the weekend and I’ll be applying Spaz Stix So bday night. I’m hoping to get a somewhat uniform finish to the armor. I’ll post Final pics next week.
 

Attachments

  • 99CB2A7B-38C3-4E16-AA23-1265E94703F8.jpeg
    99CB2A7B-38C3-4E16-AA23-1265E94703F8.jpeg
    1.7 MB · Views: 143
  • DD066B26-1DD5-4C19-BBD6-EF004DFEBF4C.jpeg
    DD066B26-1DD5-4C19-BBD6-EF004DFEBF4C.jpeg
    1.6 MB · Views: 153
  • B2AE459D-90B2-4A4A-9A67-4FD73F850038.jpeg
    B2AE459D-90B2-4A4A-9A67-4FD73F850038.jpeg
    2.9 MB · Views: 145
  • D1A81585-2080-498D-B551-0336851C3B8E.jpeg
    D1A81585-2080-498D-B551-0336851C3B8E.jpeg
    1.8 MB · Views: 132
  • E8CC819C-9A83-469D-B3DE-6D60032278CD.jpeg
    E8CC819C-9A83-469D-B3DE-6D60032278CD.jpeg
    1.7 MB · Views: 128
  • BAF9FFAC-F04F-485D-BA31-04477D505E1E.jpeg
    BAF9FFAC-F04F-485D-BA31-04477D505E1E.jpeg
    1.5 MB · Views: 141
  • 7123AFF5-6594-4F12-8666-916797BCFF73.jpeg
    7123AFF5-6594-4F12-8666-916797BCFF73.jpeg
    4.7 MB · Views: 154
I think I figured out the airbrush. I did not like the way that thigh piece or vambraces turned out so I am going to do a gloss black base coat like I should have in the first place.

Helmet is basically done. I went for darker and I have not put the gloss clear coat in yet and I like how it looks.
BF01E802-8D48-4DF6-8836-CEF7DA95DCDB.jpeg
E0E09B32-B787-4871-9641-51CED61CFEB1.jpeg
B5081F0B-2136-442D-8743-EC34EC5AA961.jpeg
B7F740ED-7C3C-41FE-B5F4-DFAE1A3EFFF6.jpeg
6A2C97A5-AFC7-4F19-AB87-A429C43BFE1B.jpeg

I applied the clear coat to the chest as an experiment to see if I would like it to go on the helmet and I think I will apply a coat. It does help bring out the metal look and dulls it down quite a bit.
Before
04443A6F-6234-4E04-966F-2531EA74DDAC.jpeg
5C66976C-89F6-42CF-A17A-CD6E68588EAE.jpeg

After
54C39028-C042-4B67-8B4A-334CED42406F.jpeg
CD0E1605-2FB7-4C8C-9025-F357C0755858.jpeg
 
You've gotta sand the XTC, my man. Apply the XTC, sand it down, hit it with a layer of filler primer, wet sand, filler primer, more wet sanding, until you have it smooth as glass. Then apply the paint. This gets rid of all of the ripples and layer lines that you can still see through the silver. Silver is an incredibly hard color to paint, and shows all of the imperfections in the layers below it. In order to have a nice glassy silver topcoat, you've gotta put in the time to get the base layer absolutely as perfect as you can.

SB
Yea I definitely hurried a bit. I did sand the xtc. A few things I need to do to help accomplish what you are saying is, thicker print walls, sand between coats of the xtc and new hands. I have struggled the last few years with crazy arthritis in my hands and my grip is not what it used to be. I used to make custom knives and using my belt grinder for several hours at a time basically destroyed my hands, wrists, neck and back. If I can print a little thicker walls then I can use my sander. I ran into this problem before even on light sanding so from day one I already was limiting myself and had to resort to hand sanding. I’m going to make many more of these for sure and this has been an awesome learning experience. I appreciate the reply.
 
This thread is more than 3 years old.

Your message may be considered spam for the following reasons:

  1. This thread hasn't been active in some time. A new post in this thread might not contribute constructively to this discussion after so long.
If you wish to reply despite these issues, check the box below before replying.
Be aware that malicious compliance may result in more severe penalties.
Back
Top