Nike MAG replicas (V2 and V3 only)

I just used the materials on the first picture in my imgur album i posted and some tape and house hold foil and a exacto.
First i taped off the whole shoe and packed it with house hold foil. Put it in the sunlight for 20min
meanwile i took a 8 once bottle and put 2 of light blue leater dye and mix with solebright all to the top of the bottle. Shaked for a minute to make it a smooth color with no swirls
after 20 min i took the shoes inside and took of the solebright, it was a bit more clear now so the blue wont look yellow when applyed.

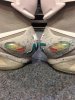
Applyed the mixture uf blue and solebright, and after 20 min cleaned them and this was the effect.

well i did the mod with the sole dye, its absolutly amazing..... cant wait to show it off it worked perfectly like i hoped true the process i thoug i kinda ruined my v3's but i didnt. i turned out better then i thought.

here is a before and after and i have a album with my proces here !
http://imgur.com/a/c5qKy

the photo below is super light because of the sun but the color is spot on

enjoy!

View attachment 686662View attachment 686663


Thanks for the tutorial !
I really want the same effect, so I just want your confirmation.

For 2 shoes ( a pair ) it needs :

3 oz bottle : https://angelusdirect.com/products/light-blue-leather-dye

4 oz bottle : https://angelusdirect.com/products/sole-bright


So it needs 2 bottle of each, or only one is enough ?

Thanks per advance,
 
so you cut directly the fabric to separate the uppers and reglue it onto the soles or unglued it and then trimed it and glued it back to the soles ?
there is a difference and the option of cutting directly along the soles edges saves time but i'm not sure of the result... I tried this on a HC pair, it ended up great but i didn't got rid of the foam inside and now it is hard foeme to put my feets in :/
anyway, i was going to trash these to use the soles for other tHing :)

i.ll post my pictures when back to canada and in my new appartment (there will be a lot of stuff to see about the modification of the HCs)

I first unglued the front part of the shoe as you indicated in your video. Then I removed the hard foam that did the road tip shape at the front of the shoe, then trimmed the extra cloth and cut the inner sole as well. And glued back. Then will put a new insole. Mine are likely a display piece. I have the ducats version of the delirium, hat and shoes so will be nice in a display case.

Canada! Cool si am I! In Montreal that is.

I'll make sure to take plenty of pics for the second shoe.


Sent from my iPhone using Tapatalk
 
IMG_0484.JPG
 

Attachments

  • IMG_0484.JPG
    IMG_0484.JPG
    1.7 MB · Views: 98
What did you use?
Looks like I will have to submit and do this as well dye the soles.

Sent from my SM-G900I using Tapatalk
 
yep its super easy. I used clear no-name spray paint (sprayed into the lid, then brushed on)
I had my shoes lying on their sides in case of drips when painting. It would look bad to have a big drip on the clear bubble if it dried wrong.
Will do this to my next pair as well (if I can ever be free of bills so I can go buy them, lol)
 
unless someone is brave enough to attempt a sock toe on the V3's?! :D Haha not me yet

I look at them every day, give the toe a squeeze and think, hmm, where to begin here. Yep, not game either just yet. Didn't someone use a thinner or similar liquid to dissolve the glue? I'd rather do that than attempt heating this spongy foam mid-sole. Once it is opened up, the construction is like the V1, so there is a heap of unpicking and resewing after the toe cap is removed. Then to glue it all back down.
 

glad you got your pics! I got mine too finally! Your lights look amazing btw :D

Heres mine
*update*

stupid iPad won't let me post the pics, will do it later once I'm back on the pc

*update*
IMG_9430.JPGIMG_9427.JPGIMG_9423.JPGIMG_9431.JPGIMG_9428.JPGIMG_9422.JPGIMG_9425.JPGIMG_9429.JPGIMG_9426.JPGIMG_9424.JPG

IMG_9422.JPG


IMG_9423.JPG


IMG_9424.JPG


IMG_9425.JPG


IMG_9426.JPG


IMG_9427.JPG


IMG_9428.JPG


IMG_9429.JPG


IMG_9430.JPG


IMG_9431.JPG
 
Last edited by a moderator:
Those look pretty good! Curious though... Are my LEDs dimmer?

I think who ever was taking the photos must have come across a setting on there camera to show the led bubble better, because comparing mine and your photos, the lighting looks the same. Maybe she just managed to use a focus point on the LED's and they were visible ?
 
Back
Top