Thank you for the kind words "3Dimpact". I think you are exactly right about the model work helping with the loss of my father. I'll have a lot of time off in November & December which should give me enough time to finish the Y Wing.Very sorry for the reason for the delay in your Y-Wing progress, but glad you're finding your way back to the work. That'll be a huge help in the healing process in and of itself - finding your way back to being 'you'.
Nice work on the model! Super satisfying watching them progress through the various stages of build - there sure are a lot of Y-Wings going together here these days!
Dan
You are using an out of date browser. It may not display this or other websites correctly.
You should upgrade or use an alternative browser.
You should upgrade or use an alternative browser.
Nice-N Gold Leader Y-Wing - My First Studio Build
- Thread starter PULLED PORKINS
- Start date
Thank you Dan,Very sorry for the reason for the delay in your Y-Wing progress, but glad you're finding your way back to the work. That'll be a huge help in the healing process in and of itself - finding your way back to being 'you'.
Nice work on the model! Super satisfying watching them progress through the various stages of build - there sure are a lot of Y-Wings going together here these days!
Dan
Still finding it tough to just sit down and work on the model but I'll get there with time.
Chuffy 70
Active Member
Nice build P.Porkins and like you I'm new to the 'lets build a model the same size as an iconic model'
Plus kudos to you for posting on the RPF, there's some seriously good modelers on here...and there's some seriously generous, along with helpful people too.
I have the same kit as you and following your build with interest, credit to you for taking the plunge!
My best wishes to you and your family for your loss
Thanks Chuffy 70. I appreciate the kind words. Still not finding any time to finish the Y Wing, it's about 80% complete but I'm still taking care of my fathers legal affairs as I am the Trustee but everything should be concluded by Thanksgiving and then I should have lot's of free time during the Holidays to perhaps get the build finished.Nice build P.Porkins and like you I'm new to the 'lets build a model the same size as an iconic model'
Plus kudos to you for posting on the RPF, there's some seriously good modelers on here...and there's some seriously generous, along with helpful people too.
I have the same kit as you and following your build with interest, credit to you for taking the plunge!
My best wishes to you and your family for your loss
Thanks again and have fun with your build.
P.S. If you have any concerns or questions during your build let
me know and I'll give you a few tips for paint adhesion and maintaining structural
geometry of the engine halves during the adhesion process. Mine had some slight
warpage.
Chuffy 70
Active Member
P.Porkins - I had to do the same thing in 2012 when my father passed away. His sister was too old to sort his affairs, so It was put upon me to do everything...you'll get there in the end.Thanks Chuffy 70. I appreciate the kind words. Still not finding any time to finish the Y Wing, it's about 80% complete but I'm still taking care of my fathers legal affairs as I am the Trustee but everything should be concluded by Thanksgiving and then I should have lot's of free time during the Holidays to perhaps get the build finished.
Thanks again and have fun with your build.
P.S. If you have any concerns or questions during your build let
me know and I'll give you a few tips for paint adhesion and maintaining structural
geometry of the engine halves during the adhesion process. Mine had some slight
warpage.
Thanks for the offer of help... at the moment I'm trying to figure out what I need - It is quite odd to get a kit with a lot of bits missing and no instructions!
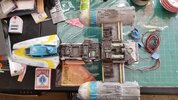
Hopefully I have located a full stockist/supplier of Plastruct here in the UK, of which the ABS T's turned up today, along with new Airfix Me 109 guns. the kit cast items were poor and as Airfix is still "fully operational" I ordered some original parts.
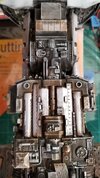
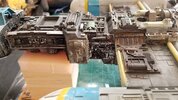
There's slight damage to the top hull and to one of the 'Centurion' greeblies/nurnys, minor on most, but I think the tank part is 3d printed these days - or i just make it battle damaged
Not quite sure what is missing regarding the engines, as this area is not very well explained - tubes, rings and the 'heat sink?' all look as if these need to be acquired.
I would be most interested in what you needed to add if anything to your engines and where you located/purchased from?
cheers
")
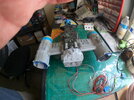
Chuffy - pics are my Dad passing out RAF M.Police and new guns from Airfix
P.Porkins - I had to do the same thing in 2012 when my father passed away. His sister was too old to sort his affairs, so It was put upon me to do everything...you'll get there in the end.
Thanks for the offer of help... at the moment I'm trying to figure out what I need - It is quite odd to get a kit with a lot of bits missing and no instructions!
Hopefully I have located a full stockist/supplier of Plastruct here in the UK, of which the ABS T's turned up today, along with new Airfix Me 109 guns. the kit cast items were poor and as Airfix is still "fully operational" I ordered some original parts.
There's slight damage to the top hull and to one of the 'Centurion' greeblies/nurnys, minor on most, but I think the tank part is 3d printed these days - or i just make it battle damaged
Not quite sure what is missing regarding the engines, as this area is not very well explained - tubes, rings and the 'heat sink?' all look as if these need to be acquired.
I would be most interested in what you needed to add if anything to your engines and where you located/purchased from?
cheers
Chuffy - pics are my Dad passing out RAF M.Police and new guns from Airfix
View attachment 1367231View attachment 1367232
Chuffy, Everything I used for the structural support of the engine Nacelles and lighting chambers I purchased at my local hardware store. You can just about use anything your mind can come up, be sure to take into account on how you will display the model and what kind of support you will need to create. I'm using a 48" "Death Star Base (with .060 hollow tubes to support the models and to hide the the wiring) I constructed out of a light wood and plexiglass which will also hold the controls for the lighting of the Y Wing and in the future Vader's Tie fighter which I've yet to start on. I would highly suggest some metal washers (with holes) for the inside of the Nacelles to enable added support and hold the roundness of them when gluing them together.
akumazeto
Sr Member
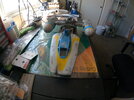
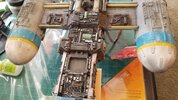
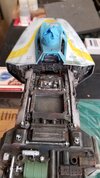
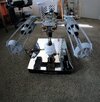
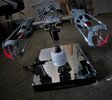
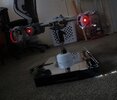
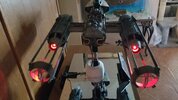
Not overkill. Nicely done.Finally got a little time to work on the Y Wing last weekend. A little progress made. Came up with an elaborate mounting set-up that's probably overkill but I wanted it to handle the weight of the model and be adjustable for multiple viewing angles. A little light grey wash on the back panel that I just finished painting on the nose of the ship and I will be done with it for now. Now on to some serious seam sanding and filling on the engine nacelles!
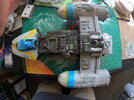
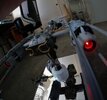
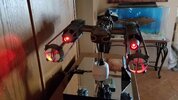
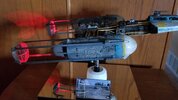
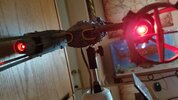
Hi guys, my apologies for being offline for so long but it has been a stressful and emotional past 2 years in our family with loss of my father and my brother. I decided it's time to get back to work on the Y Wing. I'm fully retired now and hopefully can finish this model by the end of the year. I hope everyone has made it through the pandemic okay and all of our lives can get back to normal. Here is the progress I've made over the past week, the fine detail painting on the main hull is definitely going to take a little time. I finally attached the nose piece and I'm happy to say the LED front instrument panel works great, still have to install the engine lights, but they are already prewired. Here are some updated photos. More to come as I progress.
Attachments

She looks GREAT!
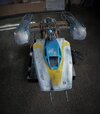
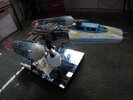
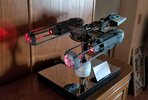
Here's a few pictures of a little more detailing and the completed underside of the model. Now I think I'm ready to move on to the engine lighting.
Attachments
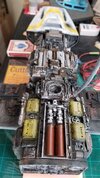
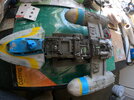
Piping is complete except for the two rear bumpers. Had to order some engine 3D resin printed nozzles from Shapeways, the one that came with my kit were warped beyond repair. Have to get going on the final assembles to try to get it finished by Christmas.


Thanks for the compliment. I'm still learning the tricks of the trade regarding painting technics but I'm happy with it so far. I remember when mine looked like this. I didn't think I would get this far but now that I'm retired, I have the time to work on it.Oh wow!!!!!! Incredible built and paint!
I really need to get off my butt and build Gold 5…
View attachment 1649718
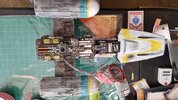
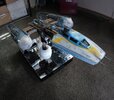
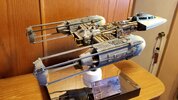
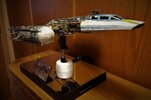
Looks like I'm pretty much done just a few touch ups on the weathering and wiring on the display base. I guess it's not too bad for my first studio build and that I have lost most of my vision in my left eye since last May so the details may be a little sloppy in places but I'm very happy with the way it turned out.
I really appreciate all of the support and positive comments from everyone to give the drive to keep going on this model during the tough times.
The guys on this site are really great and quite the skilled builders.
I really appreciate all of the support and positive comments from everyone to give the drive to keep going on this model during the tough times.
The guys on this site are really great and quite the skilled builders.
Attachments
-
 Y fin 1 (2).JPG2.4 MB · Views: 69
 -
 Y fin 2.JPG1.1 MB · Views: 64
 -
 Y fin 3.JPG1.6 MB · Views: 56
 -
 Y fin 4.JPG926.6 KB · Views: 58
 -
 Y fin 5.JPG687.2 KB · Views: 54
 -
 Y fin 6.JPG1.8 MB · Views: 54
 -
 Y fin 7.JPG1.4 MB · Views: 51
 -
 Y fin 8.JPG1.4 MB · Views: 57
 -
 Y Wing FIN-1.jpg221.6 KB · Views: 49
 -
 Y Wing FIN-2.jpg215.4 KB · Views: 49
 -
 Y Wing FIN-4.jpg183.6 KB · Views: 53
 -
 Y Wing FIN-5 (2).jpg290 KB · Views: 49
 -
 Y Wing FIN-7.jpg207.8 KB · Views: 50
 -
 Y Wing FIN-6.jpg168.4 KB · Views: 45
 -
 Y Wing FIN-10.jpg207.8 KB · Views: 52
 -
 Y Wing FIN-11 (2).jpg302.4 KB · Views: 56
 -
 Y Wing FIN-12 (2).jpg347.7 KB · Views: 75
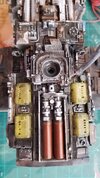
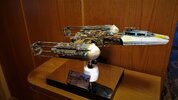
Thanks, it's much appreciated I just thought I would give it an actual used look on the mechanical areas. I've built many Hot Rods in my lifetime, and they all look like this under the hood after a while. I've got so many more studio scale kits to build, have to pick the next project.Looks great my friend! I love how you personalized the paint scheme on all the bits and didn’t just go for a single color look. Very nice.
Last edited:
Similar threads
- Replies
- 12
- Views
- 1,268
- Replies
- 150
- Views
- 16,712
- Replies
- 2
- Views
- 461
- Replies
- 6
- Views
- 1,248