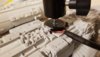
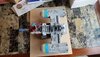
Finally got a little time to work on the Y Wing last weekend. A little progress made. Came up with an elaborate mounting set-up that's probably overkill but I wanted it to handle the weight of the model and be adjustable for multiple viewing angles. A little light grey wash on the back panel that I just finished painting on the nose of the ship and I will be done with it for now. Now on to some serious seam sanding and filling on the engine nacelles!
You are using an out of date browser. It may not display this or other websites correctly.
You should upgrade or use an alternative browser.
You should upgrade or use an alternative browser.
Nice-N Gold Leader Y-Wing - My First Studio Build
- Thread starter PULLED PORKINS
- Start date

Studio Kitbash
Sr Member
Hey, nice job.
Thank you Studio Kitbash, I'm definitely learning how to become more detail orientated building this kit.Hey, nice job.
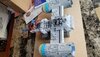
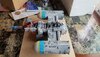
Got a little time to work on the project this past weekend. Started to add the detailed panel pieces to the hull section. I can't believe how much detail are on these parts! Hopefully I can get some time this coming weekend and finish up with this part of the build but it does look like it will be very tedious work. I did however get all of the seams filled and blended in. This beast is really starting to weigh a lot!
Attachments


Thanks Jkirkon, that's the part I'm really looking forward to. Still not sure what color to go with on the piping, looks like it should be some kind of copper or rust color and a few engine grime spots here and there. I've decided to try to do the main hull area just a little lighter than the dirty, engine grime color of backside of the nose behind the cockpit area I already painted. I think the piping will really stand out against a darker background rather than just a weathered light grey. The details just blow me away on this thing.Looking great! Wait till you get to the piping...its fun....lol
I mostly used solid plastic rods for the piping on my Gold Leader. Some of the smaller gauge pipes I made with plastic covered wire. Brass is a PITA to bend into the radi for this model. Hollow tends to kink..didnt work well for me when I heated and bent it.
There was a bit of a learning curve to heat bend the solid plastic rod, but it didn’t take too long to get the hang of it. I heated mine over a candle flame and bent to shape. It worked well. It’s a ‘touch’ thing...once you play with it a bit, it’s easy.
Overall, it was a tedious job because of the number of pipes, and staring at reference pics for hours to find them all...but fun. The pipe work really makes the Y-wing come together!
Enjoy!
Yeah this thing is like a jigsaw puzzle only you have to make the pieces first then figure out where they go. It is a lot of fun so far and I'm sure the end result is going to be worth the time and effort. I am so thankful for you and the guy's here on the RPF for providing so much needed help and info on this build, it has been a life saver.I mostly used solid plastic rods for the piping on my Gold Leader. Some of the smaller gauge pipes I made with plastic covered wire. Brass is a PITA to bend into the radi for this model. Hollow tends to kink..didnt work well for me when I heated and bent it.
There was a bit of a learning curve to heat bend the solid plastic rod, but it didn’t take too long to get the hang of it. I heated mine over a candle flame and bent to shape. It worked well. It’s a ‘touch’ thing...once you play with it a bit, it’s easy.
Overall, it was a tedious job because of the number of pipes, and staring at reference pics for hours to find them all...but fun. The pipe work really makes the Y-wing come together!
Enjoy!
Thanks Ranger565, it has been a lot of fun and should be quite rewarding when completed.Sweet Job man!
Thanks jontom.Great to see some new builds happening, looking nice!
Thanks stevee671, hope you get yours soon, where did you order it from?WOW! Looks great! I ordered on of these back on October 2019 and I'm still waiting for it to show up at my door step! One day, I may be able to put one on this website!
stevee671
Jr Member
I ordered it from Steve Niesen (Nice-N Models). I feel I should have had it back in December, at the latest. It's now June, so that puts at an almost 8 months wait.Thanks stevee671, hope you get yours soon, where did you order it from?
Last edited:
Sorry to hear that, hope it works out for the best and you get it.I ordered it from Steve Niesen (Nice-N Models). I feel I should have had it back in December, at the latest. It's now June, so that puts at an almost 8 months wait.
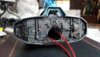
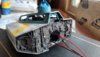
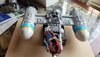
Hey guy's I know it's been some time since my last post but my father passed away a few months ago after losing his battle with Cancer. I had been taking care of over the past 12 months and we both knew it was just a matter of time. He was a great man and even a better father. Two tours in Vietnam and the tail end of the Korean War but like so many that have fought this horrible medical freight train of a disease that has claimed so many lives he lost his final battle. He will be missed but at least he's at peace now and had quite the military send off. After taking care of his legal affairs and trying to get back into the grind of my family life I have started to work on the Y Wing once again. Here are a few pictures of the early stages of the front engine caps. they still require a lot of weathering and battle affects. Still have some final filling and sanding to do on the seam lines of the nacelle's before it's final paint.
Attachments
Thanks skahtul, hopefully I can get it finished by the end of the year.Looking pretty awesome so far, nice paintwork!
Very sorry for the reason for the delay in your Y-Wing progress, but glad you're finding your way back to the work. That'll be a huge help in the healing process in and of itself - finding your way back to being 'you'.
Nice work on the model! Super satisfying watching them progress through the various stages of build - there sure are a lot of Y-Wings going together here these days!
Dan
Nice work on the model! Super satisfying watching them progress through the various stages of build - there sure are a lot of Y-Wings going together here these days!
Dan
Similar threads
- Replies
- 12
- Views
- 1,227
- Replies
- 150
- Views
- 16,655
- Replies
- 2
- Views
- 440
- Replies
- 6
- Views
- 1,232