Hi guys sorry it's been a while since my last post but I got side tracked and I'm only getting back to the Pearl now. So far I have completed all wiring, deck planking and completed the 1st layer hull planking. I have one silly question however! For my 2nd layer hull planking do I run my 0.5mm veneer strips as one entire length of the ship from bow to stern or is there a proper way to stagger them?? Any pics would be great. Many thanks in advance.
You are using an out of date browser. It may not display this or other websites correctly.
You should upgrade or use an alternative browser.
You should upgrade or use an alternative browser.
Newbie seeking help with 1:43 scale model of The Black Pearl!
- Thread starter lee7
- Start date


It's coming right along!
One thing that jumps out at me is the lanterns on the stern should all be sitting up like the middle one. The side ones shouldn't be pointing outward like that.

Your paint is looking appropriately rough too. The real Pearl is painted black, and then has layers of filth, dirt and haze painted over it.
One thing that jumps out at me is the lanterns on the stern should all be sitting up like the middle one. The side ones shouldn't be pointing outward like that.
Your paint is looking appropriately rough too. The real Pearl is painted black, and then has layers of filth, dirt and haze painted over it.
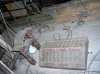
 Hi Duncanator, many thanks for your reply and advice, i tried to get the outside lanterns as vertical as possible but the fish's mouths get in the way, this is the best I could come up with I'm afraid, in regards to the paint scheme I was going to dry brush a flat black over the greenish color, I've already done a wash over it but not sure if it looks rough enough, whats your thoughts?? Also if you have any advice on using full plank lengths or stagger the 2nd layer planking as this has me temporarily stumped?
Voodoocaster
Well-Known Member
Looking great man.
With the length of a plank you go as far as a plank can go in an upward or downward bend not exceding the bend more than the height of the plank .
You have to realise they use trees to cut the plank out of")
To work really in scale imagine a large oak tree in your ships scale and cut the planks more or less in the tree its height(count until where the brances star to sprue as tree height)
The preverence goes to a whole lenght of a plank(stronger construction wise)
The point where a plank has to bend up or down more than its own height you have to start with a new plank or a stealer(filler plank),..ussually a stealer though
Try to use as many whole length and unthinned planks as possible though.
Measure the heigth of halfway the hull and see how many planks will fit without thinning them.
Measure the bow and see how much the planks have to be thinned to a point.
Measure the stern and do the same.
The leftover spaces have to be filled up with stealers.
Usually at the stern the planks will be made "wider" by the use of stealers.
At the bow the planks will be made pointier by thinning them.
At the bow use pointy trimmed planks(not thinner than half the height of a plank though) and anywhere where on the hull you have to make a strong bend you can use "stealers"(planks cut in a pointy/triangle manner.)in between planks(see image below)
The "pointy" part of the stealers shouldn't be less than half a plank's height though,or else there isn't enough room for the bold or nail to attache it to the bulkhead,..the same goes for the thinned planks at the bowside.
On a real ship there were far more bulkheads than on your model for sure so imagine at least 4 or 5 more bulkheads between your model's bulkheads and indicate you nails on them.
Go as far as you can go with a full lenght plank as you can go without exceeding the bend more than the height of the plank
Most of the planks should follow the wales (thick dark beams which follow/ indicade the deck location/height).
It is good practice to start attaching the wales first and from them work upwards and downwards with the planking and from the keel up to the lower deck wale.
So,besides the few systems mentioned above there is not really a system,..the only logic is that a plank has to be bolted or nailed to a bulkhead inside the hull and that he length of the planks are kept as long as possible(the less buttjoints on a hull the stronger it will be)
With the length of a plank you go as far as a plank can go in an upward or downward bend not exceding the bend more than the height of the plank .
You have to realise they use trees to cut the plank out of
To work really in scale imagine a large oak tree in your ships scale and cut the planks more or less in the tree its height(count until where the brances star to sprue as tree height)
The preverence goes to a whole lenght of a plank(stronger construction wise)
The point where a plank has to bend up or down more than its own height you have to start with a new plank or a stealer(filler plank),..ussually a stealer though
Try to use as many whole length and unthinned planks as possible though.
Measure the heigth of halfway the hull and see how many planks will fit without thinning them.
Measure the bow and see how much the planks have to be thinned to a point.
Measure the stern and do the same.
The leftover spaces have to be filled up with stealers.
Usually at the stern the planks will be made "wider" by the use of stealers.
At the bow the planks will be made pointier by thinning them.
At the bow use pointy trimmed planks(not thinner than half the height of a plank though) and anywhere where on the hull you have to make a strong bend you can use "stealers"(planks cut in a pointy/triangle manner.)in between planks(see image below)
The "pointy" part of the stealers shouldn't be less than half a plank's height though,or else there isn't enough room for the bold or nail to attache it to the bulkhead,..the same goes for the thinned planks at the bowside.
On a real ship there were far more bulkheads than on your model for sure so imagine at least 4 or 5 more bulkheads between your model's bulkheads and indicate you nails on them.
Go as far as you can go with a full lenght plank as you can go without exceeding the bend more than the height of the plank
Most of the planks should follow the wales (thick dark beams which follow/ indicade the deck location/height).
It is good practice to start attaching the wales first and from them work upwards and downwards with the planking and from the keel up to the lower deck wale.
So,besides the few systems mentioned above there is not really a
system,..the only logic is that a plank has to be bolted or nailed to a bulkhead inside the hull and that he length of the planks are kept as long as possible(the less buttjoints on a hull the stronger it will be)
Last edited:
View attachment 601499 Hi Duncanator, many thanks for your reply and advice, i tried to get the outside lanterns as vertical as possible but the fish's mouths get in the way, this is the best I could come up with I'm afraid, in regards to the paint scheme I was going to dry brush a flat black over the greenish color, I've already done a wash over it but not sure if it looks rough enough, whats your thoughts?? Also if you have any advice on using full plank lengths or stagger the 2nd layer planking as this has me temporarily stumped?
I think Voodoocaster has great advice on proper planking technique, So I won't add anything there,
The model you have looks to be based on the version 2 (2nd film) of the Black Pearl. The stern was narrower on the version 2 than the version 1 (1st film). In order to fit the statues of Poseidon and the whales, we had to cut and shorten their tails. Also, the whales are turned slightly inboard of the side lanterns for clearance. You can kind of see it in my photo in post #23. The lanterns also got decorative riser posts to get them up out of the way of the statues as well. It was pretty cramped.
Looking great man.
With the length of a plank you go as far as a plank can go in an upward or downward bend not exceding the bend more than the height of the plank .
You have to realise they use trees to cut the plank out of
To work really in scale imagine a large oak tree in your ships scale and cut the planks more or less in the tree its height(count until where the brances star to sprue as tree height)
The preverence goes to a whole lenght of a plank(stronger construction wise)
The point where a plank has to bend up or down more than its own height you have to start with a new plank or a stealer(filler plank),..ussually a stealer though
Try to use as many whole length and unthinned planks as possible though.
Measure the heigth of halfway the hull and see how many planks will fit without thinning them.
Measure the bow and see how much the planks have to be thinned to a point.
Measure the stern and do the same.
The leftover spaces have to be filled up with stealers.
Usually at the stern the planks will be made "wider" by the use of stealers.
At the bow the planks will be made pointier by thinning them.
At the bow use pointy trimmed planks(not thinner than half the height of a plank though) and anywhere where on the hull you have to make a strong bend you can use "stealers"(planks cut in a pointy/triangle manner.)in between planks(see image below)
The "pointy" part of the stealers shouldn't be less than half a plank's height though,or else there isn't enough room for the bold or nail to attache it to the bulkhead,..the same goes for the thinned planks at the bowside.
On a real ship there were far more bulkheads than on your model for sure so imagine at least 4 or 5 more bulkheads between your model's bulkheads and indicate you nails on them.
Go as far as you can go with a full lenght plank as you can go without exceeding the bend more than the height of the plank
Most of the planks should follow the wales (thick dark beams which follow/ indicade the deck location/height).
It is good practice to start attaching the wales first and from them work upwards and downwards with the planking and from the keel up to the lower deck wale.
So,besides the few systems mentioned above there is not really aView attachment 601706 system,..the only logic is that a plank has to be bolted or nailed to a bulkhead inside the hull and that he length of the planks are kept as long as possible(the less buttjoints on a hull the stronger it will be)
Thanks so much for the info Voodoocaster, that gives me something to go on now, I seem to be struggling with the bend in the plank as it seems to twist the plank and makes it difficult to glue it down, any ideas on that or how to prevent twisting? Thanks in advance, Lee.
I think Voodoocaster has great advice on proper planking technique, So I won't add anything there,
The model you have looks to be based on the version 2 (2nd film) of the Black Pearl. The stern was narrower on the version 2 than the version 1 (1st film). In order to fit the statues of Poseidon and the whales, we had to cut and shorten their tails. Also, the whales are turned slightly inboard of the side lanterns for clearance. You can kind of see it in my photo in post #23. The lanterns also got decorative riser posts to get them up out of the way of the statues as well. It was pretty cramped.
Hi Duncanator many thanks for you help and advice, I don't think I'll be able to straighten the outer lanterns anymore than I have as its shortening out my cables for the LEDs in the lanterns
, had you any more thoughts as to whether I should leave the paint scheme alone or add more to it such as dry brushing some darker pigments to it? Thanks, Lee
Voodoocaster
Well-Known Member
Twisting planks are a real pain.
To prevent twisting first make sure the planks are soaked long enough in water(soak the planks at least 1/2 a day before using)
You can use a pvc pipe filled with water for this if the planks are long.
Also you can at a little bit of amonia to the water this wil soften the fibers a bit BUT wil make them more prone to breaking so use this technique with caution.
Use an soldering iron to heat the sides of the planks that requier severe bends and or curves(you can also use the soldering iron to "ironing out" the planks so they lay flat on the first planking)
For impossible bends you can actually sand the planks to a curve(only sand until half the planks height)this will make the plank thinner offcourse
You can also take chips/notches out of the plank with a razorblade(on the side of the bend/curve)to make room for the bend.
You can also use a combination of the above.
Another tip is to first establish the upward or downward bend/curve and after that the inward/outward bend
Roughly do the upward/downward/sideway bend of a well wetted plank on a flat surface supporting the bend with nails on either side of the plank,..let the plank dry in it's new forced shape.
You will notice that if you slightly exagerate the curve/bend the plank it will be easier for the plank to follow the "lesser" curve of the hull since the wood would like to return to it's original shape which used to be straight,..so in a way you help the plank to return to its straight shape by over curving and when attaching pushing the bend slightly back (the plank's fibres will be gratefull to you and stay in the curve 'till the end of time without twisting the wood
After it is dry and keeps it shape glue it to the hull and than do the inward bend by wetting the plank a bit(this to prevent the wood from burning) at the point it has to go inward and using the soldering iron to iron out the curve.
A little info. on the wood fibres:
If the fibres/cells absorb moist they expand and become therefor as a rule more flexible.
If you put heat on one side of a wetted plank the fibres on that side will lose moist and therefore shrink while on the non heated side they will not.
This will make a bend possible.
Support your curves with temporary nails and or support/push the plank with blocks and elastic band against the plank above or below.
In the rough illustration below you see the chips/notches as very exagerated V shapes these are in reality just single cuts with a razor blade,..just enough to make a little bit more space for the bend.
The more incissions you make the smoother the curve.
If you sand your planks collect your wooddust,..you can use this as a filler.
Another thing of importance,..i assume this kit is a chinese "pirated" model kit.
It could very well be that the supplied wood is of inferior quality which is prone to breaking,splitting.twisting.
You could try to feed the wood with moist/steam and/ or wood conditioner to make the fibres come "alive" again but ussualy this is a waste of time.
If you think the wood quality of this kit is not that high i suggest that you'd buy some better quality planks from a shop dedicated to ship building.
View attachment plank twisting.bmpView attachment plank twisting1.bmp
Attachments
Last edited:


Similar threads
- Replies
- 10
- Views
- 593