You are using an out of date browser. It may not display this or other websites correctly.
You should upgrade or use an alternative browser.
You should upgrade or use an alternative browser.
Nerf Scout Trooper Blaster Repaint
- Thread starter 13doctorwho
- Start date
AnubisGuard - Outstanding work! That blaster looks fantastic!

Firespray
Well-Known Member
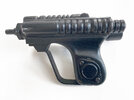
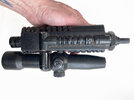
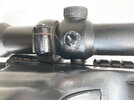
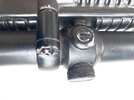
Finished up my blaster as well. Big thanks to everyone that contributed to make this possible. I started with a matte finish and used a satin finish on the transistor and scope mount. Buffed out areas of the grip that might have a bit of a shine from heavy use. I added a groove for the scope ring and drilled out all the plastic screws and replaced with real screws. Not sure why Hasbro had one standard head screw and one phillips head on the transistor. Weird! Also added a greeblie on the bottom side of the scope. Had the same issue as AnubisGuard with the scope not snapping on. It may need to be glued. All in all, this was a fun build and is a nice new addition to the collection.
Attachments


AnubisGuard
Master Member
Those real screws look fantastic!
I'd considered doing that but didn't; it really adds a lot so I wish I had!
I added a groove for the scope ring
I'd considered doing that but didn't; it really adds a lot so I wish I had!
Firespray
Well-Known Member
My regret is not adding a watch crystal to the scope like you did. Your blaster looks amazing!Those real screws look fantastic!
I'd considered doing that but didn't; it really adds a lot so I wish I had!
AnubisGuard
Master Member
My regret is not adding a watch crystal to the scope like you did. Your blaster looks amazing!
You still can – it just drops in with a little glue around the rim. Here's the one I used, the 25mm size:

Antique Pocket Watch Glass Crystal Open Face Domed Size 16/0s-19s /17MM –50 MM | eBay
Excellent, unused condition. Don't have a beveled edge toward the bottom for a press fit and you will need to glue it in place.
www.ebay.com
Firespray
Well-Known Member
Cool. I didn't realize you added that after the scope piece was already glued in. Got one ordered. Thanks for the link!You still can – it just drops in with a little glue around the rim. Here's the one I used, the 25mm size:
Antique Pocket Watch Glass Crystal Open Face Domed Size 16/0s-19s /17MM –50 MM | eBay
Excellent, unused condition. Don't have a beveled edge toward the bottom for a press fit and you will need to glue it in place.www.ebay.com
Mara Jade's Father
Master Member
Finally got mine completed.


AnubisGuard
Master Member
Looks great!
Me too…Looks amazing! I STILL haven't made mine...
Mara Jade's Father
Master Member
I wanted to post the images but at the time I did not have a lot of time to make a post. I would like to say that the kit was very easy to work with.
The only clean up I did was some slight burring on the hand guard but that was rectified by a few quick swipes of a sanding block.
I used all parts except for two I had printed myself. I used and earlier print of the trigger as it had the little bit that hooked the spring. I also printed a cropped version of the rear eyepiece so I could use the included clear lens without the part stick out.
It’s hard to tell but there is some subtle paint detail. I tried to keep any wreathing off the grip as in my mind, since I had a grip line, it was not painted and was more like the grip of a e-11. I also tried to make the finish of the muzzle, the capacitor on the grip, and scope mount seem like it was a different metal and tried to make it look more gunmetal. I also idealized the scope, although we know the real one is a casting of a single point, the detailing of the front allows for some artist license and gave the front and rear eyepieces some worn brass look. I also gave the screws a slightly different black look and gave them some weathering. I kept the weathering very minor. Just places where the blaster might rub against a holster or handled.
I knew I wasn’t going to go crazy trying to cover seams so I went for an easy and low tech method of filling screw holes using wall spackle. It’s not perfect but it draws some attention away from the screw holes and is fast and easy.
Last edited:
Similar threads
- Replies
- 7
- Views
- 1,195
- Replies
- 0
- Views
- 449