You are using an out of date browser. It may not display this or other websites correctly.
You should upgrade or use an alternative browser.
You should upgrade or use an alternative browser.
Nemik’s Manifesto (Andor)
- Thread starter Edged
- Start date

Edged
Well-Known Member
Sand, sand, sand! It wasn’t more than a few weeks ago when I started the Bryar that I was hoping someone would give me a pass and consent that the lines were just part of the game and unavoidable. You guys didn’t and I’m thankful for that. It’s a lot of work getting all them printer lines out, but I think it’s worth it. Still a couple peeking through, but I’ll get em.
Gonna follow up tonight with a layer of silver followed by a main coat of gunmetal on top. I don’t plan on exposing as much of the undercoat as I did in the Bryar, but it’s always good to have layers on “metal” surfaces for the sake of realism, I think.
Gonna follow up tonight with a layer of silver followed by a main coat of gunmetal on top. I don’t plan on exposing as much of the undercoat as I did in the Bryar, but it’s always good to have layers on “metal” surfaces for the sake of realism, I think.
Attachments
Edged
Well-Known Member
I left the damn thing at work attempting to fit it for the leather cover, so I couldn’t paint the case, but I did a bit of detail work on the components.
I felt like that section in the middle was once a glossy black that become flat after years of wear, so I painted it gloss black and then sanded it mostly away again just leaving a little behind. The lighting is different, but I think it looks pretty close to the source prop.
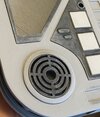
As far as the speaker grill, that didn’t seem like it was just a black plastic to me. I’m getting a seriously dirty metal vibe, so I gave it a VERY light coat of silver spray just so that it had a bit of a glint on the inside then again sanded most of it down and applied a wash over top. Still looks black, but there’s just a subtle hint of metallic to it.
I felt like that section in the middle was once a glossy black that become flat after years of wear, so I painted it gloss black and then sanded it mostly away again just leaving a little behind. The lighting is different, but I think it looks pretty close to the source prop.
As far as the speaker grill, that didn’t seem like it was just a black plastic to me. I’m getting a seriously dirty metal vibe, so I gave it a VERY light coat of silver spray just so that it had a bit of a glint on the inside then again sanded most of it down and applied a wash over top. Still looks black, but there’s just a subtle hint of metallic to it.
Attachments
Edged
Well-Known Member
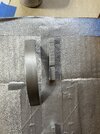
Laid a thin layer of silver, sanded with 600 grit then sprayed on the gunmetal top layer. I left that at curved section alone after the silver. The source pics LOOK as if it’s two-tone, but maybe that’s just the lighting or my old eyes. In any event, I’m keeping it as it adds a nice contrast, imo.
Attachments
Edged
Well-Known Member
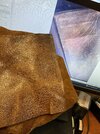
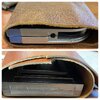
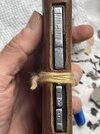
Hope I’m not annoying everyone with all the updates, but I found my leather finally! It’s VERY difficult to match leather by color, weight and grain. I could likely match 2 out of 3, but even in the industry different lots of the exact same leather from the the same manufacturer will vary. Sometimes significantly enough that if we make a luggage tag let’s say in “burgundy” in March then another batch in May, we have to make sure both pieces match when shipping out an order of 2 or more or the customer may think they got two different colors and complain.
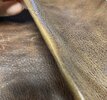
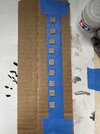
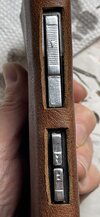
Anyway, there’s so many choices here, but this one has the perfect weight. You can have two leathers of the same thickness, but some will be much more rigid. I don’t want that here. A thicker leather was definitely used, but it’s more supple. See the comparison pic below for what I mean. I don’t want what’s happening in the bottom pic. You could score it, of course, and that wouldn’t happen, but still I prefer not to do that.
More distressing will get me closer to the color both inside an out. This is a “pull through” leather, so the color will change when pressure is applied. The grain is a bit different, though, but like I said you gotta pick your battles.
Attachments
Last edited:
the.rebel.agent
Sr Member
Color is looking good!Laid a thin layer of silver, sanded with 600 grit then sprayed on the gunmetal top layer. I left that at curved section alone after the silver. The source pics LOOK as if it’s two-tone, but maybe that’s just the lighting or my old eyes. In any event, I’m keeping it as it adds a nice contrast, imo.
Edged
Well-Known Member
Thank you. Just about done with the components now.
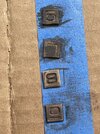
Gonna need an opinion on this piece. I think I may have gotten a bit carried away. I was just dirtying this up, then I thought maybe a touch of copper would look good and before you know it I had a rusty looking thing lol. Looks ok, I think, but maybe not the most accurate. Should I sand it off you guys think?
Gonna need an opinion on this piece. I think I may have gotten a bit carried away. I was just dirtying this up, then I thought maybe a touch of copper would look good and before you know it I had a rusty looking thing lol. Looks ok, I think, but maybe not the most accurate. Should I sand it off you guys think?
Attachments
the.rebel.agent
Sr Member
Ancient gold is what you are looking for. Def.
Edged
Well-Known Member
Cool. I actually would have used gold if I had it, but this is okay. I dirtied it up a bit more.
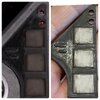
Looks like chrome buttons aren’t happening. Tamiya didn’t have any true chrome, so I tried Rustoleum. Reviews said it either didn’t work at all or if you even touched it or applied a top coat the chrome would go away, but I hadda try it. It’s a nice silver, but not any different than what I already had done with the curved part.
There are other products out there that claim to do plastic in pure chrome, but I’d have to get them online. I may just leave these as is then look for one of the old Walkman and used actually buttons. The only way to really get chrome on plastic is vac metal, like the vintage Death Star Droid figure, so I wasn’t expecting much.
Attachments
Edged
Well-Known Member
Just a tip for anyone as clueless as I am out there lol. I’ve found that painting as much as you can BEFORE you assemble is the best option. That way if you mess something up, it’s much easier to sand down or strip the offending piece while isolated than it is while attached. For example, the buttons below. I will do a final wash while assembled, but the initial weathering I’ll do individually as I wouldn’t want to damage the main body of the diary trying to fix a single button should something go wrong.
Andy way, it’s just painters tape with the sticky side up. You could also use double-sided. This is also helpful when spraying very small pieces to keep them in place. Otherwise the propellant will shoot them across the room.
Andy way, it’s just painters tape with the sticky side up. You could also use double-sided. This is also helpful when spraying very small pieces to keep them in place. Otherwise the propellant will shoot them across the room.
Attachments
the.rebel.agent
Sr Member
That's why I tend to design everything apart.
Edged
Well-Known Member
That’s SO helpful for a piece like this. Like I said before, this design is flawless. I know just from other things I’ve seen that most other modelers would have shortchanged this print. It would have been impossible to sand and frustrating to paint to say the least.
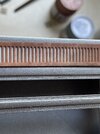
Some numbers. I tried to match them to the prop on the LFL video as best I could, but honestly, to anyone else out there attempting this, i think just dirty is enough lol. Just try to vary said dirtiness.keep your paints thin for getting inside the numbers and get it gunky to the point it’s almost dried up for the thicker areas.
Some numbers. I tried to match them to the prop on the LFL video as best I could, but honestly, to anyone else out there attempting this, i think just dirty is enough lol. Just try to vary said dirtiness.keep your paints thin for getting inside the numbers and get it gunky to the point it’s almost dried up for the thicker areas.
Attachments
Edged
Well-Known Member
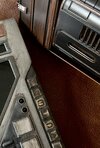
Well, it’s just about finished. Just need to find a proper chrome paint for the buttons or source out a Sanyo. I’ll have the cover cut tomorrow and the cord should be here in a day or two.
Then I just need to get a 4.7” somewhere. I checked eBay and there’s TONS of them, but I don’t trust used electronics I can’t see in person. I don’t even like buying old crap, but I don’t wanna spend hundreds on a new SE just because I’m crazy and OCD lol. I’ll figure something out. I guess in the end, being it’s just a display piece and if I put a phone inside I can never fully seal the two sides together, I may just stick with the mock screen. It looks good in there, I think.
Here’s a final sneak peak. I’ll take full pics when it’s totally finished.
Attachments
Edged
Well-Known Member
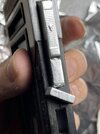
So, chrome paint. While not an impossibility, it seems like there’s a lot varying and conflicting results out there concerning what works and what doesn’t. Lots of options, some are pretty pricy some are at Home Depot. I’ve already tried 3 and got nothing resembling chrome. I’ve been checking eBay for the correct model Sportster and also coming up short, so I tried something different. Tinfoil.
Whatya’ll think? I’m gonna weather it up a bit and attempt to flatten out the edges some more, but I’m thinking this works for me. It’s either this, spending $32 on some “mirror” paint (and still not getting chrome) or using the smaller button color you see in the first pic and settling for just silver.
Whatya’ll think? I’m gonna weather it up a bit and attempt to flatten out the edges some more, but I’m thinking this works for me. It’s either this, spending $32 on some “mirror” paint (and still not getting chrome) or using the smaller button color you see in the first pic and settling for just silver.
Attachments
baron von blondle
Sr Member
My experience with mirror/shiny chrome effect is always 99.999% in prep.So, chrome paint. While not an impossibility, it seems like there’s a lot varying and conflicting results out there concerning what works and what doesn’t. Lots of options, some are pretty pricy some are at Home Depot. I’ve already tried 3 and got nothing resembling chrome. I’ve been checking eBay for the correct model Sportster and also coming up short, so I tried something different. Tinfoil.
Whatya’ll think? I’m gonna weather it up a bit and attempt to flatten out the edges some more, but I’m thinking this works for me. It’s either this, spending $32 on some “mirror” paint (and still not getting chrome) or using the smaller button color you see in the first pic and settling for just silver.
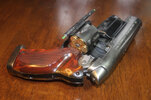
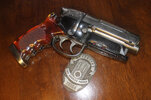
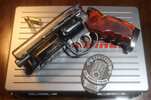
Make sure your surfaces are sanded super smooth - work your way thru different grits from 100 up to wet sand 3000 for example. Then a nice primer, then a nice undercoat of gloss black or gloss grey depending on the lightness you need then a lovely top coat or 3 of something like alclad stainless steel laquer and THEN if you wanna go a bit further have some super fine graphite powder liberally buffed into it all.
I just did this similar method on a Blade Runner sidearm and the top receiver and the butt plate are beautifully high shine chrome/steel..as not quite seen in the following pics because DAMN it's hard to photograph it's shiny beauty.
Attachments
Edged
Well-Known Member
First off that PKD is absolutely stunning! That straight up looks like metal. And those grips! I wish I knew how to get that kind of wood effect. Very nice.
Thank you for the suggestions. I did read up on the process and that’s why I said that results varied so greatly. Like you say, it’s the prep. Super smooth and super glossy black undercoat definitely seems like the proper recipe, however, I didn’t think that would work for me as my surface cannot be super smooth. Those buttons have a pattern that I can’t just sand away. Another issue is, “Walkman buttons” aren’t metal and aren’t really chrome, so it’s kinda a conundrum.
I spent some time playing with the foil. I smoothed it down with my thumbnail and then applied a clear coat on the bottom and sides to seal it. I prop should have gotten the button surface tacky before putting the foil on, but now that it’s done, I don’t wanna mess it up. It took me quite a few tries to get those smaller ones looking decent.
I’ll absolutely attempt the method you’ve outlined on a future project. It looks so good! Thanks again!
Edit: Do you guys think this looks bad, though?! It’s a little fragile, but for display purposes I think it’s ok. In the meantime I plan on experimenting with some chrome methods like The Baron outlined above. Good thing about this temporary solution is that it’s just that. I can peel this off any time.
Attachments
Last edited:
Edged
Well-Known Member
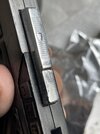
It just occurred to me the reason the original prop uses the Sanyo buttons is because they couldn’t figure out how to paint textured plastic chrome either! lol
This is better, I hope. I sanded down the sides where the foil was obviously and weathered them a bit. Now they look more like beat up buttons, I think.
This is better, I hope. I sanded down the sides where the foil was obviously and weathered them a bit. Now they look more like beat up buttons, I think.
Attachments
Last edited:
Edged
Well-Known Member
Well, that’s a wrap, pretty much. It’s still not technically put together. Definitely still want to get a phone for inside, maybe dirty up that cord a bit and I’m not completely sold on that the metal endcap, but otherwise I love it. I wish it were real, I’d totally carry it with me. It feels so natural in hand. I can’t explain it.
Thanks again, Diego, for making this come true. I never thought when I posted this thread it would truly come to fruition. I never thought that I would be able to accomplish something like this myself. I hope I did it justice.
To anyone else who may also doubt themselves. No matter how much you think you can’t do something, “Remember this: Try.”
Attachments

the.rebel.agent
Sr Member
TRY!
Similar threads
- Replies
- 3
- Views
- 18,924
- Replies
- 3
- Views
- 8,482
- Replies
- 4
- Views
- 4,299
- Replies
- 73
- Views
- 22,662