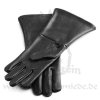
Limited Run Nazgul Gauntlets - comfortable for long convention-days

I may ask for a refund if these are not going to be done by Christmas. It's been a really long time. I could use that money for other projects if this one isn't going to happen soon.

Dave
 
I may ask for a refund if these are not going to be done by Christmas. It's been a really long time. I could use that money for other projects if this one isn't going to happen soon.

Dave

I know what you mean, my 6 month Paypal window is up in the middle of January. With little news of an actual date of completion I may do the same.
 
Ok, I absolutely understand! It's been a long time and you still don't have what you payed for and it's well in your right to ask for a refund.

Here's my suggestion:
I will rescedule my next week, to free up as much free time as possible to work on the gaunts exclusively. When I'm not able to show significant progress by the end of next week, you may get your refund if you absolutely want to.


Assuming that I DO make significant progress, it's still unlikely, that I'll finish ALL of your gauntlets before Christmas (meaning in the next 10 days), so I'll go by the order you joined in, which I have as follows:
1) TomVDJ (finished pair) -> ready for shippment before Christmas
2) vaderdarth (finished pair) -> ready for shippment before Christmas
3) Patattack (set) -> ready for shippment January 11th
4) darthwhitey (finished pair) -> ready for shippment January 11th
5) Stivie (set) -> ready for shippment January 11th

I hope that this is OK for all of you.
Jan
 
I'm okay with that, but I would also like to see some of the pulls from the newer lamination process as well as them trimed to see if there are voids and major color differences. Also you haven't mentioned if you were able to source new leather gloves or not.
 
Hey SciFiPropFreak, I don't necessarily want these before Christmas. Feel free to put someone that wants them soon, in front of me. As long as I don't have to wait another year or so, it's fine for me. I didn't mean to rush you when asking an estimate date. I prefer quality before speed! So if it takes you 3 months to deliver quality gloves, I'm fine with that. As long as there are some updates now and then, I'm fine...
 
I don't need them by Christmas either.

Like Stivie and TomVDJ I'd prefer the best materials and finish work to speed.

Having said that, it would be nice to have them sooner than later. :)

thanks for the update!
 
Good evening, everybody!

First a note on behalf of the leather gloves: I wrote to several online-medieval-larp-shops, because they usually don't put that much information on their websites regarding specific measurements, but I did't get any response. Will try to call some of them (if they have a phone number...)
Anyway, my top candidate right now are "suede" while the ones I previously used are smooth leather...I anyone has any idea what the real props were, please tell me. When I started making the gauntlets I just looked for affordable leather gauntlet gloves...
stulpenhandschuh-wildleder-schwarz--11071.jpgThese look very promising and the description says: "ideal for swordfighting" (translated from german) ;-)
They are also in the same price-range as the ones I used before. I will call them tomorrow regarding size-information.

OK, now on to what I have done today and also answering the questions about how the edges look with the fiberglass cut.
...To be honest, I wasn't entirely sure if the fiberglass would show or not, but after cutting and cleaning a few parts today, I'm really confident, that the new way of laminating the parts will look in any way different than the former method. But see for yourselves:
BandsawCutEdgeFinish.jpg
Cutting on the bandsaw with my new contraption works quite well, but I have to trim a few millimeter from the actual edge and sand down the rest with my belt-sander. After that i just gave it a quick steel-wool polish and in my opinion the parts don't look any less metallic than before.

NewPartsComparison.jpg
Comparison: LEFT: just trimmed with the bandsaw RIGHT: sanded edges and steel-wool finish.
They will of course look even better when aged a bit, like my pair of gauntlets in the background.

Masterplan.jpg
For those of you, who want to have the kit... this is basically the complete Assembly in an exploded view! ...I might make it a bit more "step-by-step" for you, though ;-)
I never really had an overall plan written down of how to assemble the gauntlets, but I need to check my supplies and maybe re-order some rivets and therefore need to know exactly how many parts of what kind I need for each pair. Of course I made a material-list to calculate the price before starting this run, but not this detailed or visualized.

I have to work tomorrow, so can't be in the Shop as long as today, but can do a bit of work in the morning.
 
I know it's dependent upon you finding a supplier, but I really do think I prefer the traditional smooth leather gloves over the suede ones. Just my two cents, not a deal-breaker or anything.

Beyond that, progress is looking mighty good!
 
Great update! Thanks for the photos and the info. I think the cut pieces look great once cleaned up. I also agree with the leather gloves over the suede ones. The ones in the photo you posted have really wide and stubby fingers. As I went for the kit option, if you have a hard time sourcing leather gloves, I would take the price off and find my own and not pay for ones I would'nt use.
 
Last edited:
I think smooth leather is best and more authentic. Those pieces look fantastic. Laminated is the way to go. Well done!
 
As suspected, i didn't spend much time in the shop today, because of work, and I mainly worked on something that hopefully will reduce the amount of fiberglass dust blown around my workshop. Since I have to sand down 4-5mm on all edges of all pieces (doesn't take very long with the belt sander) I'd rather spend 2-3h building a cardboard box around my belt sander than to raise a cloud of fiberglass-dust every time I move something in the shop for eternity. ...even thought about buying a second shop-vac, but if the box works, it a bit cheaper ;-)
SandingBox.jpg

For the leather gloves...i also have the feeling that smooth leather is better, so I kept looking. A friend eventually found great one from a shop who sells complete steel armour...so i guess they know what they are talking about.
4249_1.jpg4249_0.jpg

For those of you, who ordered the kit-version...of course you can get your own gloves, if you prefer.
The shop sells 5 different sizes (7-11). The ones I used before should be size 9. I can measure them, so in case you want to get gloves yourself, you know the minimum length they should be, etc.

Maybe it's a good idea for all of you to measure your hands like in this description and PM me the measurements.

Tomorrow it's time to make some DUST! ;-)
 
thanks for the size infos so far!

just a quick snapshot from todays progress. Am a bit in a hurry because I'm at this movie premiere tonight with some friends... "Blue Harvest 2" ist the title...anyone heard of that???
Trimming01.jpg

SandingBox2.jpg
The sander-in-a-box is working fine. only the air intake and exaust of the machine should be guided to the outside. Right now its heating up a bit inside there. But that's complaining on a high level in relation to the gained clean(-er) air.
 
so, I did a bit more trimming and started drilling holes into fingerplates. The later produces some tearout on the back, so I took a conical sanding-bit and "counter-sunk" each hole from the back.
This means that I have to tackle I have to tackle each of the 4 holes in every fingerplate 2 times...:( ... I'm not sure why this is happening and am looking for hints on how to avoid this.
Because of little problems like this, I guess I'm going to get 1 Set complete before laminating all other parts, so I can maybe change something in the laminating process which reduces the amount of time later on.

Here's the first Set of Handplates trimmed
Trimming02.jpg

also in the spirit of saving time I tested if I could use an old washing machine, which I rebuild to "stone-wash" fabric for costumes so it wouldn't look so new, to help polishing all the plates. Essentially I put some old scrap fingerplates into a small bag, together with steel-wool and some gravel and let it slowly rotate in the washing machine.
GravelFinishing.jpg
Looks quite good to me in comparison. Will still need some manual steel-wool polishing, but will save a lot of time.
 
so, I did a bit more trimming and started drilling holes into fingerplates. The later produces some tearout on the back, so I took a conical sanding-bit and "counter-sunk" each hole from the back.
This means that I have to tackle I have to tackle each of the 4 holes in every fingerplate 2 times...:( ... I'm not sure why this is happening and am looking for hints on how to avoid this.
Because of little problems like this, I guess I'm going to get 1 Set complete before laminating all other parts, so I can maybe change something in the laminating process which reduces the amount of time later on.

Here's the first Set of Handplates trimmed
View attachment 567362

also in the spirit of saving time I tested if I could use an old washing machine, which I rebuild to "stone-wash" fabric for costumes so it wouldn't look so new, to help polishing all the plates. Essentially I put some old scrap fingerplates into a small bag, together with steel-wool and some gravel and let it slowly rotate in the washing machine.
View attachment 567361
Looks quite good to me in comparison. Will still need some manual steel-wool polishing, but will save a lot of time.

I know to prevent tear out on wood when drilling you back the piece you want to drill with another piece of wood to help support the fibers underneath. May work on the fiberglass as well.
 
More plates trimmed and holes drilled
Trimming03.jpg


I know to prevent tear out on wood when drilling you back the piece you want to drill with another piece of wood to help support the fibers underneath. May work on the fiberglass as well.

You are correct! :)
I had a block of wood under the plate while drilling the holes, but because they are not flat on the bottom, that didn't help much. But the next little helping "device" worked much better since it only supports the close area around the drilled hole. The "drill", by the way, is actually a 2-flute, 2mm end-mill.
Drill_Trim_SetUp.jpgDrillingEithBackup.jpg

I'm also using the 2mm end-mill to trim the front part of the fingerplates and everything which needs a smaller radius than the belt-sander can provide.
TrimmedDetails.jpg
 
Nice work, mate. These kind of pictures are really reassuring that the gloves will actually come. As long as there are some WIP pics from time to time, I don't really care about the timing of those. Just take your time to make these great (but what I see looks very, very promising already). :thumbsup
 
Back
Top