Hedonist Farmer
New Member
So this is my second attempt at lighting a model. Things got a little out of hand and my idea of keeping this simple soon went out of the window as i was having way toomuch fun.
Let's start with some mandatory glamorous shots of the final result.


The whole thing is pretty simple on paper, there are 4 Leds in parallel powering about 40 strands of fiber optics for the cockpit and the navigation lights, two yellow 3w Leds for the engines (which are a bit overkill, but i already had those at home), all connected to a 12v external battery pack.
I upgraded the stock control panels to 3d printed ones i got from Shapeways, that are way more detailed and also already have pre-printed holes for the fibers. I also got a more detailed Mando and Grogu that i absolutely butchered with my crappy handpainting skills. Here is how the cockpit looks like on the inside.


If you don't build the interiors from the kit, there is a ton of room for wiring and all sort of crap inside. The molten volcano at the bottom is where i glued the support tube to fix the ship to the base and to run wires.


For the engines i wanted to go the old school ILM way using the reflector from an halogen lamp, but the one i had were too small so i built my own reflectors using plastic cups and aluminium foil. I then applied a layer of opaque plastic film between the reflector and the actual engine nozzle to help diffuse the light and superglued the whole thing inside the engines. Was this necessary? maybe not, but the final effect looked cool enough to justify all of this nonsense to me.

The engine bells are also 3d printed semi transparent bits, since the one in the kits are not meant to be lighted and they required a bit too much work to be hollowed out. I still had to slightly modify them to make them a bit more screen accurate (even though they are still a bit inaccurate to the filming model).

Painted the tips of the exaust cones with tamya clear acrylics to give it the high temp burnt look

I also added a blinking Led and some 1mm fibers into the mix to power the 4 navigation lights at the top and bottom of the engines. It's really hard to get those on camera since they are constantly blinking, but you can kinda see them in the initial pictures above. In the show i think they were fixed red lights like the two in the front, and you can only really see them in one episode i believe, but at this point i was completely descended in a spiral of madness and soldering fumes so i've added those as well.
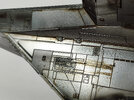
As for the rest of the model, it was pretty straightforward. Once i was done with the electronics and everything was nice and sealed, i primed the whole ship with Alclad gloss black and then airbrushed AK interactive polished aluminium for the main color. I tried to have some variations between panels adding a bit less or a bit more of the base colour, but also adding a couple of different shades of metal colors here and there. Weathering was done mostly with oil paints and some airbrush to add streaks and burn marks. At the end i sealed all with a coat of Alclad Aqua gloss. The finish on some of the parts is a bit sloppy up close, i'm aware of that, i always struggle with metallic finishes, but hey from like 1 foot away it looks awesome


I used the included decals for the yellow stripes. I think they look good enough, you can see a bit of silvering in some spots, but it's barely noticeable. I really could not, for the life of me, be bothered to mask all of that stuff for airbrushing, so these will do.


And that's pretty much it. All in all it was a really fun model to build with a lot of room for me to play around with lights and fibers. This surely got me the confidence to tackle more difficult lighting projects in the future after years of being too scared to even try.
Hope you enjoyed, for any questions feel free to ask.
Cheers.
Let's start with some mandatory glamorous shots of the final result.
The whole thing is pretty simple on paper, there are 4 Leds in parallel powering about 40 strands of fiber optics for the cockpit and the navigation lights, two yellow 3w Leds for the engines (which are a bit overkill, but i already had those at home), all connected to a 12v external battery pack.
I upgraded the stock control panels to 3d printed ones i got from Shapeways, that are way more detailed and also already have pre-printed holes for the fibers. I also got a more detailed Mando and Grogu that i absolutely butchered with my crappy handpainting skills. Here is how the cockpit looks like on the inside.
If you don't build the interiors from the kit, there is a ton of room for wiring and all sort of crap inside. The molten volcano at the bottom is where i glued the support tube to fix the ship to the base and to run wires.
For the engines i wanted to go the old school ILM way using the reflector from an halogen lamp, but the one i had were too small so i built my own reflectors using plastic cups and aluminium foil. I then applied a layer of opaque plastic film between the reflector and the actual engine nozzle to help diffuse the light and superglued the whole thing inside the engines. Was this necessary? maybe not, but the final effect looked cool enough to justify all of this nonsense to me.
The engine bells are also 3d printed semi transparent bits, since the one in the kits are not meant to be lighted and they required a bit too much work to be hollowed out. I still had to slightly modify them to make them a bit more screen accurate (even though they are still a bit inaccurate to the filming model).
Painted the tips of the exaust cones with tamya clear acrylics to give it the high temp burnt look
I also added a blinking Led and some 1mm fibers into the mix to power the 4 navigation lights at the top and bottom of the engines. It's really hard to get those on camera since they are constantly blinking, but you can kinda see them in the initial pictures above. In the show i think they were fixed red lights like the two in the front, and you can only really see them in one episode i believe, but at this point i was completely descended in a spiral of madness and soldering fumes so i've added those as well.
As for the rest of the model, it was pretty straightforward. Once i was done with the electronics and everything was nice and sealed, i primed the whole ship with Alclad gloss black and then airbrushed AK interactive polished aluminium for the main color. I tried to have some variations between panels adding a bit less or a bit more of the base colour, but also adding a couple of different shades of metal colors here and there. Weathering was done mostly with oil paints and some airbrush to add streaks and burn marks. At the end i sealed all with a coat of Alclad Aqua gloss. The finish on some of the parts is a bit sloppy up close, i'm aware of that, i always struggle with metallic finishes, but hey from like 1 foot away it looks awesome
I used the included decals for the yellow stripes. I think they look good enough, you can see a bit of silvering in some spots, but it's barely noticeable. I really could not, for the life of me, be bothered to mask all of that stuff for airbrushing, so these will do.
And that's pretty much it. All in all it was a really fun model to build with a lot of room for me to play around with lights and fibers. This surely got me the confidence to tackle more difficult lighting projects in the future after years of being too scared to even try.
Hope you enjoyed, for any questions feel free to ask.
Cheers.
Attachments
Last edited: