Do you happen to remember what specific size checkering file? I could be wrong but one in the link seems very small lines per inch...It’s called a checkering file. I stumbled across its existence during a dive down some rabbit hole.
You are using an out of date browser. It may not display this or other websites correctly.
You should upgrade or use an alternative browser.
You should upgrade or use an alternative browser.
My Mando Blaster! (Fieldmarshal modified for screen accuracy)
- Thread starter CntAllBeWinners
- Start date
CntAllBeWinners
Member
The one in the link is right. 40 lines per inch. I thought it might be a bit small at first but when I tested it out it looks pretty much perfect compared to the reference photos.Do you happen to remember what specific size checkering file? I could be wrong but one in the link seems very small lines per inch...
Okay awesome. Thanks! Did you use the same file on the hammer?The one in the link is right. 40 lines per inch. I thought it might be a bit small at first but when I tested it out it looks pretty much perfect compared to the reference photos.
CntAllBeWinners
Member
Yep.Okay awesome. Thanks! Did you use the same file on the hammer?
Okay, wanted to be fairly sure before I started grinding away lolYep.
Portaler
Active Member
Love the build. I'll be getting mine at some point this year. One question is the brass rectangular piece in the breach area screen accurate ?View attachment 1441653
More Pictures!!!
I just finished (I think) weathering this guy up and I love how it came out and wanted to share. As great as Fieldmarshal’s Bergmann is, when I got it I thought there were some tweaks I could give it to make it a bit more screen accurate. It ended up being a lot more than just a few little things, but I feel like I managed to get it pretty damn close. What do you think?
Do you have any good screen prop accurate shots you could post here ?
CntAllBeWinners
Member
These are the pics I was working from.Love the build. I'll be getting mine at some point this year. One question is the brass rectangular piece in the breach area screen accurate ?
Do you have any good screen prop accurate shots you could post here ?
These are mostly from screen grabs and promotional images from seasons 1 and 2. There have since been some decent shots from Book of Boba Fett that I don’t have. I’m sure you can find them around. Also keep in mind that there tends to be multiple versions of any on-set props, so here and there there’s a picture where it doesn’t look quite the same or a piece is missing or upside down. So there might be some judgment calls you have to make.
Portaler
Active Member
Excellent, thanks mate !! I'm fine with a few judgement calls. Not OCD as someThese are the pics I was working from.
These are mostly from screen grabs and promotional images from seasons 1 and 2. There have since been some decent shots from Book of Boba Fett that I don’t have. I’m sure you can find them around. Also keep in mind that there tends to be multiple versions of any on-set props, so here and there there’s a picture where it doesn’t look quite the same or a piece is missing or upside down. So there might be some judgment calls you have to make.
") Looks like I might get that additional brass piece. Seems to be in most versions, and changes the colours up a bit on that side of the blaster.
Looks like I might get that additional brass piece. Seems to be in most versions, and changes the colours up a bit on that side of the blaster.Definitely will still be using your pics as me reference. Looks bloody great !!
Portaler
Active Member
I'm very close to getting my kit. Just wanted to ask, did you paint all the parts unassembled ? Or assembled ? Was just thinking some may not go together so well if painted totally unassembled.I bought the anodized kit not realizing how much work I’d end up doing on it. By the time I got it looking the way I wanted it needed a total repaint. It would have been better to just get the bare aluminum kit.
The painting was a bit of an experiment. Covered it in flat black Rust-Oleum. Then I brushed on graphite powder (I hadn’t yet come across the information that it’s supposed to be rubbed on). Then I sanded the spots I wanted to be bare metal and sprayed on some Krylon flat clear. That seemed to dull the graphite a bit, so I hit it again with the graphite powder (this time rubbing it on) and hit some spots with rub-n-buff (pewter and silver leaf). The clear coat plus the graphite made the bare aluminum a bit darker, which I actually thought looked cool. I did chip it off in some places like the flash hider to get that bright aluminum look. Then I slopped on some oil paints and pulled most of it back off and then threw a bunch of Vallejo pigments on there for some general dust/dirt/grime.
I didn’t want to go too far with the weathering, since on the show the blaster looks to be in pretty good shape.
CntAllBeWinners
Member
It was a mix. Like, there are kind of sub-assemblies that got painted assembled but not yet attached to the main body. And then some stuff I painted in its own completely. If I’m remembering correctly.I'm very close to getting my kit. Just wanted to ask, did you paint all the parts unassembled ? Or assembled ? Was just thinking some may not go together so well if painted totally unassembled.
If you haven’t got a kit yet it might be worth waiting. I spoke to Fieldmarshal about possibly working together to come up with a more accurate design. While nothing came of it as far as a collaboration goes, he did mention he’s planning to start working on a v2 this summer. I’m not sure how long it would take for it to be ready to sell, though.
Last edited:
CntAllBeWinners
Member
Yeah. I ended up doing a bunch of little tweaks to things to get them to look right to my eye. The front sight was one of the easier ones. I just cut a new one from a sheet of metal (I forget if I used steel or aluminum). I don’t think there was really any part that didn’t get at least a little filing. Some bits (like the bolt area on the right side) got a lot more than that.Did you modify the front sight leaf? My front sight is not fully flush to the top of the flash hider like yours is. This turned out awesome.
I'm looking more closely at these photos - I keep noticing more little changes. You should give us a list! You've addressed nearly everything I can find "wrong" with the base kit, and some I hadn't noticed.
I really dig the fix on the back of the rear sight, the cut in on the rear of the larger piece. I've been wanting to tackle this on mine but a bit afraid to go at it with the files. I see that you've bravely reshaped the rear of the ejection port openings (or whatever those are). Did you add material to the "fins" on the large rear sight section? I can see filing the cut at the bottom, but looking at mine I'm not sure that there's enough material there to get the "fin" shape you have, which looks just right.
Did you completely replace the flat panel on the right side with the 2 hex screws? I didn't notice the right angle L shape at the top previously, gonna have to work on that. Is that actually a Z shape and hooked under an opening in the frame, or just an additional piece attached above the panel? Trying to figure out what you've done there, it does seem to match the references.
If I may offer a suggestion - The screw that holds the side plate on is just a flat disk on the real prop, not a traditional screw. What I did was find a matching threaded aluminum screw (from a binding post I think) and file the top down flat. It still screws in well enough to hold the plate, just have to use the tip of a finger instead. I think it looks much better, that screw really stand out as out of place to me. Oh, and see if you can figure out a way to reduce the size of the gap between the two base rings on the flash hider! (kidding, kinda)
Again, really nice work, I think this is the best Mando blaster replica I've seen!
You've addressed nearly everything I can find "wrong" with the base kit, and some I hadn't noticed. I really dig the fix on the back of the rear sight, the cut in on the rear of the larger piece. I've been wanting to tackle this on mine but a bit afraid to go at it with the files. I see that you've bravely reshaped the rear of the ejection port openings (or whatever those are).
Did you add material to the "fins" on the large rear sight section? I can see filing the cut at the bottom, but looking at mine I'm not sure that there's enough material there to get the "fin" shape you have, which looks just right.Did you completely replace the flat panel on the right side with the 2 hex screws? I didn't notice the right angle L shape at the top previously, gonna have to work on that. Is that actually a Z shape and hooked under an opening in the frame, or just an additional piece attached above the panel? Trying to figure out what you've done there, it does seem to match the references.
If I may offer a suggestion - The screw that holds the side plate on is just a flat disk on the real prop, not a traditional screw. What I did was find a matching threaded aluminum screw (from a binding post I think) and file the top down flat. It still screws in well enough to hold the plate, just have to use the tip of a finger instead.
I think it looks much better, that screw really stand out as out of place to me. Oh, and see if you can figure out a way to reduce the size of the gap between the two base rings on the flash hider! (kidding, kinda)Again, really nice work, I think this is the best Mando blaster replica I've seen!
Last edited:
CntAllBeWinners
Member
I'm looking more closely at these photos - I keep noticing more little changes. You should give us a list!
You've got a good eye for spotting the changes I made. At this point I can barely remember all of what I did. I kind of just started working on it and kept finding more things to do. It's all a bit of a blur. lol. I'll try to come up with something, though.
I really dig the fix on the back of the rear sight, the cut in on the rear of the larger piece. I've been wanting to tackle this on mine but a bit afraid to go at it with the files.
In addition to filing, I also soldered additional material on (that piece was steel, so soldering worked - unlike with aluminum). In hindsight I could have used magic sculpt but at that point I was planning to weather it only with steel wool so I wanted metal under any paint.
I see that you've bravely reshaped the rear of the ejection port openings (or whatever those are).
I actually ended up opening up those slots and rebuilding a lot of the area around them to get the shapes right. At a certain point that whole area was ripped open. It wasn't for the faint of heart. lol.
Did you add material to the "fins" on the large rear sight section? I can see filing the cut at the bottom, but looking at mine I'm not sure that there's enough material there to get the "fin" shape you have, which looks just right.
I did add to the fins. I extended them back and made them a bit taller. I think I used magic sculpt there. The trick for that stuff is to add more than you need, let it cure, then file it back to what you want.
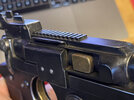
Did you completely replace the flat panel on the right side with the 2 hex screws? I didn't notice the right angle L shape at the top previously, gonna have to work on that. Is that actually a Z shape and hooked under an opening in the frame, or just an additional piece attached above the panel? Trying to figure out what you've done there, it does seem to match the references.
This bit was tricky! There was very little reference that I could find showing it in any detail so I kind of made my best guess, but I'm really happy with how it came out. It manages to match the images pretty well. Yes. I made a completely new panel. It's actually two pieces soldered together because I couldn't figure out how to bend the sheet metal tight enough in opposite directions. it's kind of hard to describe, but if the panel were removed you would see two slots. The big one that you see behind the panel, and a small one at the top left of the big one. I added a metal piece to separate the two slots and then the panel hooks around that divider and out the small slot. Also, Magic Sculpt to fill in gaps and make it conform to the barrel. Here are some pictures that I hope might help.
If I may offer a suggestion - The screw that holds the side plate on is just a flat disk on the real prop, not a traditional screw. What I did was find a matching threaded aluminum screw (from a binding post I think) and file the top down flat. It still screws in well enough to hold the plate, just have to use the tip of a finger instead.
I'll have to replace that screw! But yeah, there's only so much that can be done with the existing model. Certain things would need to be modeled in from the beginning to be accurate. The flash hider is one, the width of the handle is another. I did a lot of reshaping to the handle, but to get it totally right the blaster's whole profile would need tweaking.
Again, really nice work, I think this is the best Mando blaster replica I've seen!
Thanks so much!
Attachments

Portaler
Active Member
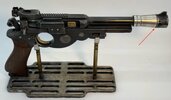
Excellent stuff !!! I have just been prepping mine for painting and sub assembly. Did you add another groove in the flash hider (see red arrow) ? Or how did you do that ? I see it is very difficult to do the masking around a round cylinder accurately.
Wish I had access to a lathe !
Wish I had access to a lathe !
Attachments
CntAllBeWinners
Member
I did add that grove. It was a pain. Lol. I ended up attaching the flash hider to a rod (actually, one of the rods from the holder) and chucking that into a drill press and using a hacksaw blade to cut the groove. You might be able to get away with using a power drill, but it’s pretty tricky to get the hacksaw blade to stay steady. I, too, wish I had access to a lathe. And a mill.Excellent stuff !!! I have just been prepping mine for painting and sub assembly. Did you add another groove in the flash hider (see red arrow) ? Or how did you do that ? I see it is very difficult to do the masking around a round cylinder accurately.
Wish I had access to a lathe !
Portaler
Active Member
Cool, that's not a bad idea. Might try the drill first, then if too difficult might invest in one of those. They're a bit more expensive here in EU, but still something like $60 or so. So not crazy expensive. But extras are starting to add up on this build.Not my build, but I too added the groove to the flash hider. I did mine on a small pen lathe (they're like $35), not as scary as I expected.
P.S I did notice the hammer thumb grip on mine (and that flat screw head) already had grooves added. So the guys at the Blaster Factory must have added it to the machining programme. A nice surprise, considering I was contemplating purchasing the special checkering file.
Similar threads
- Replies
- 12
- Views
- 921
- Replies
- 9
- Views
- 1,436
- Replies
- 3
- Views
- 345
- Replies
- 0
- Views
- 530
- Replies
- 2
- Views
- 476