You are using an out of date browser. It may not display this or other websites correctly.
You should upgrade or use an alternative browser.
You should upgrade or use an alternative browser.
My first Iron Man Mark 6 foam build
- Thread starter Akilo101
- Start date
-
- Tags
- iron man iron man 2


Quickordead
New Member
Looks really good to me so far. Just starting my first build as well but finding cutting the foam accurately a bit of a problem. Looking to make a hotwire cutting table to get it better. Keep up the good work.
Akilo101
New Member
Looks really good to me so far. Just starting my first build as well but finding cutting the foam accurately a bit of a problem. Looking to make a hotwire cutting table to get it better. Keep up the good work.
Thanks, I am using an ordinary x-acto knife and it is working really well for me.
Last edited:

nice! im doing the same thing (only its the mk4) so we have pretty much the same pieces all except for the chest plate. what foam thickness are you using? yesterday I finished cutting out all of the paper templates and today im starting on the foam pieces. also, what did you do to articulate the arm and bicep attachment?
ill definitely be following this post!
ill definitely be following this post!
Akilo101
New Member
nice! im doing the same thing (only its the mk4) so we have pretty much the same pieces all except for the chest plate. what foam thickness are you using? yesterday I finished cutting out all of the paper templates and today im starting on the foam pieces. also, what did you do to articulate the arm and bicep attachment?
ill definitely be following this post!
Thanks, I am using 6mm EVA foam from Hobby Lobby. I found that the foam hinge in my pepakura files ripped if i put any stress in them, so I 3D printed my own. I created a recess in the hinges so that a bolt can fit inside while still maintaining the flat shape. Here are some pictures of the pieces I printed.


Akilo101
New Member
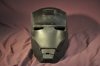
Hey guys, I have been working on the helmet the past few days and am almost finished but I am worried that it might be too small. I can wear it but is does seem a little off. I am not an expert on this and wondered if you guys could help me. All comments will help me at this point, thanks.


Ikras
Active Member
All looking good so far. Working on a mk4 myself and the 3D printed hinges are a nice idea. I'm working with thicker foam so hopefully I don't run into those issues but it looks like a good idea. Once you've made it all I'd say just be careful with flexing against any painted surfaces when it comes to that stage. Could possibly rub/scratch paint off with the harder surface?
Helmet wise, I'm not so sure. It's hard to tell with those pictures, a bit more light on the front could be a great help. For your first helmet it's looking really good. Scale wise I guess a lot depends on what you want to fit in there with you (lighting, electronics, etc). Shape wise, from the last picture, it looks like the front of the faceplate should maybe be more level with the jaw?
A caveat would be I've not had too much success myself with the helmet having made it twice and not entirely satisfied with the second. I'm hoping to make it a third time once I'm done with the rest. It is a complicated part to make.
Hopefully someone with more foam helmet experience can chip in as well for you.
Akilo101
New Member
All looking good so far. Working on a mk4 myself and the 3D printed hinges are a nice idea. I'm working with thicker foam so hopefully I don't run into those issues but it looks like a good idea. Once you've made it all I'd say just be careful with flexing against any painted surfaces when it comes to that stage. Could possibly rub/scratch paint off with the harder surface?
Helmet wise, I'm not so sure. It's hard to tell with those pictures, a bit more light on the front could be a great help. For your first helmet it's looking really good. Scale wise I guess a lot depends on what you want to fit in there with you (lighting, electronics, etc). Shape wise, from the last picture, it looks like the front of the faceplate should maybe be more level with the jaw?
A caveat would be I've not had too much success myself with the helmet having made it twice and not entirely satisfied with the second. I'm hoping to make it a third time once I'm done with the rest. It is a complicated part to make.
Hopefully someone with more foam helmet experience can chip in as well for you.
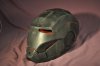
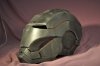
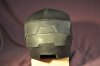
Thanks Ikras, I am going to use Plasti Dip, which I have heard will make crinkles and other mishaps less likely to occur. I took a few better pictures of me in the helmet to aid everyone viewing them. I think it will fit the lights etc. that i want inside, but wont have room for much more. I also looked into what you said about the face plate and jaw not lining up and when I fix it there will be between .5-1 cm extra play in front of my face. I hope that your helmet comes out as you want it to (great build by the way).


Ikras
Active Member
Thanks Ikras, I am going to use Plasti Dip, which I have heard will make crinkles and other mishaps less likely to occur. I took a few better pictures of me in the helmet to aid everyone viewing them. I think it will fit the lights etc. that i want inside, but wont have room for much more. I also looked into what you said about the face plate and jaw not lining up and when I fix it there will be between .5-1 cm extra play in front of my face. I hope that your helmet comes out as you want it to (great build by the way).
The new photos are definitely much clearer and a great help.
Sounds good. I've seen plastidip giving good results for people. It's expensive in the uk otherwise I'd probably be using it myself. I think that it looks like you would probably have space for the lights depending on how you plan to do them. A lot of info on here for how people go about it which I've found well worth a read. I think beyond space for additions it really comes down to how snug a fit you are comfortable with and how it looks scaled to any other parts.
Hope the build is still going well for you.
(Thanks very much. Still getting there slowly. Really need to put up an update soon.)
Akilo101
New Member
Hey guys, sorry for the lack of posts, My summer has been filled with activities. However, I have managed to finish cutting out all major pieces of the suit. I still have not made the hands, which I am wanting to 3D print, the shoes, and the shoulder bells.
If anyone knows where I can download cad for the hands, it would be greatly appreciated.
Thighs


Back


Cod Piece


Bicepts


Torso


If anyone knows where I can download cad for the hands, it would be greatly appreciated.
Thighs
Back
Cod Piece
Bicepts
Torso
Attachments

Last edited:
Baggins14
New Member
Great progress man! I want to make a mark 6 as well. I've put off working on my mark 7 because laziness but I kept thinking the mark 6 would be simpler to do. I've been looking all over the RPF for mark 6 foam files but cant find any. If you could link to the ones you're using that would be awesome! Thanks
Akilo101
New Member
Thanks Baggins14, I am using the files found here (Mark 4 and 6)
http://www.4shared.com/rar/rhlonlCE/MARK_4_and_6_foam_files.html?
The files for the Mark 7
http://www.4shared.com/rar/RXhIlkXn/avengers_foam_pep.htmll
http://www.4shared.com/rar/rhlonlCE/MARK_4_and_6_foam_files.html?
The files for the Mark 7
http://www.4shared.com/rar/RXhIlkXn/avengers_foam_pep.htmll
Akilo101
New Member
Thanks Baggins14, I am using the files found here (Mark 4 and 6)
http://www.4shared.com/rar/rhlonlCE/MARK_4_and_6_foam_files.html?
The files for the Mark 7
http://www.4shared.com/rar/RXhIlkXn/avengers_foam_pep.htmll
- - - Updated - - -
Thanks Baggins14, I am using the files found here (Mark 4 and 6)
http://www.4shared.com/rar/rhlonlCE/MARK_4_and_6_foam_files.html?
The files for the Mark 7
http://www.4shared.com/rar/RXhIlkXn/avengers_foam_pep.htmll
- - - Updated - - -
Thanks Baggins14, I am using the files found here (Mark 4 and 6)
http://www.4shared.com/rar/rhlonlCE/MARK_4_and_6_foam_files.html?
The files for the Mark 7
http://www.4shared.com/rar/RXhIlkXn/avengers_foam_pep.htmll
http://www.4shared.com/rar/rhlonlCE/MARK_4_and_6_foam_files.html?
The files for the Mark 7
http://www.4shared.com/rar/RXhIlkXn/avengers_foam_pep.htmll
- - - Updated - - -
Thanks Baggins14, I am using the files found here (Mark 4 and 6)
http://www.4shared.com/rar/rhlonlCE/MARK_4_and_6_foam_files.html?
The files for the Mark 7
http://www.4shared.com/rar/RXhIlkXn/avengers_foam_pep.htmll
- - - Updated - - -
Thanks Baggins14, I am using the files found here (Mark 4 and 6)
http://www.4shared.com/rar/rhlonlCE/MARK_4_and_6_foam_files.html?
The files for the Mark 7
http://www.4shared.com/rar/RXhIlkXn/avengers_foam_pep.htmll
Ikras
Active Member
Good to see you back with a great chunk of progress as well. It's all coming along very nicely.
I'm not sure about hand files. I just used the basic template version myself. I've definitely seen other people 3D printing them though so the files must be out there somewhere. Hope you get a response on that soon.
I'm not sure about hand files. I just used the basic template version myself. I've definitely seen other people 3D printing them though so the files must be out there somewhere. Hope you get a response on that soon.
RocFoamArmory
Active Member
The helmet does look a bit small. Once the suit is on it will get hot and if you want to wire LEDs in the helmet(which looks sick), you should have a bit of breathing room. Pun intended.
RocFoamArmory
Active Member
nice! im doing the same thing (only its the mk4) so we have pretty much the same pieces all except for the chest plate. what foam thickness are you using? yesterday I finished cutting out all of the paper templates and today im starting on the foam pieces. also, what did you do to articulate the arm and bicep attachment?
ill definitely be following this post!
Check out my foam build, http://www.therpf.com/showthread.php?t=251384&p=3831496#post3831496. I used 1/2 in. thick foam floor mats for a lot of it, and 6mm craft foam for the arms. It is harder to bend the foam, but once the piece is all together it holds its shape and is really sturdy. For the arm joints, I used giant paper fasteners from Office Max, the kind where you push through and bend the two arms back on the other side. Hope this helps!
- - - Updated - - -
Hey guys, sorry for the lack of posts, My summer has been filled with activities. However, I have managed to finish cutting out all major pieces of the suit. I still have not made the hands, which I am wanting to 3D print, the shoes, and the shoulder bells.
If anyone knows where I can download cad for the hands, it would be greatly appreciated.
Thighs
View attachment 539098View attachment 539095View attachment 539099View attachment 539096View attachment 539097View attachment 539092
Back
View attachment 539104View attachment 539103View attachment 539106
Cod Piece
View attachment 539101View attachment 539102View attachment 539100
Bicepts
View attachment 539107View attachment 539108View attachment 539109
Torso
View attachment 539089View attachment 539088View attachment 539091View attachment 539090
I used 2mm craft foam for the hands, with 2 coats of plastidip and lots of paint. They are pretty sturdy once glued to a thin glove, but still can flex to work with wiring the repulsor leds.
Similar threads
- Replies
- 1
- Views
- 1,039
- Replies
- 4
- Views
- 1,140