CB2001
Master Member
I've decided to create this thread in the general modeling section since I couldn't figure out where else to put it. I've been looking for potentially cheap ways to make a stop motion puppet without having to spend a whole lot of money (trying for as low as shoe-string as possible). As I've pointed out in the Thrift Store Finds thread, I picked up a book about stop motion animation called The Art of Stop-Motion Animation by Ken A. Priebe, which covers everything from the history of stop-motion animation to how to build one (they even mention Robot Chicken and it's use of action figures). Though the book does give many great examples of types of puppets and materials use to make them, I decided to attempt to experiment with other material I could find for a bit less than what is used for the cheapest production. The reason for this is because I've been toying around with the idea with making a comic book, but due to an inability to draw but being pretty good with building models, I've considered the possibility of using stop-motion style puppets and models as a means of making the comic possible. So far, I've only been experimenting with some materials to see if they could be useful instead of buying the expensive stuff or possibly more expensive methods (I've even considered doing what Robot Chicken appears to have done, using reproduction Mego 9-inch figure bodies, but replace the arms and legs with wired armatures and blend them into the body, which sounds like something I may end up doing). Here are my results thus far. I did not photograph my first set of experiments, but if anyone wants photos to get a clear idea on what I'm describing, I'll be more than happy to recreate the first tests (as its easy for me to do). So, here's what I've been able to figure thus far.
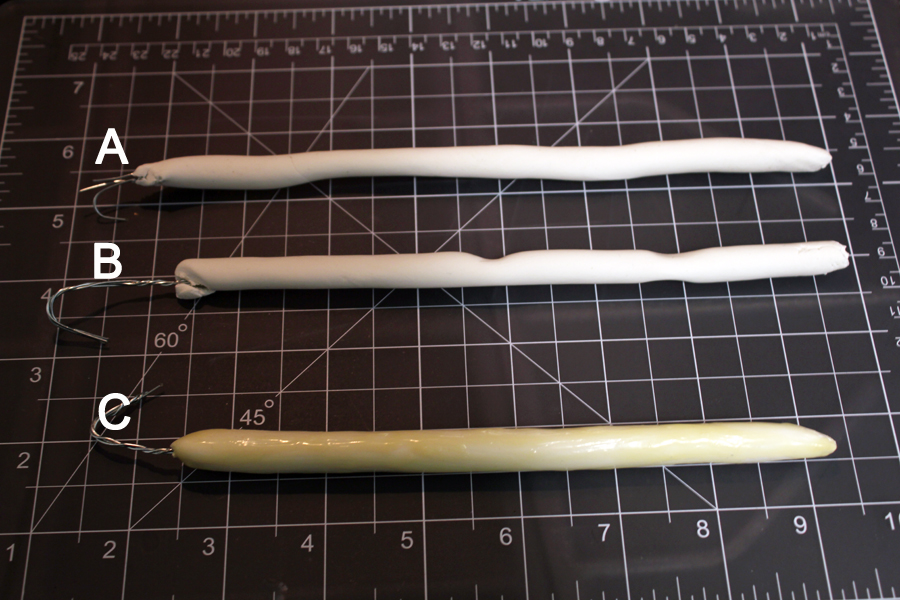
My first initial test was with Crayola Model Magic, which is a light weight modeling compound. I've used this material before, and remembered how flexible it could be when it was moist. Due to Mara Jade's Father's $50 AT-AT diorama, it got me wondering about using it for a stop motion puppet. Typically, I know that some of the cheapest stop-motion puppets often use either plasticine (aka clay) or use foam over an armature (be it a basic wire one or one the ball-and-socket types). Since it had been a while since I last used Model Magic for anything, I decided to try it out on a basic three-banded aluminum wire "arm" I constructed. I wanted to see if the Model Magic, after it dried, was able to still have just as much flex as it does when it's still moist.
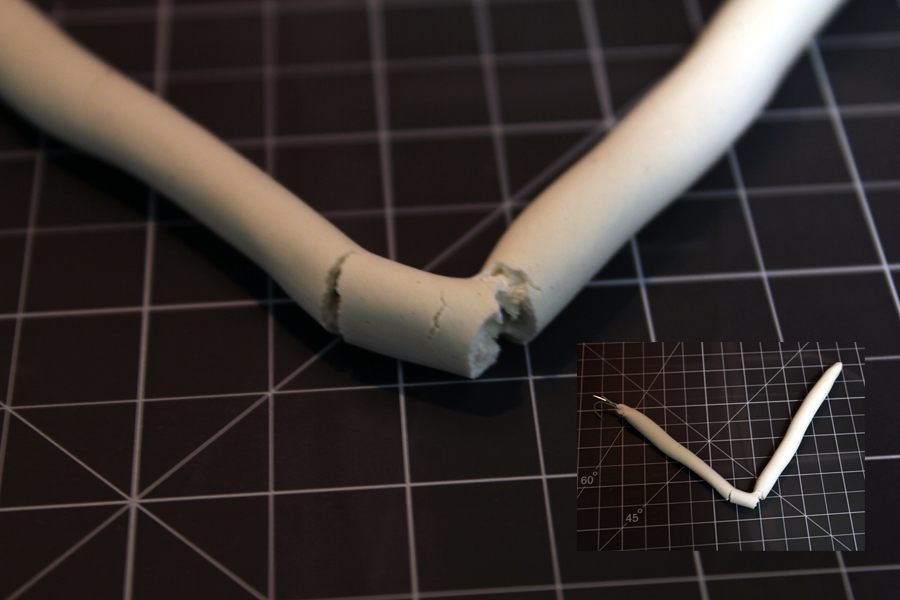
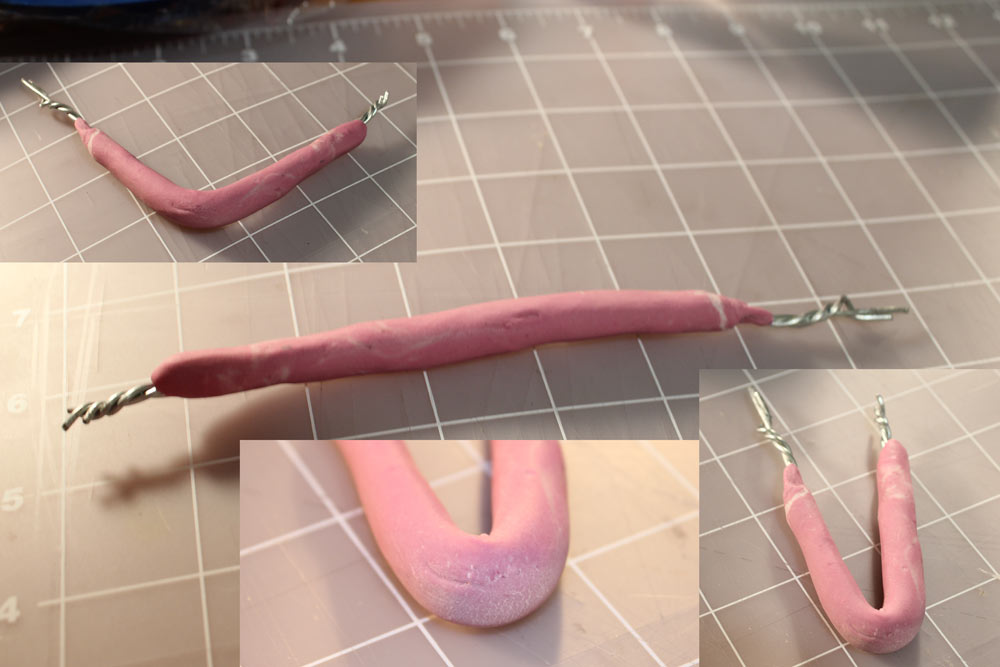
The first attempt everything went well when it came to applying the Model Magic to the arm. After allowing it to dry, I attempt to bend the arm to see how much flex it had. The "arm" I constructed was a straight piece, and I attempted to bend it to where there was a 90-degree bend. The "arm" was bent, but I noticed the initial problem: when you bent it, the outer most part of the Model Magic ripped on one side (image it like this: imagine the "arm" I constructed to be like a real arm, and I was bending the arm up at the elbow joint. Now image if the skin and some muscle where the elbow itself is were to rip due to a lack in elasticity. Basically, something like that). I repeated the bend two more times one above and one below my first attempt, both of them ripping. Another thing I noted was that even after the compound had completely dried, it didn't have much grip on the wire. After some thinking, I began to think of a way that could help in keeping the ripping from occurring. After reading through the above mention book again, I began to wonder, "What if I covered the thing in liquid latex?"
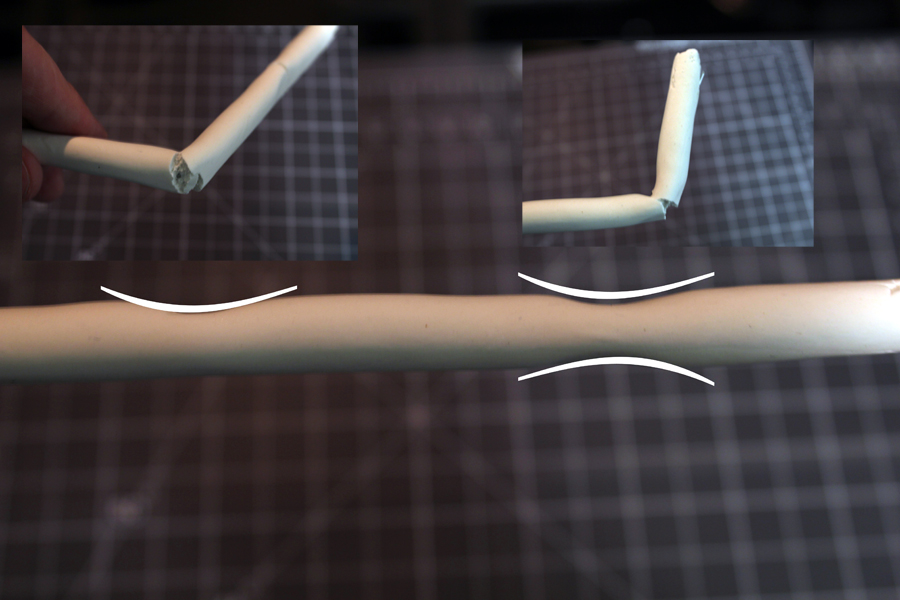
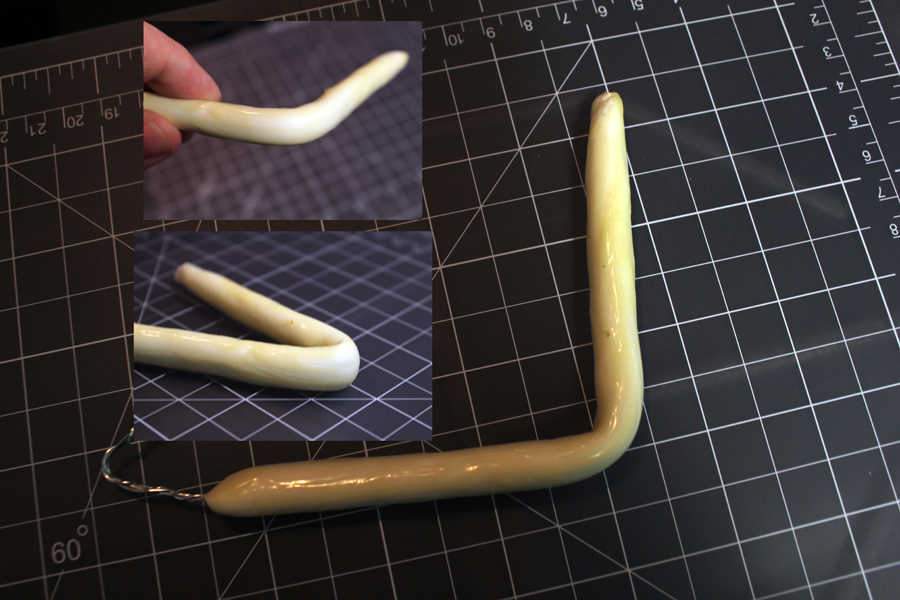
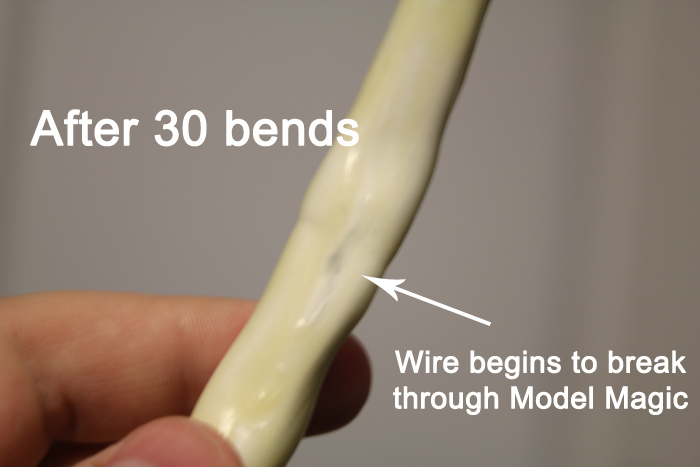
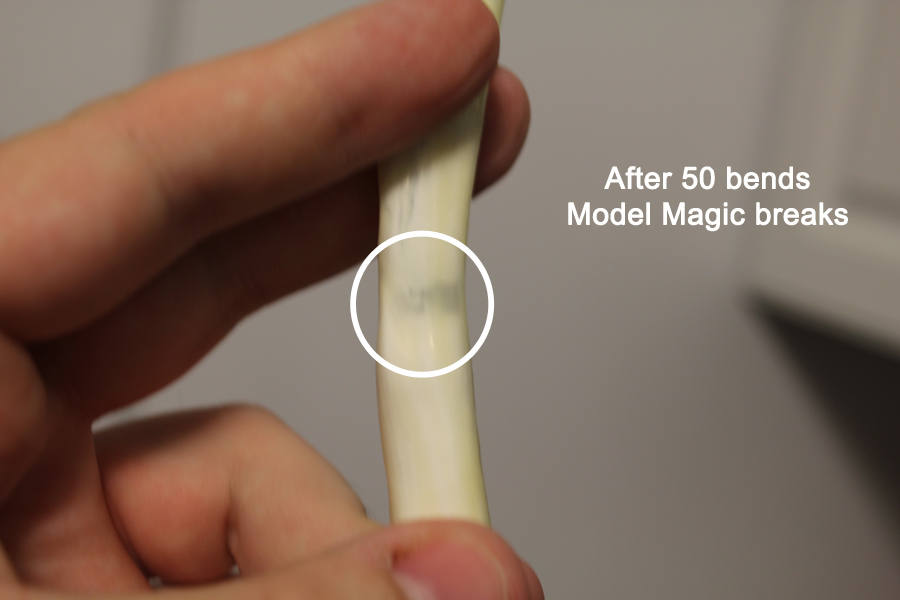
Before my second test, I went over to the Hobby Lobby in Valdosta and bought a 16 oz. bottle of Woodland Scenics Latex Rubber. This was located in the diorama isle, where you can buy materials and kits to make settings (basically the kind of stuff you'd typically would see for model railroads, but not as specific). I know that the mentioned item may not be worth it (since it came from one of those "hobby and craft" stores), but it's regular price was $17.99 and got it for only $10 (due to my Hobby Lobby App) and it is the only latex I could find at this time. I also bought some el-cheapo brushes to help apply the latex onto the "arm." And I understood that the latex rubber was meant to be primarily for mold making and not for something else. So, began test number 2. After applying a new sample of Model Magic on to the "arm", I waited for it to be completely air-dried like before. I then applied liquid latex three times to it, using some of the instructions on how to do it with foam from the book. I did the 90-degree bend and saw that the Model Magic did not tear. I brought the bend even closer to see if it would rip, with nothing happening at that point. It was after I bent it back straight and then tried it again a few more times did the Model Magic finally tear underneath the latex covering. This was a step forward to me, and it told me a lot: covering the entire arm with the Model Magic would tear after several bends, though the latex still remained intact. And still, the Model Magic wouldn't be adhering to the wire it was covering.
So far, I've figured that I could probably use Model Magic for something that doesn't require a whole lot of flexing, like a torso piece in which the abdomen has minimum bending unlike an arm, but I've picked up another idea about using "cheese cloth" or some other thin mesh-fabric to wrap around the piece to serve as skin, and using the Model Magic to act like "muscle", leaving some room for where the bend is to occur to see if it looks more like an arm bend without the risk of tearing.
Of course, this is just the first couple of attempts. I've also considered on using the mold method typically used in film productions to produce a puppet, but instead of using latex or foam latex, using silicone caulk (I found two tutorials. The first one is the second part tutorial from a professional stop-motion animator who showed how to make a silicone head for a character (explaining, as we all know, that latex tends to break down over the years and that silicone tends to last longer), and a second tutorial on how to use silicone caulk from hardware stores to make molds of items (basically describing how to thin the silicone down to where it's pourable or even brushable). I do not know if I'll go through with testing out the silicone caulk method, but it does sound like it could be cheaper and more readily available than the professional grade silicone than the gentleman in the first video uses. I may include updates on my further experiments, to see what happens, see where they may lead me and what I may eventually attempt. Thank you for your time for now. If there's any alternate materials that can be found anywhere on the cheap or any tutorials you think I should see that could test out on the cheap, feel free to let me know and I'll experiment with it as well.
My first initial test was with Crayola Model Magic, which is a light weight modeling compound. I've used this material before, and remembered how flexible it could be when it was moist. Due to Mara Jade's Father's $50 AT-AT diorama, it got me wondering about using it for a stop motion puppet. Typically, I know that some of the cheapest stop-motion puppets often use either plasticine (aka clay) or use foam over an armature (be it a basic wire one or one the ball-and-socket types). Since it had been a while since I last used Model Magic for anything, I decided to try it out on a basic three-banded aluminum wire "arm" I constructed. I wanted to see if the Model Magic, after it dried, was able to still have just as much flex as it does when it's still moist.
The first attempt everything went well when it came to applying the Model Magic to the arm. After allowing it to dry, I attempt to bend the arm to see how much flex it had. The "arm" I constructed was a straight piece, and I attempted to bend it to where there was a 90-degree bend. The "arm" was bent, but I noticed the initial problem: when you bent it, the outer most part of the Model Magic ripped on one side (image it like this: imagine the "arm" I constructed to be like a real arm, and I was bending the arm up at the elbow joint. Now image if the skin and some muscle where the elbow itself is were to rip due to a lack in elasticity. Basically, something like that). I repeated the bend two more times one above and one below my first attempt, both of them ripping. Another thing I noted was that even after the compound had completely dried, it didn't have much grip on the wire. After some thinking, I began to think of a way that could help in keeping the ripping from occurring. After reading through the above mention book again, I began to wonder, "What if I covered the thing in liquid latex?"
Before my second test, I went over to the Hobby Lobby in Valdosta and bought a 16 oz. bottle of Woodland Scenics Latex Rubber. This was located in the diorama isle, where you can buy materials and kits to make settings (basically the kind of stuff you'd typically would see for model railroads, but not as specific). I know that the mentioned item may not be worth it (since it came from one of those "hobby and craft" stores), but it's regular price was $17.99 and got it for only $10 (due to my Hobby Lobby App) and it is the only latex I could find at this time. I also bought some el-cheapo brushes to help apply the latex onto the "arm." And I understood that the latex rubber was meant to be primarily for mold making and not for something else. So, began test number 2. After applying a new sample of Model Magic on to the "arm", I waited for it to be completely air-dried like before. I then applied liquid latex three times to it, using some of the instructions on how to do it with foam from the book. I did the 90-degree bend and saw that the Model Magic did not tear. I brought the bend even closer to see if it would rip, with nothing happening at that point. It was after I bent it back straight and then tried it again a few more times did the Model Magic finally tear underneath the latex covering. This was a step forward to me, and it told me a lot: covering the entire arm with the Model Magic would tear after several bends, though the latex still remained intact. And still, the Model Magic wouldn't be adhering to the wire it was covering.
So far, I've figured that I could probably use Model Magic for something that doesn't require a whole lot of flexing, like a torso piece in which the abdomen has minimum bending unlike an arm, but I've picked up another idea about using "cheese cloth" or some other thin mesh-fabric to wrap around the piece to serve as skin, and using the Model Magic to act like "muscle", leaving some room for where the bend is to occur to see if it looks more like an arm bend without the risk of tearing.
Of course, this is just the first couple of attempts. I've also considered on using the mold method typically used in film productions to produce a puppet, but instead of using latex or foam latex, using silicone caulk (I found two tutorials. The first one is the second part tutorial from a professional stop-motion animator who showed how to make a silicone head for a character (explaining, as we all know, that latex tends to break down over the years and that silicone tends to last longer), and a second tutorial on how to use silicone caulk from hardware stores to make molds of items (basically describing how to thin the silicone down to where it's pourable or even brushable). I do not know if I'll go through with testing out the silicone caulk method, but it does sound like it could be cheaper and more readily available than the professional grade silicone than the gentleman in the first video uses. I may include updates on my further experiments, to see what happens, see where they may lead me and what I may eventually attempt. Thank you for your time for now. If there's any alternate materials that can be found anywhere on the cheap or any tutorials you think I should see that could test out on the cheap, feel free to let me know and I'll experiment with it as well.