You are using an out of date browser. It may not display this or other websites correctly.
You should upgrade or use an alternative browser.
You should upgrade or use an alternative browser.
My DL-44 Builds. Two(!!) MGC's and a Field Marshall Now! GK, Hoth, ANH Hero, OH MY!!!
- Thread starter NathanM
- Start date
NathanM
Well-Known Member
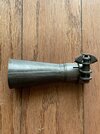
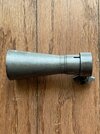
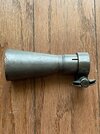
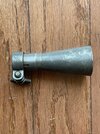
The scope will haunt me lol.your flash hider looks awesome! congrats, the look is really close to the one they used
NathanM
Well-Known Member
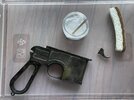
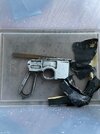
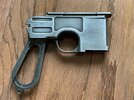
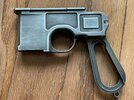
Here's the close-up photos of the finish as promised:
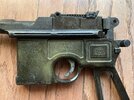
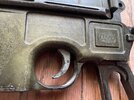
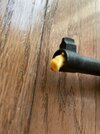
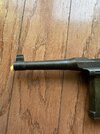
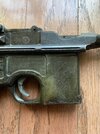
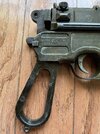

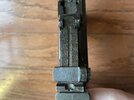
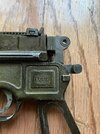
I'm officially back to being torn on the finish. The wear is heavy and the color is almost sickly. Also the trigger shows some minor corrosion as well as molding marks in various places on the body of the gun so it may be worth sanding. There's some sort of weird red wax-like flakes that need cleaning off. I'm thinking if I do refinish it, maybe it's just the lower that needs refinishing with cold bluing.

I also need to figure out replacement grips. Is there any option for wooden handgrips for the MGC? The handgrips on the left are ones I have for an eventual ANH hero build I plan on doing with the Field Marshall setup for reference. They are similarly sized but don't quite fit correctly.
More to come!


I'm officially back to being torn on the finish. The wear is heavy and the color is almost sickly. Also the trigger shows some minor corrosion as well as molding marks in various places on the body of the gun so it may be worth sanding. There's some sort of weird red wax-like flakes that need cleaning off. I'm thinking if I do refinish it, maybe it's just the lower that needs refinishing with cold bluing.

I also need to figure out replacement grips. Is there any option for wooden handgrips for the MGC? The handgrips on the left are ones I have for an eventual ANH hero build I plan on doing with the Field Marshall setup for reference. They are similarly sized but don't quite fit correctly.
More to come!
beautiful flash hider! I'm excited for you on this build.
My recommendation for this MGC is to start light, to see what you're working with. Maybe a toothbrush and a paste of baking soda and Dawn dish soap, 0000 Steel wool buffing or a light/quick polish with Brasso or something. Test in small areas, or the inside of the magazine plate to see if it removes the finish, I don't think they will.
Maybe you'll get rid of a layer of corrosion or gunk and see what color the metal is without other stuff in the way? It does look like the lower frame took a heavy beating...
I also have a syringe of this red gel gun grease that I squirted around the bolt and action inside since I basically rubbed off the old grease they used when i disassembled and cleaned my gold ones
NathanM
Well-Known Member
There was definitely an oily substance on the exterior and in the action when I first received it. I'll be lubing the interiors once I start the process on it (with the Hoppe's 9) but yes, thanks for the advice to go slow and see what minor cleaning does to it. I didn't actually consider that the layer of grime may be concealing the more proper finish.
Best of luck here!
NathanM
Well-Known Member
Added a 3rd coat and I'm not sure if I'll do another one. Here it is as it stands with the untouched upper.
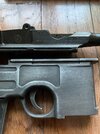
The shade is getting there but I don't think it'll ever be quite as dark with just bluing. Gonna tackle the upper tomorrow and the various small bit's that show on the exterior. Then on to degreasing the innners and putting it back together and relubing.

The shade is getting there but I don't think it'll ever be quite as dark with just bluing. Gonna tackle the upper tomorrow and the various small bit's that show on the exterior. Then on to degreasing the innners and putting it back together and relubing.
NathanM
Well-Known Member
I considered using my Aluminum Black but was liking the finish with the Perma Blue. I did use Renaissance Wax on the finish to coat it and that darkened it up some. Maybe I'll try the upper with the Aluminum Black to see how it turns out and compare and adjust if needed. Would the Aluminum Black result in a darker finish due to the alloy?Oh man that looks great! Nice work on the sanding, my god it's like that rough finish was never there.
Would you have more luck with Aluminum Black or something? PermaBlue is more for steel
NathanM
Well-Known Member
Did quite a bit today.
Started by filing just the front barrel sight off.
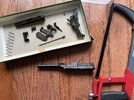
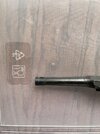
Because it's a shorter barrel version, I figured the sight was a safe place to start.
With that in mind, in the photo Scottjua has, I have the same barrel seam at the base of it by the upper receiver. Does anyone know the distance from that line to where the flash hider sits?

Based on my rough comparison maybe 2.5"? That sound right?
Started by filing just the front barrel sight off.


Because it's a shorter barrel version, I figured the sight was a safe place to start.
With that in mind, in the photo Scottjua has, I have the same barrel seam at the base of it by the upper receiver. Does anyone know the distance from that line to where the flash hider sits?
Based on my rough comparison maybe 2.5"? That sound right?
Last edited:
NathanM
Well-Known Member
You kicked it off with the sale lol. Can't believe I was able to get an MGC so fast after that too.Fantastic work! Can’t wait to see the finished product. The FH turned out great!
NathanM
Well-Known Member
Kind of on hold until my. Solo's Hold heat sink is shipped. I can't really lay out anything else as that needs to fit first.
I'm struggling with a plug adapter for the M9 hider. I thought maybe some epoxied and stacked nylon washers sanded and drilled out to size would be good but they are to brittle to do anything with.
I think I need a drill press for that maybe and even for drilling the scope mount holes. I'm scared to attempt them free hand.
We'll see.
hey,
so here is how I do my adapters for the M9. this is just one way to do it, lots of way to do but since you mention you would need a drill press and everything, I did everything by hand here, so maybe that can help
I use a small tube and a sleeve of thin aluminium that I curved around the barrel. It depends on the size of tubing you have, if you have one with a better fit, you might need just that.

Then I file the inside of the tube a bit with a round file until it fit the barrel at the position I want:


then, you put the tube, and then the sleeve and flash hider progressively until it fits tightly:


pretty quick and easy and no crazy tools involved
I hope this helps
so here is how I do my adapters for the M9. this is just one way to do it, lots of way to do but since you mention you would need a drill press and everything, I did everything by hand here, so maybe that can help
I use a small tube and a sleeve of thin aluminium that I curved around the barrel. It depends on the size of tubing you have, if you have one with a better fit, you might need just that.
Then I file the inside of the tube a bit with a round file until it fit the barrel at the position I want:
then, you put the tube, and then the sleeve and flash hider progressively until it fits tightly:
pretty quick and easy and no crazy tools involved
I hope this helps
regarding the holes in the body, I did them freehand with just a small tool for alignment, visible in the top left here:

I then threaded the holes as it's a bit difficult to fit a nut inside the gun, because of the mechanism in the back.
I'm sure some people also use epoxy or similar glues to hold the scope mounts too. if you are not confortable with the holes and threading.
I then threaded the holes as it's a bit difficult to fit a nut inside the gun, because of the mechanism in the back.
I'm sure some people also use epoxy or similar glues to hold the scope mounts too. if you are not confortable with the holes and threading.
Similar threads
- Replies
- 19
- Views
- 1,402
- Replies
- 8
- Views
- 669

