My builds/finds: aluminium razor crest lever

Thanks, didn’t take too long to fill in the back, was easier/quicker than I thought it would be. Done for today, I’ll tackle the front tomorrow

F3CFD3CE-F71D-4F42-A975-4D34622AAD4D.jpeg


Just wanted to check it against the cloth I had printed, camera is doing something wierd with the perspective, and the colour, (in real life it’s got more orange) but I think that’s close enough for me.

59AFE990-E861-486C-AA7E-17BA09E024E8.jpeg

712B65BC-FA5C-49E0-AD81-6ECBBD8EC460.jpeg
 
Last edited:
I finally feel like there is light at the end of a steel ring tunnel.

Both sides are joined and 1 shoulder. To get the links to align in the right direction to be joined together I needed to add an extra vertical row, I’m not quite sure on the mechanics of how that works, it must be something to do with the links alternating in different directions, this also made the shoulders equal on both sides.

I joined the sides first, as they were longer and I thought it would be easier that way round. Joining the shoulders was mind bending and fiddly, but soon I’ll be able to extend the sleeves.

I added an extra ring in the arm pit where the 3 section of the main body and the 2 sides of the sleeves meet. Not sure if that will be necessary or if I’ll need to add more extra rings in that area, guess I’ll find out as I go.

I ordered some wood to make a display stand for it, hopefully it will arrive by the time I’m finished.

5E01EBE1-953C-49B5-908D-3102AEB3A141.jpeg

6A7CE078-F4A0-41EE-A50F-D831DB17B036.jpeg

0EFC7A19-C1AC-4E9C-8B43-DBECA15CE5A3.jpeg

89CDC5EF-2A4D-442D-9275-485DB14782B9.jpeg
 
Last edited:
Update on this weeks progress, almost there.
I realised there IS a shot of the suit held up from behind I had missed and I’d got the neck hole wrong, so I filled in the V on the back, the neck hole was also looking too large so I needed to add more rows, holding it up to compare to the images, extending the sleeves and joining the arm pits was tricky but I got done, each sleave has 23 rings in it’s circumference and 20 rows in length. The oak for the stand also turned up. Also ordered a cheap mythosaur pendant to go with it

B541CCE7-B9CD-404D-ACF7-879FD1AF4876.jpeg
 
Sorry for the delay in posting, had the shirt finished a while ago, but I’ve been working on a little display stand for it, the joinery involved was a little more complicated than I thought. Just waiting for the lacquer to fully harden.

6A36E505-4AAB-4079-922E-2D4975D0A5D9.jpeg
AAF1E8DE-550B-46E5-82E8-3304A027CA2F.jpeg
 
realised I never posted the cloth bundle, it’s a simple thing, instead of making another suit, I just filled it with chain to give it some body/weight.

126160ED-7CA6-4424-A415-218337454266.jpeg


Next one up

Ever since I saw this thread: Spotchka recipe As a fan of obscure props, I liked the idea of a glowing bottle as a cheap prop. I’ve got no intention of drinking it so I decided to use some UV pigment instead.

This is what I’m aiming for:

6EF995B2-C3DA-4583-ACA3-F8348B976886.jpeg


9CDBBF3B-C4C0-468E-A237-873364D71A27.jpeg


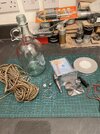
So here are the materials I either had or picked up:

12824793-9105-48F7-9DD8-8DD916B437CA.jpeg


- A vintage cider bottle
- Para cord for the netting
- welded steel ring to finish the net at the bottom
- couple of metal bits as lanyard beads (just to add a little detail
- vintage metal bottle stopper, to keep the contents in
- battery powered light.
- UV led and lens, to replace the light
- switch and 3.7v battery (same size as AA)
- UV pigment
 

Attachments

  • D8095A8B-5103-4AA4-B4DD-FA96D58D3C0D.jpeg
    D8095A8B-5103-4AA4-B4DD-FA96D58D3C0D.jpeg
    2.3 MB · Views: 56
Last edited:
So first things first I needed a uv light, so I set about modify the light puck, I didn’t end up using the lens in the end as it didn’t quite fit and it wasn’t really needed.

Basically just changed the led and added a switch, nothing too taxing. Leant those tiny slide switches aren’t enclosed, so when you glue them down, they fill up with glue, lol.

252F64D6-8505-4D44-82F7-2AF495BC7348.jpeg


212DB476-D137-418E-9F97-85FF30B0C514.jpeg


Then I wanted to test out the pigment, before starting the netting incase it didn’t work. a little of this stuff goes a long way, less is definitely more in this case. At first I used too much it was super cloudy, so I watered it down more.

I’m really pleased, it glows so bright my camera won’t pick up the correct colours or do it justice.

59DA34AA-8619-4FE1-B79D-D64AAD8A9A13.jpeg


D37CD3D4-D1E2-4CCD-B5F1-BD9C3E9ED57C.jpeg
 
Started on the net for the bottle, made a loop and did a diamond knot, followed by a few lanyard knots, added one of the greeble beads followed by more lanyard knots another bead, few more knots finished with another diamond knot. This give a sort of handle thing but more importantly forms a loop round the neck to start the netting.

EE9289C3-3F3A-4A42-B733-43A83656B682.jpeg

00383DB9-787B-4D52-A08E-06C6FD859A27.jpeg

6EB8240B-B535-48A3-A849-AF693D4CF20B.jpeg
 
Hey there, I'm not sure I understand, but, are you going to have an UV light lit under the botle? isn't that super dangerous for your eyes?
 
Hey there, I'm not sure I understand, but, are you going to have an UV light lit under the botle? isn't that super dangerous for your eyes?
Yep that’s right. I’ll use a UV led in the puck and will light it from underneath. It’s not mega strong, so I don’t see any danger it’s just a black light, not like a tanning bed light.

I don’t think this would be anymore dangerous than going outside. It’s not like looking at a laser.

It’s 395nm and only 2-3w. But thank you for you’re concern. I guess looking directly at any cree led would be dangerous to a degeree but it’s diffused. I’m sure this would be safe.
 
Last edited:
Yep that’s right. I’ll use a UV led in the puck and will light it from underneath. It’s not mega strong, so I don’t see any danger it’s just a black light, not like a tanning bed light.

I don’t think this would be anymore dangerous than going outside. It’s not like looking at a laser.

It’s 395nm and only 2-3w. But thank you for you’re concern. I guess looking directly at any cree led would be dangerous to a degeree but it’s diffused. I’m sure this would be safe.
ok then, awesome :) good luck with your new project :)
 
ok then, awesome :) good luck with your new project :)
Thanks - I did do a little more research, after your post, as I wouldn’t want to encourage anyone to do anything potentially dangerous. And thought I’d share my findings

UV in a frequency of under 200nm is used for tanning and disinfection and prolonged exposure over a number of years can cause skin cancers.

UV in a frequency on 300-400 is generally considered safe as it is not strong enough to damage DNA.

Anything over 400 is visible light.

But that said you shouldn’t look directly at any high powered light source. The sun, a high powered led, down the barrel of a lightsaber.

The led i used is a single cree chip, in the 395nm range and operated at 3.8v it’s similar to type that are used in base lit light sabers.

It wouldn’t hurt to wear eye protection (sun glasses) before diffusing it with a lens, if you’ve not used to using these type of leds before, they are very bright. Looking directly at them will make you see spots for a little while.

When I was testing to see if it was wired up I just pointed it away from me, so I was looking at the reflection of the light against the wall and not directly at the chip. Realised this is 2nd nature, so it’s something I should have pointed out in my earlier posts, incase anyone is thinking of trying this out themselves.

Thanks for posting and reminding me to not take mine or anyone else’s safety for granted. When you are used to working with something you get nonchalant to the risks and assume others have the same knowledge or experience, which again isn’t always the case and shouldn’t be taken as granted.

Apologies for not saying this sooner.
 
Last edited:
Awesome, thank you for posting your findings, didn't want to be a pain, just genuinely concerned for yours or anyone else's safety when i saw that :)
thank you for the clarification, it's great info :)
 
I’ve posted the EH-17 scout blaster elsewhere, so apologies if you’ve seen it already - I like to have a record of all my builds in one place, but don’t like posting the same pictures to multiple threads at the same time, so thought I’d wait till I finished something else.

2171219D-7FCC-4BF8-A52B-929B446B77CA.jpeg


F6A94DD9-4915-47FC-B29F-29DF8CA6FB91.jpeg

7424D3F9-98BC-491C-B642-21FC599731B4.jpeg

11CE041A-3D2F-4BEC-8137-FBD3DA5F74CE.jpeg


I’ve had the parts to make a Star destroyer capacitor bearing from TFA for a while, they were some of the first found parts that I acquired, but it’s taken till now to build it. I wont post a tutorial as it’s already been covered in other threads.

The space inside was begging for for guts/greebles, I’d seen a couple of others do this, but I’d not seen one with working lights.

I added a blinking led running off of a hearing aid/watch battery and a magnetic reed switch. I mounted a magnet in the lid, so it only turns on when opened

ED34C378-FEF2-4D1E-9A20-28732D7EB7A1.jpeg

692CB5D7-D4DF-466E-9CD7-F48276BE9D38.jpeg

53F0414B-8BFA-46A7-A30A-6245BE714124.jpeg


Here they both are on my display shelves

6B5F7925-CFA1-43C3-A34B-B8E4E642A5EE.jpeg


I’ll have to make some 1/4 portion ration packs to go with it.
 
Last edited:

Your message may be considered spam for the following reasons:

If you wish to reply despite these issues, check the box below before replying.
Be aware that malicious compliance may result in more severe penalties.
Back
Top