You are using an out of date browser. It may not display this or other websites correctly.
You should upgrade or use an alternative browser.
You should upgrade or use an alternative browser.
My builds/finds: aluminium razor crest lever
- Thread starter woodywaverider
- Start date
woodywaverider
Sr Member
Thank you very much.
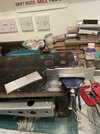
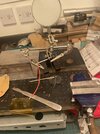
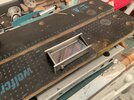
I was able to get a bit more done, I’ve got a rough plan for the viewfinder, but I’m kinda making it up as I go.
I got the top and bottom plates cut out and filed to fit the contour of the back. I don’t have access to a milling machine, so I thought I’d try to etch the lip using salt and copper sulphate.
I’m pretty pleased with how they turned out. I really didn’t want to have to re do these parts as they took me the best part of a week, I still need to drill some holes in them for the switch, so really hoping I don’t f’up.
Attachments
woodywaverider
Sr Member
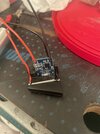
I realised that once the viewfinder is in place, I won’t be able to open the main body, due to the way it’s hinged.
I thought about just sealing the battery in, and although I’m adding a recharge port that was still really bugging me.
So I decided to cut an access hole in the back, I took out one of the rivets from the back plate, tapped the hole and swapped it out for an bolt, now I can remove the plate to change the battery if I ever need to

Also the led filaments I ordered from China 4 months ago arrived in the post today! I thought they had been lost in the post, but couldn’t find any the same size and colour anywhere else.
I tested them and they are so much brighter than the 3mm. I’m taking it as a sign that they show up just now, so I’m going have to modify the viewfinder side pieces to accommodate them.
I thought about just sealing the battery in, and although I’m adding a recharge port that was still really bugging me.
So I decided to cut an access hole in the back, I took out one of the rivets from the back plate, tapped the hole and swapped it out for an bolt, now I can remove the plate to change the battery if I ever need to
Also the led filaments I ordered from China 4 months ago arrived in the post today! I thought they had been lost in the post, but couldn’t find any the same size and colour anywhere else.
I tested them and they are so much brighter than the 3mm. I’m taking it as a sign that they show up just now, so I’m going have to modify the viewfinder side pieces to accommodate them.
woodywaverider
Sr Member

woodywaverider
Sr Member
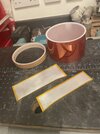
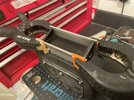
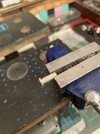
Bit more progress, couple more pics, viewfinder almost done now, just need to make the greeble for the top. Please ignore the mess of glue in the back, no one will see it.
I’m waiting on a resistor coming in the post, didn’t have the right value in my collection.
If it’s not here tomorrow I’ll start the strap whilst I’m waiting.
I’m waiting on a resistor coming in the post, didn’t have the right value in my collection.
If it’s not here tomorrow I’ll start the strap whilst I’m waiting.
Attachments
haasofprops
Member
This is great! Thanks for sharing the process as you went along!
woodywaverider
Sr Member
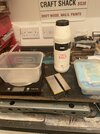
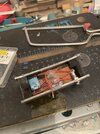
I got the main body sealed and added the nimrod strap to the sides, and put together this little greeble for the top of the viewfinder.
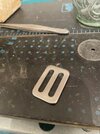
I found a slide buckle for the strap, it’s a little too fresh for Star Wars, so I’m soaking it in white vinegar for a few days to take off the shine.
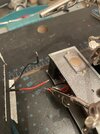
I’ve got the viewfinder connected and glued on, it all works.
I was planning to use an old belt that no longer fits for the strap, but it’s not long enough so I’ve ordered a Serbian ammo pouch, not sure I’ll need that buckle now, oh well.
Once I’ve got the strap done I’ll go take some glamour shots
I found a slide buckle for the strap, it’s a little too fresh for Star Wars, so I’m soaking it in white vinegar for a few days to take off the shine.
I’ve got the viewfinder connected and glued on, it all works.
I was planning to use an old belt that no longer fits for the strap, but it’s not long enough so I’ve ordered a Serbian ammo pouch, not sure I’ll need that buckle now, oh well.
Once I’ve got the strap done I’ll go take some glamour shots
Attachments
Last edited:
woodywaverider
Sr Member
Finally got her finished and had some time to go take some pics. Really pleased with the end result. I’d like to take the trooper Trent for his excellent work on his kit and for sharing the images, whilst I didn’t use the kit the thread was a great inspiration/ reference. I’d also like to thank jocha for sharing his file for the laser etching of the display screen.

woodywaverider
Sr Member
I wanted to get one more project in before Christmas. A droid caller based on a Leitz Wetzlar flash - i found one for $12 - I have all the parts and hopefully it’s only a few hours build.
A kobold flash is just out of my budget, even an accurate replica is pricey. I saw a tutorial on the smugglers room and liked the idea of using found parts to make something in universe rather than have a resin cast, that I’d have to then paint.


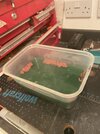
Here’s all the parts, obvs there’s the flash, I’ll be adding a switch, led, buzzer, battery plus connector, d ring, an ANC 4 weld on fitting and a knurled thrums screw.

I stripped the flash down, here are all the bits I’m keeping for the build.

And here all the extra pieces I don’t need, including a funky 22 1/2 volt battery. There’s some nice potential greebles here - I’ve ear marked the brass pin for a hardware graflex.

The bottom is held in by 3 screws, (don’t loose one like I did and spent about 30 mins hunting for it) the rest of the bits come off too, I used a dermal to take down the central contact and opens the side a bit and cut down the connectors - to give extra room for the battery to fit.


I cut the thumb screw down, then turned it in my hand drill. I also cut the thread down. Tapped a hole in the upper part of the flash.

The ANC fitting fits perfectly in the top, just as some extra detail. The d ring just pushes in the the c track, it’s snug.
I drilled the 2 holes for the switch and led, there is just enough room for the battery.

Bit of hot glue and the buzzer sits on top.
Add the battery and screw the bottom back on, hopefully at this point your 3 screws are still where you left them and you’re not on your hand and knees hunting for it.
Quick test that the electronics work, twist the top on and it’s done. Not a bad rainy day project. Not accurate, but looks the part

A kobold flash is just out of my budget, even an accurate replica is pricey. I saw a tutorial on the smugglers room and liked the idea of using found parts to make something in universe rather than have a resin cast, that I’d have to then paint.
Here’s all the parts, obvs there’s the flash, I’ll be adding a switch, led, buzzer, battery plus connector, d ring, an ANC 4 weld on fitting and a knurled thrums screw.
I stripped the flash down, here are all the bits I’m keeping for the build.
And here all the extra pieces I don’t need, including a funky 22 1/2 volt battery. There’s some nice potential greebles here - I’ve ear marked the brass pin for a hardware graflex.
The bottom is held in by 3 screws, (don’t loose one like I did and spent about 30 mins hunting for it) the rest of the bits come off too, I used a dermal to take down the central contact and opens the side a bit and cut down the connectors - to give extra room for the battery to fit.
I cut the thumb screw down, then turned it in my hand drill. I also cut the thread down. Tapped a hole in the upper part of the flash.
The ANC fitting fits perfectly in the top, just as some extra detail. The d ring just pushes in the the c track, it’s snug.
I drilled the 2 holes for the switch and led, there is just enough room for the battery.
Bit of hot glue and the buzzer sits on top.
Add the battery and screw the bottom back on, hopefully at this point your 3 screws are still where you left them and you’re not on your hand and knees hunting for it.
Quick test that the electronics work, twist the top on and it’s done. Not a bad rainy day project. Not accurate, but looks the part
Attachments
Last edited:
woodywaverider
Sr Member
Thanks, can’t really take any credit for that, I saw a tutorial on smuggler’s room.It looks great- wonderful ingenuity!
")
woodywaverider
Sr Member
Next up Krate dragon detonator from E1:S2 of the mandalorian. This is what I’m aiming for:

I was able to find a Bund alarm and nkk switch. The rest of the greebles will be made from aluminium.
So far I’ve stripped it down and had a few adventures trying to bend stainless for the hanger, but the results weren’t satisfactory, so I’ll use aluminium instead.
I’ve bent some 5mm aluminium and put a thread on the end for the stick protector as test, now I just need 2 the same/correct size


.
I was able to find a Bund alarm and nkk switch. The rest of the greebles will be made from aluminium.
So far I’ve stripped it down and had a few adventures trying to bend stainless for the hanger, but the results weren’t satisfactory, so I’ll use aluminium instead.
I’ve bent some 5mm aluminium and put a thread on the end for the stick protector as test, now I just need 2 the same/correct size
.
woodywaverider
Sr Member
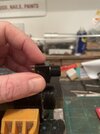
There isn’t enough space to fit the switch without modifying the buzzer housing, so I cut the thread in half, I was exited to test fit the switch.
Then I worked on a template for the 2 plates either side of the light.


Then I worked on a template for the 2 plates either side of the light.
Attachments
Last edited:
woodywaverider
Sr Member
I got the side plates cut out and started cutting out the 2 notches below the post using a jnr hack saw and the files.
Added the hole to some 3mm aluminium glued it in, being careful not to glue the 2 halves of the alarm together at the same time. Then I filed it down flush.
but I’m calling it a day now, the 2nd notch will have to wait till tomorrow. Then I’ll work on the side rails.


Added the hole to some 3mm aluminium glued it in, being careful not to glue the 2 halves of the alarm together at the same time. Then I filed it down flush.
but I’m calling it a day now, the 2nd notch will have to wait till tomorrow. Then I’ll work on the side rails.
Last edited:
woodywaverider
Sr Member
Little progress update. 2nd notch filed and filled.
Blanked off the hole for the original switch from the inside ready to be filled with bondo.
I marked and punched where the holes for the switch protectors go - top left hole sits over the Bund logo, so I’ll need to fill it with bondo first
Bent the hanger, turned out better this time.


Blanked off the hole for the original switch from the inside ready to be filled with bondo.
I marked and punched where the holes for the switch protectors go - top left hole sits over the Bund logo, so I’ll need to fill it with bondo first
Bent the hanger, turned out better this time.
woodywaverider
Sr Member
This is where we’re at currently.
Logo and switch hole, filled and sanded flush.
Sanded down the raised icons.
Bent and threaded the switch protectors
Hopefully get the side rails done at the weeken once I’ve tidied up, then there’s a hole bunch of sanding to do.
Tested the light and it works!


Logo and switch hole, filled and sanded flush.
Sanded down the raised icons.
Bent and threaded the switch protectors
Hopefully get the side rails done at the weeken once I’ve tidied up, then there’s a hole bunch of sanding to do.
Tested the light and it works!
Last edited:
Similar threads
- Replies
- 2
- Views
- 856
- Replies
- 20
- Views
- 1,155
- Replies
- 2
- Views
- 1,073
- Replies
- 3
- Views
- 493