My builds/finds: aluminium razor crest lever

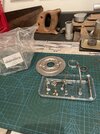
Think I have the activation switch shaped - I say that as I’ve left the top flat, I can’t tell form the images if the top has a slight concave? Can anyone confirm?

this has taken about a week so far - every plane needs some form of adjustment.

I thought I may be able to cut the radius out with a cutting wheel, but that didn’t work - so I had to use a grinder, sanding drum and files, offer it up and repeat, I think this as as close as I can get it by eye and hand.

E6075238-1755-4073-9E13-8CFF3590D241.jpeg
F427A37E-7E56-4DA4-95A1-52C686FE42B7.jpeg
6B92B434-647D-459D-BE08-96BED060C160.jpeg
0CF77BBD-737F-4A56-A9B0-29B28042F91C.jpeg
015F5503-DD75-4D9E-BE96-133C00914F7E.jpeg
7C3FB158-3D30-43D9-875D-33F0518D31A1.jpeg
F8C409C1-D835-47A8-80D1-B82439A574C8.jpeg


then added a scallop to the inside so it sits on the dome.

BDFFD521-E71A-4AF5-A1A2-802D4E005F61.jpeg


Filled the thumb recess

902F5076-6160-45D1-9FED-DFF1E715F49F.jpeg


E8D80213-7F18-4A92-84BA-E1251FC13AE0.jpeg


Next up will be attaching it and the bottom half. If any one knows if the switch has a slight concave on the top and can let me know that would be super helpful.
 
Thank you. I’ve glued in the lens assembly and attached the switch piece. There wasn’t enough room for 2 flange head bolts, so I used a set screw instead, I also cut the track piece out of the floor mat.

5AAF6F00-AB16-4E41-83E2-4384F88AFF6B.jpeg
5510C79B-4C70-484B-B7B5-907B9A0DBD0A.jpeg
E7497B7E-EEF2-49F2-AF2F-0E6E3FD5CD4C.jpeg
9C8BC6EB-47B0-4F23-9ED3-776ED7317766.jpeg


next up I need to figure out the assembly so I can separate the 2 half’s so the batteries can be changed and start work on the electronics.
 
I’ve got the closing assembly knocked out, wasn’t precious with it, as it won’t be seen.

I filed out some notches to allow extra room for the batteries and speaker.

It makes the bottom slightly magnetic, but it’s not strong enough to stick it to a vertical surface (I tried). That would have been cool, but it was never my intention, so nothing lost there. It will stick horizontally, which is neat.

I found a piece steel with a pressed patten and a hole that I think will make a nice stand in an acrylic box.

I’ve not glued it in yet as there is still few bits to clean up and glue, and I’ll need to get the leds in first, but you get the idea.

going to clean up my workspace and crack on with moding the electronics. It’s going to be tight to squeeze it all in but I did a very quick test fit minus the leds, and activation switches,

also realised I’m missing a kill switch. I want to display it in the open position. I can add that in later and just remove the batteries for now.

E2D360BE-30E5-466B-A02D-DA30CA0ECA10.jpeg
A0DBB4E4-3EC7-4243-9D81-16B9B8EF9B92.jpeg
 
I got the electronics done, we have lights and sound.

the 3 x 3mm flashing leds are grouped together and connected to 5mm red led and a separate micro lever switch. Please excuse the hot glue, I couldn’t get my heat shrink over the multiple joins.

found a sound file on the net, played it through my phone to record it. There are other similar modules that come with a 3.7v recharge battery and a micro usb to upload an mp3 file. that can play up to 8 mins but they were too large for this project. Plector labs do a TD soundboard but it was $60 last time I checked and this board was £5 all in with the speaker attached.

the 3x aaa battery pack has been swapped for a small 2x n pack

the ‘record’ switch has been removed, as it’s no longer needed - I could have left it, but wanted to save space and don’t want it going off accidentally and wiping the sound effect.

the ‘play’ switch has been swapped for a 2nd Micro lever.

I’m just waiting for the glue to cure on the closing assembly, then test that it’s strong enough to work without pulling away.

Then, I’ll mount the switches on either side of the sliding switch. Fingers crossed that it works and I don’t glue it shut by accident.

test fit the internals and glue them in with hot glue, then glue on top half and the rubber track.

So still quite a bit to do.
F7A64DD1-2851-40EA-9FC7-03910EC20DC5.jpeg
5BF92D43-7506-496F-B946-BCB330999D92.jpeg
FC3C8B41-C4AC-4AF6-AB62-D5FB28FB68CB.jpeg
53E8E383-9F54-42F5-B200-DA88708D58C7.jpeg
B2028FE2-D9C0-43D5-B280-AC90B6D94C70.jpeg
492B6031-940A-43DA-9BB8-116AC980B863.jpeg
 
Small update. I’ve glued on the track piece, and got all the electronics installed, they all fit just. Excuse the mess of tape and hot glue.

A neat quirk of the board is the switch for the sound is pressed once to start and then a 2nd time to stop it, it will play on a loop till then.

As the light are on a separate switch it’s worked out that when you turn the sound off the light will come back on, so I can run it with lights and sound, or just with the lights on there own. Not what I intended, but seems to add a little more functionality. A second happy accident.

I just need to glue the top on now that I’ll do later. I’m going to hold off on posting the finished piece till, I’ve made it’s display stand/case. It’s its own separate little build, but to me the piece isn’t complete without it.

I’m waiting for the acrylic cube to arrive in the post, before I can start this part.
5B9686EF-7B55-420E-9F11-C87A6D6036E2.jpeg
1178056D-5B4F-4BA5-AE42-B5B85FB22BCB.jpeg

B129238B-CB4E-424D-AFDE-9DDD3609F24E.jpeg
8884A0A5-2D74-45C9-A9BD-DBCC29B695B2.jpeg
 
My display cube arrived in the mail today, I need to make a base for it. Here is the manifold plate I found by the side of the road, I’m assuming it’s off of a vehicle? It needs to be cut down a little to fit. I’ve picked out some greebles. There is a solder lug anchor, carburettor pin parts, a vape part, some sort of mechanical arm and what I think is the mouth piece from a head set?

62E12906-2C48-46A9-B1A0-314B05F6BCC5.jpeg


A4FE45EA-88E7-4998-9990-146C13B0519A.jpeg
 

Attachments

  • 105CD37E-8649-4F8C-AFAB-E8BF4FBFF07B.jpeg
    105CD37E-8649-4F8C-AFAB-E8BF4FBFF07B.jpeg
    1.9 MB · Views: 74
Nice! you have a good canditate here for a part of the Jedi comlink from the prequel trilogy:
View attachment 1484572


Good eye, that is exactly what I’d bought them for. there is another used on the top.
they are also used on the visual dictionary version of the neuro-saav rangefinder that I’m building next! I had a pack of 10, so had some spare.

I think the part on the front of the communicator is also a mechanical arm, or part of steering rig from a kit, but I’ve never been able to identify it.

1DEE12D5-5261-4527-966F-308FCCE111F9.jpeg
6E16947A-284D-4904-A6E0-CA08A3FAFADD.jpeg

 
Last edited:
Display base is coming along, feels like it’s taking as long as the actual piece. The steel manifold took a surprising amount of time to cut. All greebles are pinned and glued together (not to the base yet. Just waiting for the glue to dry and the rain to stop so I can go outside and give everything a pre weathering coat of flat black

2FCE7E42-2343-449E-BCC9-9E4A11B2F80F.jpeg
 

Your message may be considered spam for the following reasons:

If you wish to reply despite these issues, check the box below before replying.
Be aware that malicious compliance may result in more severe penalties.
Back
Top