My Adventures in 3D Printing

So the hand plates I printed had some warping, which, I’m guessing, was due to the lack of supports and the high temps at which you need to print ABS.

So I went back and reprinted in a different orientation with supports. Came out pretty good! A few printing goobers, but the 0.1mm layer height really produces some impressive results!

963A7FB1-4F2C-4F86-B834-052EF0B2EEDC.jpeg


My Octoprint kit showed up yesterday, so I’ll be working on setting that up today.

Sean
 
Those are abs? They look pretty good, but I’ve heard that a good way to prevent warping in ABS is by enclosing the printer, that way heat doesn’t escape.
 
Those are abs? They look pretty good, but I’ve heard that a good way to prevent warping in ABS is by enclosing the printer, that way heat doesn’t escape.
Yes, ABS.

Thanks for the tip on the enclosure. I haven’t decided where I’m going to keep the printer yet, so I may look into that.

Sean
 
Having completed a few prints in PLA and ABS, I decided to try my hand at PETG. As with the other filaments, I have some adjustments to make, but not bad…

Sean
7D18FA75-CBC0-433A-B20D-41F7D9E8785B.jpeg
 
Yes, ABS.

Thanks for the tip on the enclosure. I haven’t decided where I’m going to keep the printer yet, so I may look into that.

Sean
Lots of great DIY options-- one of the most popular is using ikea "lack" tables and plexi. If you do make an enclosure, look into moving your power supply and mainboard outside of the printer so they don't overheat in there.
 
Dang wish I hadn't been away from the thread so long! I may have been able to post some helpful comments since I have a FDM printer.

Anyway, I manly print in PLA - I've never had a problem with basic hatchbox pla from amazon.

I've always had great success getting the level as close as possible, then micro stepping the z-offset down through the printers tuning menu.

Preach! Learning you need to adjust the z offset after any initial or calibration check is a hard lesson to learn. I have a prusa - mk3s with the bendable magnetic plate and the z-offset always fixes my adhesion problems. If you have glass hairspray or glue sticks can help also.

I have my support settings dialed in on my Prusa so I can just pull them off by hand like butter!
 
If you have glass hairspray or glue sticks can help also.
I'm with you there. I just put glue stick on before every print now. Even with the perfect settings, perfect level, perfect z-height, things can go wrong. Build plates wear, temps fluctuate-- glue sticks just make everything better. All I hvae to do now is press start and let it go.

I have been meaning to get silicon spacers to replace the springs-- keep my bed level for longer
 
I use hairspray on top of a mirror, and I never had any problems with prints sticking to the plate. The cheaper the hairspray the better.
One good thing is that as soon as my print is finished and the bed cools, the print comes off easily. Some prying is necessary to get the part off of a still warm bed. One problem, with hairspray, is also what I've mentioned about the part coming off easily once the bed is cool....if you ever have a power outage, and you don't catch it in time, the bed cools and the print comes off easily, that even a nozzle squirting out PLA can knock it around.

TazMan2000
 
After experimenting with some other filaments, I went back to PLA to print some handles and a drip hanger for the Anycubic Mono X. The handles will be adhered to the sides of the UV covers for both the printer and the wash and cure station. The drip hanger goes on the printer, and is designed to hang the build plate on after printing so the excess resin drips off and back into the vat.

For those interested:
Printers printing parts for printers…isn’t this how Skynet started…?

Sean
9CB82663-F12F-46D2-B275-88FB26B95449.jpeg
 
Picked up an Octoprint from www.th3dstudio.com (who I’d highly recommend!) and have been working through Teaching Tech’s calibration - https://teachingtechyt.github.io/calibration.html
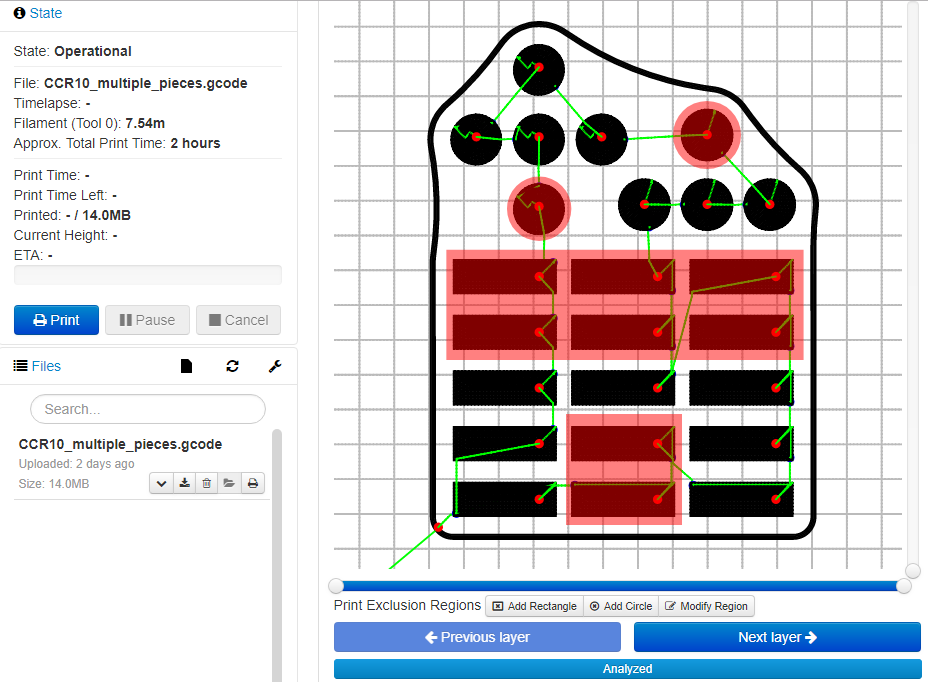
Octoprint is so helpful. I highly recommend getting the "exclude region" plug-in

You can mark areas of the build plate you want to stop the printer from proceeding with. So if you have a bunch of items on the build plate and one of them starts to fail, you can mark it in octoprint and it wont print that object further. Stops you from having to reset a print job just because 1 object fails.
 
Looks like it is turning out ok so far. I've always heard about ABS needing a heated enclosure since cooling stresses the material and causes severe warps.

TazMan2000
 
Looking good! Ditto what Taz said. ABS is very temperamental when it comes to drafts, probably why you're seeing the brim lift up there. Also, just as a mini PSA, ABS does have some pretty nasty off-gassing. Dont know where its set up in your home, but I would recommend setting it up in a remote room that can be ventilated easily once you're done

If you want to save on time and filament, Ive found that helmets dont usually require supports at the dome. The inside will string, but the outside layer prints fine-- this is one I printed this past weekend with no supports on the dome. Ignore the crazy stringing-- the 4.11 version of Cura changed my retraction settings and I haven't tuned them in again yet, haha:

image1 (1).jpeg


image0 (1).jpeg
 
Last edited:
Good news is the print finished!
C6EEA368-61CC-49C2-BEFD-58F29E0A00FE.jpeg


Bad news is it has lots of issues…

Layers separating along with the unsightly seam where my print head likes to change directions…
979A877C-3D8F-4FA0-A3D2-F84AADEF5D47.jpeg


The visor area apparently needed some supports. Any recommendations for a good Cura tutorial on supports?
01C2EAB1-B0BE-4B6E-A3D1-9EDC34574DF7.jpeg


The dome cracked around where the internal support structure was…
4FCD62AD-9F7E-4394-8907-BA70EF2A9786.jpeg


The back side is damn near flawless though, so there is hope!

CEEACAB9-EEA8-4196-8E18-25DE050A751A.jpeg


Overall happy that I was able to complete such a large print, but still lots of room for improvement!

Sean
 
The back does indeed look great!

The seam will more or less always be present-- unfortunate side effect of the printing process. If you look for "zseam alignment" or something along those lines in cura, you can set where it happens. I usually set mine to "Sharpest corner"-- that way it aligns with an edge and is hidden better.

Chep or teaching tech always has great tutorials on supports. I usually just turn them on in cura and leave them at default. Only thing Ill do is add support blockers from the left hand menu if I dont want supports in certain areas-- like at the top of the dome like I mentioned before.

Sometimes you can get away with no supports on horizontal pieces and rely on your machine's bridging capabilities, but if the line has any curve it will get messy like the visor did; straight lines only, up to around 10mm depending on your machine and it's abilities. There are bridging tests on thingiverse you can print to test out how far you can push your machine.

Layer separation is probably from printing the ABS without an enclosure. Drafts of air hit it and cool the plastic before it can bond properly. If this was happening all over I would guess that your temp needs to be upped, but since the back is perfect I would guess drafts. If this was in another material like PLA I would guess you wouldnt see those splits at all.

One thing that looks really good-- your layer alignment on the back is pretty much perfect. I have had some of the toughest time getting my z motor and leadscrew to play nicely and have had some prints with some wobble in them as the printer moves layer to layer
 
Last edited:

Your message may be considered spam for the following reasons:

If you wish to reply despite these issues, check the box below before replying.
Be aware that malicious compliance may result in more severe penalties.
Back
Top