My 1:5000 Bandai Star Destroyer

jusdrewit

Sr Member
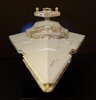
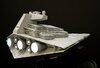
Boy, what a love hate relationship I have with this model. The casting and overall look of this model is breathtaking, the detail, proportions is everything I've wanted for a SD model all my life...

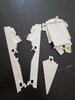
.. But boy, the inside engineering killed me as I did everything I could to avoid the 'smiley' raised bow seen in the side walls on so many builds here. I test fitted it early on and I saw the dreaded curve smiley bow so I was determined to do what I could do correct it.

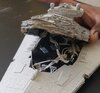
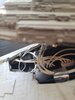
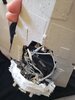
I had bought the standard non lighted SD edition, and luckily I found Bandai's led lighting kit on Amazon for around $7 so I bought two of those which I use one for this. I also found that the way to turn off the lights stock is maddeningly frustrating, which I tried to streamline to the best of my limited abilities. An external power source would be ideal but for now I've rigged it where I can slide off the wedding cake, and flick them and off with a knife without dealing with the white plastic defusers that even made it further complicated. I also removed most of the pegs which where contributing to the pull off the bow upward it seemed. Once I removed those, the side walls seemed fairly straight to me thankfully. Removing the light leaks wasn't as bad as I feared also. I did some very light Aztec gray paneling via airbrush and later marker, however they don't show up real good in the photos. Sadly near the end I realized I lost my Millennium Falcon during my build, does anyone know where we can get another one? :(

Here's some pics I took with my cell phone, I tweaked some of the lighting as it wasn't the best in my living room where I took though. anyways hope everyone likes! A shout out to all those before me who I tried to emulate.

20200703_012957.jpg20200703_014421.jpg20200703_014542.jpg20200703_014809.jpg20200703_014903.jpg20200703_015212.jpg20200703_015302.jpg20200703_015353.jpg20200703_015731.jpg20200703_020508.jpg20200703_020634.jpg
 

Attachments

  • 20200703_011658.jpg
    20200703_011658.jpg
    484 KB · Views: 385
  • 20200703_015006.jpg
    20200703_015006.jpg
    988.5 KB · Views: 366
  • 20200703_012851.jpg
    20200703_012851.jpg
    796.1 KB · Views: 396
Well done! I am exceedingly jealous you were able to minimize the 'smile' of the bow. I did everything I could think of to eliminate the one on mine, to no avail. This was the most anticipated kit I ever desired, and upon opening the detail was not only balls-on-accurate but I was beyond eager to get that build finished and painted. Took me about 4 weeks - and I have to say that my build was without question the biggest disappointment in a model I have ever experienced - because of that bow 'smile' and rise. It is the only Bandai kit I have made to date that has caused me any disappointment. And I paid big bucks for it when it was first released - and to-date is the most expensive kit I ever purchased.

I'm happy to see your build has overcome the great warping and it looks terrific, even via smartphone photography.
 
I like the colour, nice and white as it should be (y):)
Thank you! I read a bunch of 'what color is a SD threads' and decided white with a bare minimum tiny bit of weathering was best.

Well done! I am exceedingly jealous you were able to minimize the 'smile' of the bow. I did everything I could think of to eliminate the one on mine, to no avail. This was the most anticipated kit I ever desired, and upon opening the detail was not only balls-on-accurate but I was beyond eager to get that build finished and painted. Took me about 4 weeks - and I have to say that my build was without question the biggest disappointment in a model I have ever experienced - because of that bow 'smile' and rise. It is the only Bandai kit I have made to date that has caused me any disappointment. And I paid big bucks for it when it was first released - and to-date is the most expensive kit I ever purchased.

I'm happy to see your build has overcome the great warping and it looks terrific, even via smartphone photography.

Thank you, I really appreciate it! I've read all your SD threads and your custom Zvezda is absolutely jaw dropping. I absolutely concur with you about this being the only Bandai model that's disappointed and frustrated me to no end. My stomach sank as I saw that curvature that so many here have experienced. It really is just a rare instance of poor internal engineering by Bandai.

I'm sure you've tried so this, but my fix was just to remove all the pegs that seemed to be pulling it, I also noticed that when I added in some of those white defusers they also added to the pull so most of them were eliminated. When I eyeballed all 4 edges of the two hulls and the side walls they were straight right out of the box so something had to be pulling them creating the smiley when I snapped everything into place. Essentially after I had put down the sidewalls, I just laid the top hull on top of the bottom one, so there was zero pressure - verified it was still straight then applied glued when I was 100% sure. Where the side walls join there was tiny raised ridges with little divots that helped me line it up also. Thankfully this seemed to work and I could work on the next headache on this kit, the lighting setup.

Anyways, I hope one day you'll be able to finish it, I know we all would love to see your finished product!
 
Excellent!

Any chance you have some shots of the interior, particularly what was removed to avoid the "Bandai Star Destroyer smile"?

Sure, I'll take some when I get home. All I can do is remove the top wedding cake portion so some might be hidden further down the hull but I'll try. Just a warning though, it's not a pretty sight lol since the white defusers have predetermined slots for the LEDs to fit, I had to find alternative ways I could have the LEDs placed in the same location without them so it's pretty jerryrigged inside with tape and cardboard. Luckily that's all hidden :D
 
Maybe you used an angle that minimizes it, but I don't really spot the pronounced bend I have seen in a lot of other builds

Oh. It is there - trust me. Head-on shots showcase that 'smile' in egregious fashion.

That, despite the fact I cut the forward insertion pegs off the bow completely. That reduced the overtly serious warp, but it was still there - and enhanced once I got the diffuser shroud placed. It was the one kit I wanted to build out of the box without any major enhancements, lighting or fuss since I have been so invested in the Zvezda. The only extra effort I put into the kit was to fill the window holes with Elmer's glue to eliminate the burn outs from the LED lighting and fill some of them from inside to create multiple red and orange lights.

Knowing what I do now, if I was going to build the kit today and was not invested in the Zvezda - I would scrap the entire diffuser system and put in my own fiber through the pre-drilled holes and install my own 3 volt lighting kit, completely remove all the insertion pegs for the forward bow section and glue the hulls together.
 
Ah, this came out nicely! Like Invar said, mine has been in the box since I got frustrated with the smile. I've ditched all of the white diffusers and snipped the pegs off of the front, so maybe mine will be half as good as this one...?

SB
 
Really nice build, really like the nuisances of colour throughout the build.

Thank you very much!

Ah, this came out nicely! Like Invar said, mine has been in the box since I got frustrated with the smile. I've ditched all of the white diffusers and snipped the pegs off of the front, so maybe mine will be half as good as this one...?

SB
Haha I'm sure it will be good, good luck on yours!

Here is mine with the cake portion removed, as I said it's super ugly inside. Unfortunately both hulls are glued down so I can't show more of the internals. It's pretty much how they designed it except for the absence of the defusers. Here's also a photo of all the defusers I didn't use if that helps.

20200705_095624.jpg
20200705_094947.jpg
20200705_094529.jpg
20200705_094443.jpg
20200705_094416.jpg
 

Attachments

  • 20200705_095624.jpg
    20200705_095624.jpg
    1 MB · Views: 258
  • 20200705_094947.jpg
    20200705_094947.jpg
    1.1 MB · Views: 269
  • 20200705_094529.jpg
    20200705_094529.jpg
    1 MB · Views: 232
  • 20200705_094443.jpg
    20200705_094443.jpg
    1.1 MB · Views: 184
  • 20200705_094416.jpg
    20200705_094416.jpg
    1.2 MB · Views: 231
Absolutely awesome dude. I hope mine looks as good when I'm done. I'm always blown away how big this thing looks in pics and how small it is in real life. Still the most accurate detail and proportion wise than any other model. :)


Ben
 
Ah, this came out nicely! Like Invar said, mine has been in the box since I got frustrated with the smile. I've ditched all of the white diffusers and snipped the pegs off of the front, so maybe mine will be half as good as this one...?

SB
Thank you! Mine was in the box quite a bit too, I believe I got it last September and just finished last week lol sure was frustrating

Thanks for those. Any tool in the arsenal to combat to SD smile will be useful
Good luck! Hope they help in any small way, that smiley is so aggravating.

Absolutely awesome dude. I hope mine looks as good when I'm done. I'm always blown away how big this thing looks in pics and how small it is in real life. Still the most accurate detail and proportion wise than any other model. :)


Ben
Thanks! I totally agree, I can't believe how good it looks and with the right lightning conditions it's just a beauty and looks so much larger than it's 12" length. I hope this weekend I can try and take some better photos of it with a slightly better camera :)
 
Congrats.

I am glad you fixed the bow. I ordered this kit a month ago for xmas, it will be my first kit.

When i made some research about how to paint this, found out about the infamous bow. I know my OCD won't let pass this.

I like the very light color you used. I found many Star destroyer too dark. I always think about the devastator which seems is quite white under light.
Will make some try with Tamita spray paint, maybe Light grey primer (w/ masking tape for the grey "panels") and Insigna white.
Thank you! I did the same thing, light grey for the primer then masked it off to create the panelling. If doesn't show up well on the photos I took but it looks like pretty good in person. Good luck!
 
This thread is more than 3 years old.

Your message may be considered spam for the following reasons:

  1. This thread hasn't been active in some time. A new post in this thread might not contribute constructively to this discussion after so long.
If you wish to reply despite these issues, check the box below before replying.
Be aware that malicious compliance may result in more severe penalties.
Back
Top