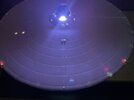
Hi RPF, long time not see. Iv been working on my 1:350 Enterprise refit for a while and i kinda want to show my progress to see what people think, this project has so far stretched over the birth of my daughter a pandemic and any about 3 jobs haha. Iv been moving slowly as iv seen the results of so many talented model makers work that i really wanted to do the kit justice and achieve a good finish. Any way with out further delay her she is.


You are using an out of date browser. It may not display this or other websites correctly.
You should upgrade or use an alternative browser.
You should upgrade or use an alternative browser.
My 1:350 Enterprise refit (picture heavy)
- Thread starter Dan3088
- Start date
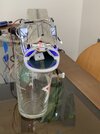
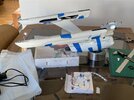
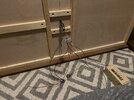
I set off assembling and detailing the support kits, the arboretum, shuttle bay and officers lounge. The work bees were especially tricky to detail given their size. I spent a fair few hours just light blocking the interior of all the main sections of the body and saucer, aluminium tape is great for this but bear in mind any electricals can short out on it if not properly insulated.
Attachments
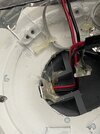
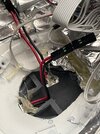
For the lighting i went with the pre assembled kit from Trek Modeler this was mid March 2020 so full scale pandemic lockdown was in place and i had a long lay off from work, progress was huge and i couldn't have been happier with the lighting kit when it arrived from America in the post. Unfortunately however, the kit was wired slightly wrong meaning the startup sequence did not follow the correct pattern, the guys at Trek Modeler were great and after a quick 6000 mile return trip to Florida and back my lighting kit was working perfectly. I cant stress enough how good this kit is, the instructions are a god send and the workmanship is excellent.
The lighting kit went in a dream and i glued up the engineering hull and nacelles. As per the lighting kit instructions each install was tested and retested before gluing.
Attachments
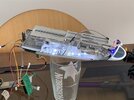
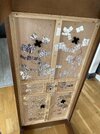
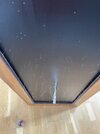
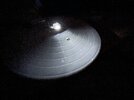
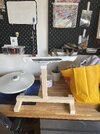
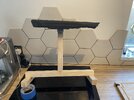
At this point i take a total detour to build a stand for my developing model. My idea was to repurpose a coffee table that i had laying about in to a fully illuminated stand to compliment the model. Using fibre optic wire i created a star field on the base of the table and a reinforced mount for the model to sit on. This all involved days of drilling holes running cable and gluing. I was quite satisfied during the first light up test it looked just how i imagined it.
Attachments

Hunk a Junk
Sr Member
Looks great! This kit is such a chore to build! It takes so much patience just to get it built much less do it right.
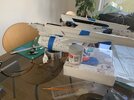
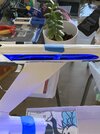
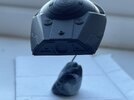
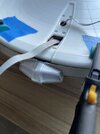
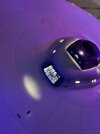
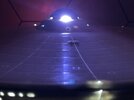
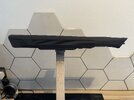
Anyone who has tried to light this kit has probably found out that the spotlights are a challenge to get right, TMP used a back lighting method for some of the insignia lights and registration lights. While i used this method in places i really prefer actually projecting light on to sections of the ship, i fell i looks more natural. I decided early on i wanted the name and registry light to be cast from the bridge, however the gap from the bridge rim to the saucer just isnt tall enough to cast the light, the angles are all wrong. Trek Modeler have instructions on raising the bridge using styrene strips but it doesn't look good or refined and with all the putty and sanding work it would need i went a different direction.
I designed a raised bridge module in cad with all the detail i could want and printed it. I don't mind saying it was there was a lot of trial and error in the design process to accommodate the resin printing process but all in all im happy with the results.
I designed a raised bridge module in cad with all the detail i could want and printed it. I don't mind saying it was there was a lot of trial and error in the design process to accommodate the resin printing process but all in all im happy with the results.
Attachments
Totally agreed should be worth it in the end. Iv probably gone off to the deep end on some of the stuff iv done, but it has been great fun.Looks great! This kit is such a chore to build! It takes so much patience just to get it built much less do it right.
Hunk a Junk
Sr Member
Totally agreed should be worth it in the end. Iv probably gone off to the deep end on some of the stuff iv done, but it has been great fun.
There's no deep end on this kit. It's a series of bottomless pits!
 The only question is which pits we choose to fall down.
Haha ha you are not wrong, iv just checked my profile and i started a thread for this kit in 2013 coming on 10 years and still not done.There's no deep end on this kit. It's a series of bottomless pits!
Hunk a Junk
Sr Member
Cool! You're almost a third of the way to finished!Haha ha you are not wrong, iv just checked my profile and i started a thread for this kit in 2013 coming on 10 years and still not done.
Hello anyone who happens to read this, between my job, baby and rebuilding my 3d printer i have not had much time to work on the Enterprise, that said this weekend i have made some progress.
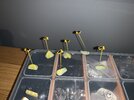
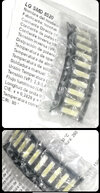
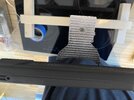
For a couple of weeks now i have been trying to sort the forward registry lighting to a point im happy with, the Lighting kit led just didn't project the light i wanted so after much head scratching i had a brainwave and sourced some rectangular SMD’s that fir perfectly in the cut out in the bridge module i designed. The SMD i found are used in LG Led tvs and run natively at 3v. The only real draw back is wiring them is a pain in the ass given their fiddly size, luckily they were 10 for around £3 so breaking a few wasn't a big worry.
For a couple of weeks now i have been trying to sort the forward registry lighting to a point im happy with, the Lighting kit led just didn't project the light i wanted so after much head scratching i had a brainwave and sourced some rectangular SMD’s that fir perfectly in the cut out in the bridge module i designed. The SMD i found are used in LG Led tvs and run natively at 3v. The only real draw back is wiring them is a pain in the ass given their fiddly size, luckily they were 10 for around £3 so breaking a few wasn't a big worry.
Attachments
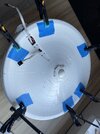
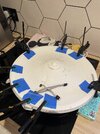
I have also arrived at the point in time i have sealed the final half of the saucer section, this is a big moment that i have worried about for some time. This now means i have all the major components assembled and after some filling and sanding of the saucer edge i can start painting.
Attachments
I am indeed, its my first time lighting a kit using this method and im not confident the final effect will be visible once painted.Pretty nice. Are you using the 'Raytheon effect', for the spots?
Another update from the slowest moving build ever haha, first nacelle in to the base primer coat after much sanding and filling.
Attachments
TazMan2000
Master Member
The painting on on the shuttles and the hanger is amazing.
TazMan2000
TazMan2000
Thank you so much, learning all the time. They were my first attempt at airbrushing, this hobby has so many skills to get to grips withThe painting on on the shuttles and the hanger is amazing.
TazMan2000
Similar threads
- Replies
- 67
- Views
- 8,606
- Replies
- 11
- Views
- 1,408
- Replies
- 1
- Views
- 974