superjedi
Sr Member
Hi all,
I had commented in Guy Cowen's thread that I was working on weathering my Han EE, and didn't want to post my own work in his thread.
I saw some pics of Guy's EE over on Rebelscum when he first posted them, and that pushed me over the edge to do mine! :lol I had been debating it for a long time, and his came out so great that I wanted to try it, too.
I disassembled the blaster into as many different pieces as I could. It wasn't that complicated. I mainly only needed an Allen wrench for the screw on the flash hider, and a common screwdriver for the rest of the parts. The scope was actually glued into the cradle, but I used some plain ol' muscle power to pull it out.
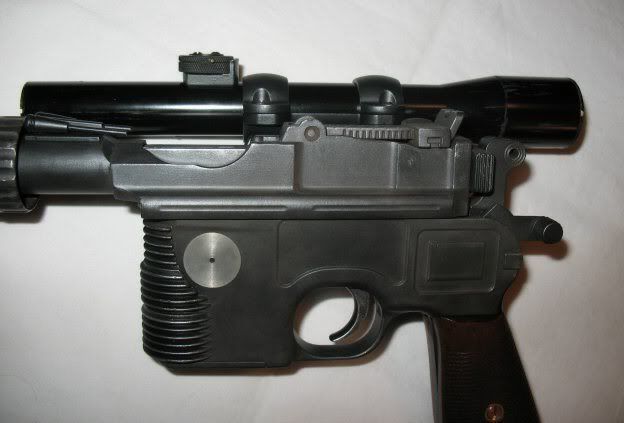
I basically used 2 shades of Humbrol Metal Cote paints: Polished steel, and Aluminum. I started by dry-brushing the Polished steel onto the blaster, giving it an overall slightly uneven finish. I used a VERY dry brush to do this, and really 'scrubbed' the paint onto the blaster. Here's an overall shot.

I went back over parts of the blaster, making some panels subtly lighter. Especially the hammer area, and some edges, to show more wear.

Here's a view of the opposite side as well.

As I really liked the way Guy's blaster was turning out, I followed one of his techniques, which was scrubbing some rust-toned pastel into the surface right after dry-brushing the steel. I used some pigment powder from a weathering set I had bought a while back. The shade I used was called "Soot," and is basically a very dark brown rusty shade. Almost like an oily black. Applying the powder (which was also scrubbed into the surface) really changed the tone of the steel! I applied this only to certain areas, to give a subtle color shift over different sections of the blaster.
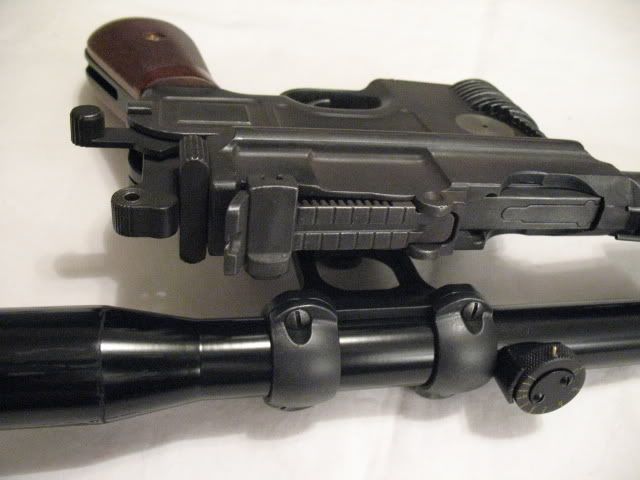
All the lighter edge wear and chips were done with Humbrol Aluminum. You can see these pretty easily on the horizontal bar and the grill on the front of the magazine. Some of the other lighter edges are more subtle, and may not show up too well in the pics.
In the following pic, you can see a slight difference between the magazine area below the horizontal bar, and the upper receiver. This is from that pigment powder.

The varying tones show up (I hope) in this pic as well.

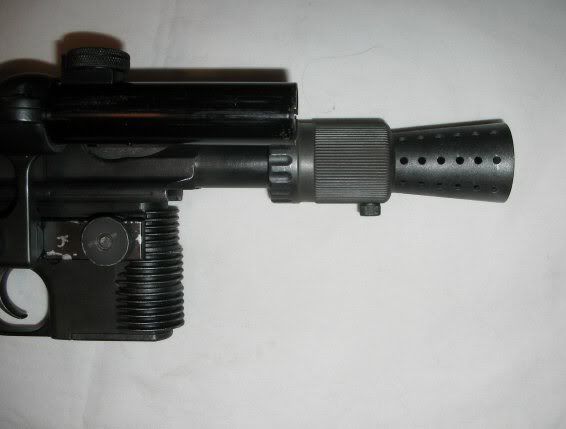
For the flash hider, I dry-brushed on some Tamiya Gun Metal over most of its rear section, and part way up the cone. Then I used that same 'soot' powder to make it more dingy looking. After that, I dry brushed some Humbrol Aluminum in random areas around those bullet-shaped cutouts, and close to the muzzle. Here's a couple of angles of the flash hider.


As Guy mentioned, the blaster's scope is actually brass! So to weather it, I wrapped some tape close to the ends, leaving the thin end caps exposed. I took a coarse file, and chipped away the black paint, exposing the brass beneath. Then, I dragged the file along the body of the scope, making thin longitudinal scratches. I didn't do much else to it, except making little chips here and there to expose more of the brass. I didn't want to mess with the finish of the scope, as I believe it appears different than the main body of the blaster.


So there it sits! The weathering is pretty subtle in places, but I really like it better than the pristine look it had.
Thanks again to Guy. I wouldn't have started this if I hadn't seen his skills in action! :thumbsup
Thanks for looking,
Eric
I had commented in Guy Cowen's thread that I was working on weathering my Han EE, and didn't want to post my own work in his thread.
I saw some pics of Guy's EE over on Rebelscum when he first posted them, and that pushed me over the edge to do mine! :lol I had been debating it for a long time, and his came out so great that I wanted to try it, too.
I disassembled the blaster into as many different pieces as I could. It wasn't that complicated. I mainly only needed an Allen wrench for the screw on the flash hider, and a common screwdriver for the rest of the parts. The scope was actually glued into the cradle, but I used some plain ol' muscle power to pull it out.
I basically used 2 shades of Humbrol Metal Cote paints: Polished steel, and Aluminum. I started by dry-brushing the Polished steel onto the blaster, giving it an overall slightly uneven finish. I used a VERY dry brush to do this, and really 'scrubbed' the paint onto the blaster. Here's an overall shot.

I went back over parts of the blaster, making some panels subtly lighter. Especially the hammer area, and some edges, to show more wear.

Here's a view of the opposite side as well.

As I really liked the way Guy's blaster was turning out, I followed one of his techniques, which was scrubbing some rust-toned pastel into the surface right after dry-brushing the steel. I used some pigment powder from a weathering set I had bought a while back. The shade I used was called "Soot," and is basically a very dark brown rusty shade. Almost like an oily black. Applying the powder (which was also scrubbed into the surface) really changed the tone of the steel! I applied this only to certain areas, to give a subtle color shift over different sections of the blaster.
All the lighter edge wear and chips were done with Humbrol Aluminum. You can see these pretty easily on the horizontal bar and the grill on the front of the magazine. Some of the other lighter edges are more subtle, and may not show up too well in the pics.
In the following pic, you can see a slight difference between the magazine area below the horizontal bar, and the upper receiver. This is from that pigment powder.

The varying tones show up (I hope) in this pic as well.

For the flash hider, I dry-brushed on some Tamiya Gun Metal over most of its rear section, and part way up the cone. Then I used that same 'soot' powder to make it more dingy looking. After that, I dry brushed some Humbrol Aluminum in random areas around those bullet-shaped cutouts, and close to the muzzle. Here's a couple of angles of the flash hider.


As Guy mentioned, the blaster's scope is actually brass! So to weather it, I wrapped some tape close to the ends, leaving the thin end caps exposed. I took a coarse file, and chipped away the black paint, exposing the brass beneath. Then, I dragged the file along the body of the scope, making thin longitudinal scratches. I didn't do much else to it, except making little chips here and there to expose more of the brass. I didn't want to mess with the finish of the scope, as I believe it appears different than the main body of the blaster.


So there it sits! The weathering is pretty subtle in places, but I really like it better than the pristine look it had.
Thanks again to Guy. I wouldn't have started this if I hadn't seen his skills in action! :thumbsup
Thanks for looking,
Eric


