Analyzer
Master Member
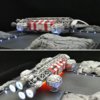
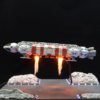
I always loved the design of the Eagle Transporter.
This kit is listed as 1/72, but it is closer to 1/100 or so. There is also a lot of shape issues with the kit as well as not having an open cage which really helps sell the look of the kit. I have seen lots of amazing builds that leave little if anything of the original kit left when done.
Since I have the 1/48 version, I am not going to go all out fixing everything, but I do want something that looks a little better than the out of the box kit. Hopefully at some point they will do a proper 1/72 version that is as good as the 1/48 one, but until then...
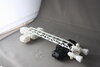
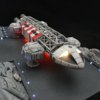
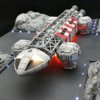
First, fixing the angles of the spine. The out of the box version just looks noticeably wrong in it's shape/ So cut off all the cross supports, shorten them a tiny bit and glue back together at a new angle. Also the out of the box spine is missing all of the bottom cross bars. The sprues from a Bandai Garmillas warships kit were the prefect diameter to for it I used them for the bottom bars


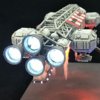
Then opening up the cage parts. Unfortunately the bars are only hollow half rounds. This means you either have to rebuild the whole thing from scratch or settle for cutting out the openings and not worry about the rest. I chose to just cut them out as I the other way is may more time than I want to invest in it


Next is to open up the landing gear support boxes

And open up this part as well


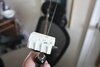
This also means there are non of the internal parts, so scratch building them it was...
I used some landing gear parts form a 1/72 Cosmo Falcon along with brass tubing to simulate these parts

.JPG")
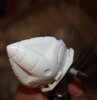
I made a mold of the vents on an N scale F-Unit train engine and used various styrene bits


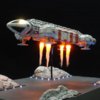
It's a little rough, but it is going to be hard to see behind the cage anyway so I'll settle for it
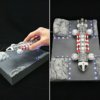
And all together
.JPG")

with some primer to even things out


Next up, I have to do it all over again for the interior parts for the front cage
This kit is listed as 1/72, but it is closer to 1/100 or so. There is also a lot of shape issues with the kit as well as not having an open cage which really helps sell the look of the kit. I have seen lots of amazing builds that leave little if anything of the original kit left when done.
Since I have the 1/48 version, I am not going to go all out fixing everything, but I do want something that looks a little better than the out of the box kit. Hopefully at some point they will do a proper 1/72 version that is as good as the 1/48 one, but until then...
First, fixing the angles of the spine. The out of the box version just looks noticeably wrong in it's shape/ So cut off all the cross supports, shorten them a tiny bit and glue back together at a new angle. Also the out of the box spine is missing all of the bottom cross bars. The sprues from a Bandai Garmillas warships kit were the prefect diameter to for it I used them for the bottom bars
Then opening up the cage parts. Unfortunately the bars are only hollow half rounds. This means you either have to rebuild the whole thing from scratch or settle for cutting out the openings and not worry about the rest. I chose to just cut them out as I the other way is may more time than I want to invest in it
Next is to open up the landing gear support boxes
And open up this part as well
This also means there are non of the internal parts, so scratch building them it was...
I used some landing gear parts form a 1/72 Cosmo Falcon along with brass tubing to simulate these parts
I made a mold of the vents on an N scale F-Unit train engine and used various styrene bits
It's a little rough, but it is going to be hard to see behind the cage anyway so I'll settle for it
And all together
with some primer to even things out
Next up, I have to do it all over again for the interior parts for the front cage
 in case anyone wonders what those orange "stains" are