Paul6700

Well-Known Member
RPF PREMIUM MEMBER
Acquired the parts of a full scale MSE-6, better known as the mouse droid, from a fellow R2 builder. He slowly accumulated all these parts from a variety of part runs on the Mouse Builders Forum and decided to ultimately not to build this one. When I bought all of this off him I was thinking I would just make another mouse droid, as I already built a scaled version of it years ago and this one would be a 1:1 replica.

I was not planning on documenting the build as there are so many good examples of how to build a mouse droid, but I got his crazy idea to put something inside the droid. There is mouse droid out there with a Porg inside driving it around, which inspired me to put something inside this thing. Also, the full size droid is bigger than you might think which lends itself to having something inside.

So my plan is to combine this:
14445141_10157503425000594_9209180429380171133_o.jpg

This is the actual mouse droid on exhibit
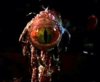
With this:
dianoga.jpg

This is the Dianoga from the special edition release of ANH.

I believe the original Dianoga puppet was built by Phil Tippet for Star Wars and a few years ago it came for auction at the Prop Store. I am going to use most of those original puppet pictures as reference.
 

Attachments

  • dianoga.jpg
    dianoga.jpg
    7.3 KB · Views: 408
Last edited:
On to the build:

2019-05-02 22.47.47.jpg

Since I acquired all the parts together, I am not exactly sure who did the original part runs. I believe this is the resurrection chassis which was built based on a 1/10 scale RC car. The wheels are 3d printed to simulate the original look of the wheels on the original bot.

2019-05-04 15.46.02.jpg

The full scale mouse droid shell is vacu-formed styrene and is readily available. This shell was scribed on the inside as to where the wheel cutouts should be. I ended up building the support structure fir the top and bottom shells out of .5 inch by 1.5 inch poplar.

2019-05-04 15.54.18.jpg

Also used scrape pieces to make sure that the center section was set back .5 of an inch.

2019-05-04 18.32.39.jpg

The middle section was attached to the bottom section and everything is press fit into the shell. I used a router to trim away the excess plastic.

2019-05-05 15.03.20.jpg

Next, used a Dremel to cut out the wheel wells and any plastic that was in the way of the chassis.

2019-05-05 16.21.02.jpg

I used aluminum standoffs to attach the chassis to the bottom shell. A couple extra pieces of poplar serve as the cross bars for those attachments. Also added aluminum bar stock as keys for the top and bottom shells to align and magnets on both shells.

2019-05-05 16.22.42.jpg

Now it begins to look like a mouse droid.

14468559_10157503424710594_145841454209798566_o.jpg

Next I added the front bumper, this is a picture of the original droid. The very front bumper looks like it was part of whatever RC car was used. It also looks like it could be metal.

2019-05-11 19.12.36.jpg

Mounted a piece of wood to the bottom of the plastic shell.

2019-05-11 21.36.00.jpg

Then added styrene .5 inch square stock to the wood piece and also ran square stock back to the chassis so that it would also work as a bumper.

2019-05-11 21.55.57.jpg

The finished look of the front bumper.
 
Last edited:
The Dianoga will live in the center section of the droid and I wanted a hatch or door that wouldn't be super noticeable. I also did not want the whole top shell to move.

2019-05-18 11.35.01.jpg

There are two top pieces that get bolted to the top shell and I used them to decide where and how the hatch will open. Basically the forward piece will still be attached to the top shell and the back piece will be bolted to the hatch. First step, cut out the hatch.

2019-05-18 11.23.28.jpg


2019-05-18 11.23.32.jpg

Using styrene square stock, I made an upper and lower rectangle for the opening.

2019-05-18 14.45.59.jpg

Once I figured out the proper height, I was able to build the Dianoga tank.

2019-05-18 14.45.08.jpg


2019-05-19 13.45.02.jpg

The hatch just placed so I could figure out the hinges. Right about now I figured out that the hinges need to be moved further back.

2019-05-29 21.02.24.jpg

To get the hatch to open properly, I added another piece of styrene square stock and cut the back rail to allow the hinges to be set further back. The hatch will be operated by a servo further down.

2019-05-29 21.02.44.jpg

This tank will eventually be skinned in styrene sheets.
 
I so want to make a 1:1 RC version. If only, to make it with a side ramp that opens, and a tiny wind up-up AT-AT that comes skittering out.
 
I did not take a lot of individual pictures of the greeblies being assembled as they are well documented many times over. You can head to the Mouse Droid Builders forum or Facebook page and get blueprints or files. The picture below has one top set built out of styrene, the one on the far right is 3d printed or you can go the route I did and the mostly metal components.

2019-05-30 22.37.54.jpg


2019-06-11 22.51.34.jpg

These perf boards are actual replicas of the originals and I believe they are available through the club. I bought chips, chip sockets and disks to match the originals.


2019-07-03 14.54.03.jpg

Use glazing putty to fill in gaps and coat the wood to keep it from looking like wood.

2019-07-03 14.54.58.jpg

Using the original droid for reference I bolted all of the pieces onto the top shell.

2019-07-03 14.55.17.jpg
 
Added old circuit boards and styrene tubes around the inside of the tank and styrene sheets all the way around to seal the sides. The bottom will be finished later once I have the Dianoga.
2019-07-03 14.56.04.jpg


Styrene in different thicknesses was used for the hatch detail and I added tubes for the LED's to sit in.
2019-07-07 19.50.06.jpg
 
Wicked chassis! Are the chassis really available now?

I know a few years ago when I wanted to build one there isn’t a single chassis on the market and you had to have your own laser or water cut..

There was a chassis made years ago, and at the time those older chassis were fetching BIG bucks
 
Wicked chassis! Are the chassis really available now?

I know a few years ago when I wanted to build one there isn’t a single chassis on the market and you had to have your own laser or water cut..

There was a chassis made years ago, and at the time those older chassis were fetching BIG bucks

I am not sure if this chassis is still available or not. You can check in with gvardaman at astromech.net as I think he was working on a newer chassis. Sorry I am not more help in this area.
 

Your message may be considered spam for the following reasons:

If you wish to reply despite these issues, check the box below before replying.
Be aware that malicious compliance may result in more severe penalties.
Back
Top