MOS General Zod Kryptonian Build, slow but steady

Creator1326

Well-Known Member
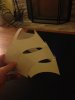
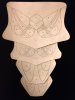
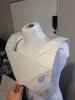
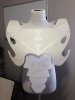
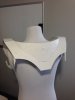
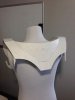
New to The RPF here. I must say I am completely amazed at the talent here. I'm especially excited that since this is my first armor build I'll be able to detail it here. And with the awesome work of others like carl9149 I'll have an "undersuit?" to match the movie with my armor after 45 days. Here are a few shots of the progress since last week. All posterboard patterns until the Worbla arrives.

This starts the whole process with digital calipers, french curves, and taking measurements from the DC Iconic Variant statue of Zod.
French Curves.JPG
 
Last edited:
The pauldrons are still giving me fits. The last "rib" is part of the assembly but is jointed to a separate piece on the bicep. It is linked to the shoulder cuff though so all three stay together. I do have the "blade" thing that extends out from the back of the bottom rib, it's not pictured.
 

Attachments

  • pauldron pattern1.JPG
    pauldron pattern1.JPG
    804.2 KB · Views: 426
Last edited:
Next up are the abdominal plates. I eyeballed and traced the general shape from a close up picture. I'm thinking these will be joined with some kind of fabric elastic bands since when I bend over they buckle, if they slid past each other that would keep them tight against my body. I also plan to put a few sections of felt so that as the front slides against the back they don't get all scratched up. The numbers you see are the level of material layers with 0 being the back / baseplate they are built on. these will be a craft foam build up on a warbla base.
 

Attachments

  • abdominal.JPG
    abdominal.JPG
    840.5 KB · Views: 419
Last edited:
Here's the front of the chestplate. I had to fix the curves on the strap hook sections since they were way too wide and where no where near the ab plates. You can see the cuts by the hooks. You can see up by the shoulders there are standoffs. This took a bit to figure out the right shape so it was flat on the top and curved off the front and back and fit my shoulder. FYI the dress form is a mens 40R sized form which is also my suit size. But I need to lose an inch or two from the gut :-/
]
 

Attachments

  • Front shot.JPG
    Front shot.JPG
    800.8 KB · Views: 409
Last edited:
Here are the fixed strap hooks and the ab plates put into place.
 

Attachments

  • Fixed Front and ab plates.JPG
    Fixed Front and ab plates.JPG
    687.5 KB · Views: 353
Last edited:
Here's the back of the chestplate, backplate? IDK whatever.
 

Attachments

  • back shot.JPG
    back shot.JPG
    662.1 KB · Views: 338
  • back-shot.jpg
    back-shot.jpg
    10.8 KB · Views: 313
Last edited:
The back is a long way from done, even with a cape I want this to be a replica. This is the "Butterfly of carpal tunnel" cape support. It looks like the cape actually starts just under the shoulders, over the butterfly but under the bottom of the top most part of the back of the chest plate. Ya it sticks out funny, it looks better when I curve them towards the back.
Butterfly-of-Carpel-Tunnel.jpg
 
Last edited:
I figured after the butterfly I needed a break so why not attempt to sculpt one of the 300 or so slats I'm going to need for the various side, leg and back straps. This is going to be the worst if I can't mold or 3D print these bad boys. Just need to learn autocad now, ugh.
Slats.jpg
 
Last edited:
The cod piece and cod straps and chest straps are done and "inserted" into the strap matrix that hangs above the tailbone. The strap matrix is three main pieces and then details on top of that, it looks supportcomplex but it's not that bad (I think). These four straps will have two more of the slated straps pass under the whole assembly, JOY! I plan on just making the straps from warbla and foam only I'm going to make another sculpey clay mold so I can get in the three bumps and some of the raised details. I could just as easily I guess not waste the warbla and make casts of these belt segments. Ideas? Experiences?
Cod-Back.jpg
 

Attachments

  • back-shot.jpg
    back-shot.jpg
    10.8 KB · Views: 301
Last edited:
Here's the front of the cod with the chest strapped in and the ab plates line up nicely with the detail on the front of the cod. Again it looks like a mess of lines but that was me breaking it down into basic shapes that are layered up.

Yes I've been trying it on throughout the process and even the straps all fit. I guess it's back to the pauldrons for now.
Cod-Front.jpg
 
Last edited:
Here's a segment of the side straps and cod straps. I decided I'm going to cast these since sculpting one took about an hour or so this morning.
Belt-Buckle.jpg

Not sure why so many of my pictures keep going AWOL. Grrrr.
 
Last edited:
Alright. Started casting the side and code strap segments. Using the "Amazing casting" products. The mold is made from their amazing casting putty which is nice and flexible but I ended up with a crease on one side inside of the mold. This makes one corner of the segments a little fatter on one side but nothing a power sander can't take off in a few seconds.

The top right is the original scuplt. The bottom right is one of the castings and you can see the mold with another cast in progress on the left.
Castings.jpg
 
Last edited:
I have some minor tweaking to do on the chest front. Yes there is a divot that runs down the front center. Don't mind the lines, I cut out the worbla 1/2" larger to stretch around the back.
chestplate-front.jpg

- - - Updated - - -

Here's the back collar, yes same as the front cut larger so I could stick it to the inside back. The wrinkles at the bottom won't show, there is a bumpout I still need to add.
chest-plate-back-collar.jpg
 
I formed the ab plates by making a cardboard form with a slight angle to it.
ab-plate-forming.jpg

- - - Updated - - -

Here's the top plate all done. I should have done four layers but decided that level of detail wasn't necessary.
ab-plate-top-formed.jpg
 
Here's all four plates. The top two are the same design, the bottom two are the same design and all have just three layers of warbla.
ab plates formed.JPG
 
This is the "backplate" that goes right below the collar and holds the two butterfly shaped "wings" that support the cape. I was pleasantly surprised at how nice and easy sheet PVC is to heat form. It's good for structural items that you build on with detail later.
Backplate.jpg
 
Cod piece belt is now done. It's a tiny bit off center and don't mind the lines, I was using some scrap pieces. I might fool with centering later but hopefully nobody is looking at my crotch that closely lol.
cod-piece-belt.jpg
 
This seems to be working for a belt segment. I carved out four holes with a dremel and used craft tin to make the buckle and then filled in the holes with more of the same resin. I used tin since I'm going to stick the other half of the velcro on and it needs to stay flat. I also made two buckles because I don't want it to twist on the strap. I thought about using a big long buckle but that's a lot of material to remove, replace and it's harder to get the velcro on both sides.
Belt-Segment.jpg
 
Last edited:
This thread is more than 7 years old.

Your message may be considered spam for the following reasons:

  1. This thread hasn't been active in some time. A new post in this thread might not contribute constructively to this discussion after so long.
If you wish to reply despite these issues, check the box below before replying.
Be aware that malicious compliance may result in more severe penalties.
Back
Top