Morlock Temple

epoxinator

Well-Known Member
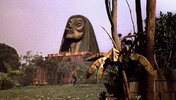
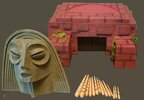
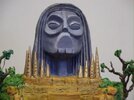
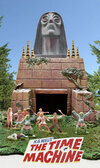
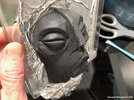
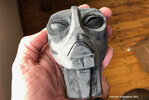
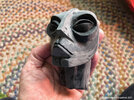
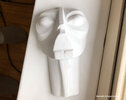
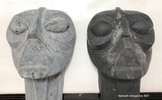
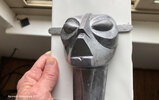
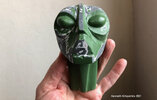
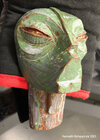
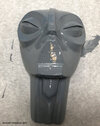
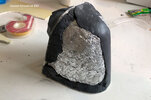
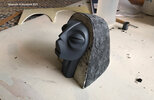
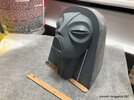
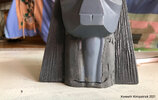
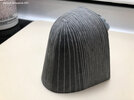
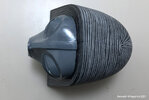
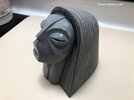
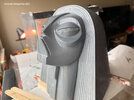
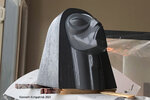
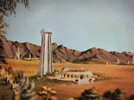
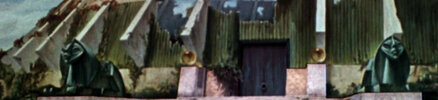
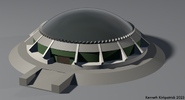
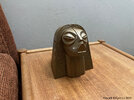
Many people have a model of the Time Machine from the 1960 film. But there are other elements in the film that I like quite a lot. I'm a fan of Wah Ming Chang, and he did some of my favorite elements in this film, including this head statue on top of the Morlock Temple. This temple is next to the time machine when it stops in the year 801,701. When the time traveler comes to a stop near it, he takes a control lever from his time machine so he can explore this future time without losing the machine. When he returns to the temple, his machine has been dragged behind the closed and locked doors of the temple.

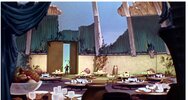
Behind that same door is the passage down to the Morlock caverns, where the Eloi, trained over the millenia to come into the temple when the air raid sirens sound, meet their fates as food for the Morlocks.

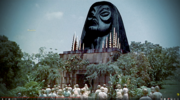
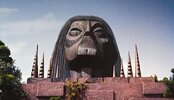
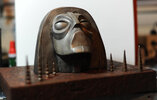
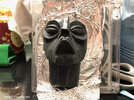
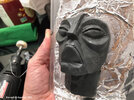
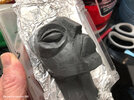
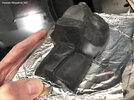
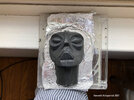
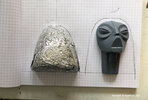
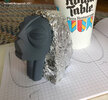
I think this is a really great design, and I was surprised that I couldn't find any evidence of anyone having made one. I've seen a couple of practical and 3D model/3D prints, but I haven't seen any that capture the menace and arrogance of the original sculpt.

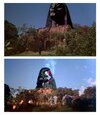
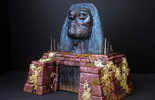
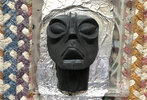
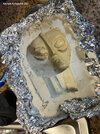
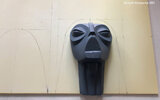
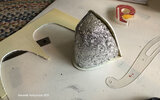
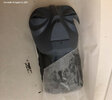
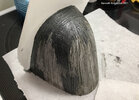
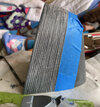
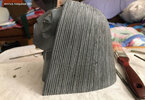
From what I've been able to find out, the original was destroyed for a shot near the end of the film, after the Time Traveller and the Eloi set fire to the Morlock caverns and wipe them out. The last photo attached shows the "fire damaged" remains of the statue.
 

Attachments

  • b512c1d6361ad17795e693f4fd79f478.jpg
    b512c1d6361ad17795e693f4fd79f478.jpg
    61.7 KB · Views: 6,303
  • Screen Shot 2021-05-14 at 12.15.53 AM.png
    Screen Shot 2021-05-14 at 12.15.53 AM.png
    12.8 MB · Views: 238
  • thetimemachine10-1.jpg
    thetimemachine10-1.jpg
    59 KB · Views: 183
  • Time Machine (1960) 7.jpg
    Time Machine (1960) 7.jpg
    33 KB · Views: 822
  • TM18.jpg
    TM18.jpg
    142.7 KB · Views: 218
An Internet search resulted in the following finds. Some are just awful, some are OK, but none of them have the power of the original. One of them, a metal sculpture commissioned through the website deviantart.com, is my favorite of the lot, although the neck is shorter than on the original. I also like the Tiki mug version.

I think the difficulty in replicating the original is because there only appear to be 4 shots of it. I have not been ably to find any preproduction or behind-the-scenes photos or artwork of the piece.
 

Attachments

  • 1960-time-machine-morlock-sphinx_1_fe77e60f9f3f0a0737924747fb6ca799.jpg
    1960-time-machine-morlock-sphinx_1_fe77e60f9f3f0a0737924747fb6ca799.jpg
    194 KB · Views: 523
  • morlock_sphinx_by_justin5578_d6y78ff-fullview.jpg
    morlock_sphinx_by_justin5578_d6y78ff-fullview.jpg
    57.6 KB · Views: 109
  • Morlock Temple TIKI copy.jpg
    Morlock Temple TIKI copy.jpg
    43.5 KB · Views: 142
  • Model for sale.jpg
    Model for sale.jpg
    57.1 KB · Views: 117
  • 04790bf705a500bba9c487540dc8b44a--the-time-machine-the-white.jpg
    04790bf705a500bba9c487540dc8b44a--the-time-machine-the-white.jpg
    48.8 KB · Views: 391
  • sphinx_boxart.jpg
    sphinx_boxart.jpg
    1.1 MB · Views: 123
Last edited:
This is my first take of the face. I used polymer plastic to start out. I've used it a little in the past, but this is the first time I've used it on something of this size. What works about it is that I had a plastic spatula that I used to kind of spread it like peanut butter, to get the curves and lines of the face, and the sharp angles of the chin and jawlines and eyes and eye sockets.

There is a point of diminishing returns, when the material warms up and a desireable change in one place leads to an undesired distortion in an adjacent area. It tended to go better when I worked on it cold, and then when it started to warm up I set it aside to cool down. Putting it in cold water did not work: it seems to absorb water if I'm not careful.

The interesting thing about this first version is that many of my mistakes were based upon relying on a single image from the film. The bottom lip and jaw are too long and the eyes too high in the face because I was using the image from below, looking up at the face. I see those same distortions in the Internet models I could find, especially the metal sculpture.
 

Attachments

  • sphinxface 1.jpg
    sphinxface 1.jpg
    572.9 KB · Views: 89
  • sphinxface 2.jpg
    sphinxface 2.jpg
    509.9 KB · Views: 80
  • sphinxface 3.jpg
    sphinxface 3.jpg
    504.8 KB · Views: 86
  • sphinxface 5.jpg
    sphinxface 5.jpg
    430.7 KB · Views: 84
  • sphinxface 4.jpg
    sphinxface 4.jpg
    449.7 KB · Views: 81
One of the benefits of the polymer clay is it's plasticity. Once I realized how overly large I had made the mouth, I was able smash the lower face together and decrease the size of the jaw and lower lip.

I forgot to mention earlier that there is an aluminum foil ball underneath the surface polymer. I had sketched out a half-face on paper, and then traced it on the back of a clear plastic CD cover, then flipped and traced it backwards to get the other side of the face, in an effort to keep it as symmetrical as possible. I made an aluminum foil ball, out of which I had roughed out the shape of the face, that I smashed up against the plastic. The polymer recommends keeping it less than a certain thickness, because if it's too thick then it won't harded properly when heated. Also, the polymer is somewhat expensive, whereas aluminum foil is really cheap in comparison. The back of the face was flat because in the original piece the front of the hair is completely flat, and I knew I was going to glue the face on to the rest of the head later.

You will notice the polymer is now on a piece of aluminum foil: overnight the polymer was eating through the CD cover plastic, and if I hadn't caught it the next morning and pulled it off before it bonded more fully to the plastic, I probably would have had to start over.

Anyway, once the face was repaired from pulling it off the plastic, and then making the changes to the mouth and jaws, I baked it to harden the polymer. I then carved and sanded that before the final picture.
 

Attachments

  • Edits 1.jpg
    Edits 1.jpg
    496.8 KB · Views: 125
  • Edits 2.jpg
    Edits 2.jpg
    681.2 KB · Views: 153
  • Edits 3.jpg
    Edits 3.jpg
    387.1 KB · Views: 139
At this point I decided to make a copy in epoxy. I've read that polymer isn't ideal as a final version because it's somewhat brittle, and because it can't be painted with enamel (learned that the hard way on a related project.)

I made a Plaster of Paris copy after coating the polymer version with some beeswax furniture polish I have lying around. Then I mixed up enough PC7 epoxy to fill the mold, coated the surface of the Plaster of Paris with another layer of beeswax, and cast an epoxy version. Some detail was lost around the eyes, so I filled in the broken eye slits with more epoxy, and alternately painted it with enamel paints I have lying around, and sanded and carved it to get it closer to the ideal shape. One problem with using this type of epoxy is that it can get bubbles in it, and sanding it down can expose them. I can fill them with paint if they aren't too big, but sometimes I have to mix up a small amount of epoxy to fill in larger voids. One of the fixes I made during this period of changes was extending the length of the neck.

By the way, I've been told that epoxy can be bad for you, so I use nitrile gloves when working with it and sanding it, and I use an N95 mask when sanding it.
 

Attachments

  • changes 01.jpg
    changes 01.jpg
    461.1 KB · Views: 150
  • changes 02.jpg
    changes 02.jpg
    752.7 KB · Views: 114
  • changes 04.jpg
    changes 04.jpg
    276.3 KB · Views: 106
  • changes 03.jpg
    changes 03.jpg
    400.3 KB · Views: 112
  • changes 05.jpg
    changes 05.jpg
    369.7 KB · Views: 98
  • changes 06.jpg
    changes 06.jpg
    386.7 KB · Views: 124
  • changes 07.jpg
    changes 07.jpg
    272.7 KB · Views: 126
Last edited:
Finally got a look to the eyes that I think works a lot better. I knew it's been looking like an ET, so I finally ground down the eyes a lot with a Dremel, and cut the eye slits into the eyelids. I also made an adam's apple after paying a little more attention to reference photos. Another change was to change the angle of the upper lip to match the angle of the flat plane of the nose. I still need to carve in the mouth. After I made those changes I used another jar of enamel paint, this one gold. That was a mistake: the paint was old, and after days it never hardened. I finally wound up sanding and scraping it off, resulting in the middle photo of it looking like old jade with gold outlines. Pretty cool look, but I got photos and moved on. I revised the neck again, and then repainted with a grey paint that hardened correctly.
 

Attachments

  • eyes neck 1.jpg
    eyes neck 1.jpg
    521.3 KB · Views: 210
  • eyes neck 2.jpg
    eyes neck 2.jpg
    384.4 KB · Views: 99
  • eyes neck 3.jpg
    eyes neck 3.jpg
    367.3 KB · Views: 152
The face is getting there, so it was time to do the hair. I had a styrene plastic board on hand. After creating a front and bottom curve that I liked on graph paper I transferred the curves to the styrene, and cut them with a Dremel and smoothed the edges. Then I made an aluminum foil ball to fill in the back volume of the hair, and I taped it and the front and bottom styrene pieces all together.

I got 5 rolls of that knead-to-set epoxy to cover the aluminum foil and bond the two pieces of styrene together. Within 15-20 minutes I had the aluminum foil completely covered with the epoxy. It takes 30 minutes for that stuff to completely harden, so after it was firm but not completely hardened I was able to sand off the excess and rough it into a shape that I liked with some really coarse sandpaper. Final pic is the face leaning up against the new hair element. I had previously cut a hole in the bottom piece of styrene, so I gouged out all the aluminum foil that I could to leave it hollow.

Once I had the hair element and the face element together I realized I had made another mistake in the neck. In order for the hair lines to flow around the face correctly, the neck needs to be wider. The neck was too thin, and there should not be an undercut next to the jaw. I resculpted a new neck on the original polymer model, made another Plaster of Paris mold of just the new neck, and cast a new epoxy neck on the old one. The adam's apple is now higher and there are tendon lines in the neck. I normally try to take epoxy out of a Plaster of Paris mold as soon as possible so the epoxy won't bond to the plaster. This time I took the cast out too early, before the epoxy had set properly, and the epoxy stuck to the mold and tore off the neck a bit. I jammed the casting back into place until it was truly set, but the damage was done. I had to clean out what was too damaged and graft yet another layer of epoxy over to fix the damage. I can't even remember how many different times I've had to fix it. This latest fix, I put the epoxy on and then pressed parchment paper (for cooking) over the surface of the new epoxy. Once the epoxy has hardened the parchment paper won't stick to it anymore, and by forming the parchment against the epoxy I can minimize the amount of sanding I need to do. The parchment can leave a very smooth surface. Wax paper works as well but it's much more delicate and more prone to tear when it's being forced into the surface of the epoxy.
 

Attachments

  • Hair 02.jpg
    Hair 02.jpg
    413.3 KB · Views: 174
  • Hair 01.jpg
    Hair 01.jpg
    365 KB · Views: 120
  • Hair 03.jpg
    Hair 03.jpg
    177.4 KB · Views: 136
  • Hair 04.jpg
    Hair 04.jpg
    386.8 KB · Views: 140
  • Hair 05.jpg
    Hair 05.jpg
    370.9 KB · Views: 95
  • Hair 06.jpg
    Hair 06.jpg
    315.6 KB · Views: 134
  • Neck & Hair 1.jpg
    Neck & Hair 1.jpg
    459.3 KB · Views: 99
  • Neck & Hair 2.jpg
    Neck & Hair 2.jpg
    429.1 KB · Views: 96
  • Neck & Hair 3.jpg
    Neck & Hair 3.jpg
    324.4 KB · Views: 91
Last edited:
After putting a coat of PC7 on the hair element and sanding it down, I had the brilliant idea of making the lines of hair out of that same epoxy and then using the epoxy to glue it to the surface of the hair. Not so brilliant after all: it left soft and hollow areas under the surface that kept popping through, it looks clumpy and uneven, and it took a couple of weeks to get all the hair glued on. After spending another week or so working on it, I disliked it's appearence, and bit the bullet and scraped and sanded it all off, put another even layer of epoxy on over the entire surface and sanded it flat, and started again.

I made a center line down the crown of the head and measured out even dots along it. I measured out slightly longer dots along the bottom.

Starting at the front I used painters tape to connect the dots from bottom to top to bottom on the other side, and with the aid of a metal ruler I filed lines in the epoxy alongside the tape. The lines aren't all even, because I'm human, but the angle of the lines looks much better than my earlier attempt. The front of the hair on the original has no center part, so I did that too, but there are no pictures of the back of the original head to show how Wah Ming Chang dealt with the back of the head of the original. I decided to have all the hair at the back of the head meet at a point where the back of the head starts angling down.

I'm much happier with this look than on my first attempt.

Does this look identical to the original? No, I don't think so. But I like it enough that I will finish it off. Do I want to try again to get something closer to the original? Maybe. We shall see.

What I'm doing now is filing the lines deeper into the head, trying to keep them all even. I'm also working on the front of the hear. More on that later.
 

Attachments

  • Hair 2 v02.jpg
    Hair 2 v02.jpg
    470.7 KB · Views: 115
  • Hair 2 v01.jpg
    Hair 2 v01.jpg
    649.3 KB · Views: 124
  • Hair 2 v04.jpg
    Hair 2 v04.jpg
    354.5 KB · Views: 89
  • Hair 2 v03.jpg
    Hair 2 v03.jpg
    756.4 KB · Views: 94
  • Hair 2 v05.jpg
    Hair 2 v05.jpg
    777.5 KB · Views: 101
  • Hair 2 v06.jpg
    Hair 2 v06.jpg
    318 KB · Views: 103
  • Hair 2 v07.jpg
    Hair 2 v07.jpg
    283 KB · Views: 96
Now that the lines are filed, what I'm doing is painting the hair element with enamel to fill in bubbles and holes and scratches where the file slipped when I was scribing the lines. I let the paint harden, file the lines out to keep them deep, and then sand the entire surface to smooth things out more. I'm trying to file very gently so I don't disturb the surfaces inside the scribed lines, and sand gently so I don't destroy the lines but do smooth out surface imperfections.

It's getting close to the time to epoxy together the face and the hair. I also think I might want to make a little elevated base around the hair and neck. I'm not sure yet if I want to connect the head to a building replica. I might want to try to make a copy of the connected head and neck first.
 

Attachments

  • Hair lines v01.jpg
    Hair lines v01.jpg
    501.5 KB · Views: 96
  • Hair lines v02.jpg
    Hair lines v02.jpg
    739 KB · Views: 101
  • Hair lines v03.jpg
    Hair lines v03.jpg
    347.6 KB · Views: 95
  • Hair lines v04.jpg
    Hair lines v04.jpg
    258.4 KB · Views: 82
While I'm at it, I did want to call out these other cool things in the film. I love the ruins of the Eloi dome, in which the Morlocks house and feed the Eloi. I love the intact dome and tower complex, briefly seen as the time traveler, moving through time on his machine, is released from his prison of lava when it finally weathers away around him. And I love the pair of Morlock sphinxes that flank the doorway into the Eloi dome ruins.

The Eloi dome complex, the dome ruins, and the sphinx pair, only existed as matte paintings, there were no models made.

I believe the sphinxes were designed by Wah Ming Chang, because they look like his style, but I don't know if he also designed the Eloi dome complex. The matte painting of the Eloi complex was done by Bill Brace, as part of a timelapse where first the tower and then the dome come into being and then the tower weathers away into ruin. He also did the matte painting of the exterior of the ruined dome, and another of the broken ceiling as the Time Traveler comes inside. Yet another thing I would like to try is the little black Morlock gargoyle seen in the interior painting.
 

Attachments

  • eloi dome frame grab.jpeg
    eloi dome frame grab.jpeg
    133 KB · Views: 274
  • Eloi complete dome and tower.jpg
    Eloi complete dome and tower.jpg
    337.9 KB · Views: 175
  • Eloi sphinx pair.jpg
    Eloi sphinx pair.jpg
    215.3 KB · Views: 185
  • Eloi Dome interior.jpg
    Eloi Dome interior.jpg
    159.7 KB · Views: 286
Last edited:
It's been a while since I've worked on these Time Machine elements. Had a bit of a direction change on the Eloi dome. I found a MUCH simpler version of the building on a film poster. I'm thinking that the dome can be a section of a hemisphere. I found a 6-inch diameter dome online, from which I can cut a section for the dome. The sort of "crown" of vents can be a separate piece that glues the dome down to the building. Now I'm figuring out how to separate the pieces into segments so the printed segments can be as inexpensive and functional as I can.
 

Attachments

  • 6 inch plastic sphere for 4 inch dome.jpg
    6 inch plastic sphere for 4 inch dome.jpg
    371.8 KB · Views: 103
  • Eloi dome 06.jpg
    Eloi dome 06.jpg
    163.3 KB · Views: 113
  • Eloi dome 02.jpg
    Eloi dome 02.jpg
    168.3 KB · Views: 96
  • Eloi palace Perspective slant  base.png
    Eloi palace Perspective slant base.png
    1.7 MB · Views: 189
  • simplified eloi palace from poster.png
    simplified eloi palace from poster.png
    1.1 MB · Views: 71
In the meantime, I've finished and painted bronze the head for the Morlock Sphinx. I've been tinkering with "body" designs for the building to which the head will be attached. I don't want to make it too big, and I don't want to make it look like a ruin. I'm wondering if I should make the body out of stained and varnished wood, instead, because I kind of like the head as a decorative object in the living room.
 

Attachments

  • Coffee table sphinx.jpg
    Coffee table sphinx.jpg
    474.6 KB · Views: 155
  • sphinx body 1.jpg
    sphinx body 1.jpg
    179.5 KB · Views: 88
  • sphinx body 2.jpg
    sphinx body 2.jpg
    139.4 KB · Views: 94
In the meantime, I've finished and painted bronze the head for the Morlock Sphinx. I've been tinkering with "body" designs for the building to which the head will be attached. I don't want to make it too big, and I don't want to make it look like a ruin. I'm wondering if I should make the body out of stained and varnished wood, instead, because I kind of like the head as a decorative object in the living room.
Did you finish the build..
This looks Great by the way did you ever build the former palace?
 
Back
Top