Moebius classic 1978 battlestar galactica build

Escape068

Well-Known Member
Just started the classic 1978 Moebius Battlestar Galactica kit. It will have interior lighting, laser sound effects and the original theme song with another custom board from TenaContgrols. I will be using fiber optics on this build in warm white, Cool whited flickering LEDs for the engines and the landing bays will also be detailed and lit. I will also be using the Pargrafix photo-etch set.

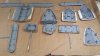
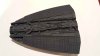
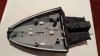
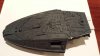
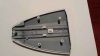
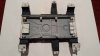
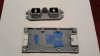
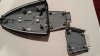
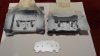
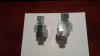
The following pictures show the interior light blocking and a dark primer coat on the exterior. Installation of the Fiber Optics (FO) and wiring will follow. All FO holes are already drilled. The idea is to paint the exterior of the ship with the base coat then secure all the fiber optic, engine LEDs and wiring then assemble the ship and only have to lightly spray the seams which aren't that many. The seams on this kit fit very tight leaving very little putty work which is a plus.

- - - Updated - - -

ClassicBSG_GALACTICA.jpg 942_ClassicBSG_GALACTICA.jpg
 

Attachments

  • 20180729_100529smaller.jpg
    20180729_100529smaller.jpg
    126.9 KB · Views: 464
  • 20180805_192418smaller.jpg
    20180805_192418smaller.jpg
    86.2 KB · Views: 386
  • 20180805_192441smaller.jpg
    20180805_192441smaller.jpg
    89.6 KB · Views: 420
  • 20180805_192428smaller.jpg
    20180805_192428smaller.jpg
    105.6 KB · Views: 483
  • 20180805_192455smaller.jpg
    20180805_192455smaller.jpg
    69.2 KB · Views: 384
  • 20180805_192505smaller.jpg
    20180805_192505smaller.jpg
    87.4 KB · Views: 390
  • 20180805_192519smaller.jpg
    20180805_192519smaller.jpg
    75.5 KB · Views: 425
  • 20180805_192609smaller.jpg
    20180805_192609smaller.jpg
    84.2 KB · Views: 374
  • 20180805_192759smaller.jpg
    20180805_192759smaller.jpg
    79.7 KB · Views: 533
  • 20180805_212640smaller.jpg
    20180805_212640smaller.jpg
    72.5 KB · Views: 387
I built mine a couple of years ago - long before I attempted to do any lighting work. I just airbrushed the engine glow static as I have done since 1977 on my space models.

Galactica Engines.jpeg

Now that I've done the 1/29 Revell X-Wing and now tedium in building the 1/2700 Zvezda Star Destroyer - I'm keen to the idea of buying another one to build with lighting.

Great kit! The PG photo etch is excellent for this kit.

I look forward to seeing what you do with her!
 
Hi Invar......

How is your Star Destroyer coming?

I like how you painted the back of the Galactica. do you have some more pictures and what base color did you use?

Thanks!!


I built mine a couple of years ago - long before I attempted to do any lighting work. I just airbrushed the engine glow static as I have done since 1977 on my space models.

View attachment 835129

Now that I've done the 1/29 Revell X-Wing and now tedium in building the 1/2700 Zvezda Star Destroyer - I'm keen to the idea of buying another one to build with lighting.

Great kit! The PG photo etch is excellent for this kit.

I look forward to seeing what you do with her!
 
Hi,

I picked up the bridge and the 2 domes from Tony via Shapeways.

To tell you the truth comparing the domes there is not much difference but the smaller dome having some tiny extensions that run around the bottom edge. I can add that to the existing one. The rest of the detail on both look very similar.

Tony's bridge is very nice but poses a challenge to get FO through the front since it's a pretty thick wall. I'm still undecided on how I want to do that but have plenty of other things to do before I have to decide.

I drilled out the launch tubes and want to light the tubes in red but I don't want them to beam the light out like a flashlight. It has to be a very subtle glow. I covered the inside of the launch tube drill openings with .10" red evergreen and used the light from the hangar bay to light them. The light coming out of the launch tubes is too bright so I put some black plastic strips in front of the red plastic about 3 mm away which blocks a good about of light coming out of the tubes but they are not all evenly light.

Anybody with any ideas on how to do this better or should I not do that's since I don't think it was ever shown that way on the TV series.

If you want to, spend more money, and up the accuracy, I highly recommend Tony's parts on Shapeways:

https://www.shapeways.com/shops/308bits?section=Galactika+Mobius&s=0
 
Hi Invar......

How is your Star Destroyer coming?

I soooooooo regret having been gifted the high resolution ILM 8 footer pics taken at one of the Identities exhibits. It's made my life a daily tedium of greeblie hell, because I am so intent on trying to mimic at least in parts what the photos show. Most of the tedium is because I am having to carve and craft a large bunch of parts from scratch to mimic it. For example:

Top first Cake section.jpeg

Starboard trenchrear.jpeg

I'm having to wear a head magnifier to see to do this work. I had thought the nightmare of the trenches was over - then I got a look at the wedding cake sections in high res. Oh well, I've read that some model masters spend a good year on a model kit so, I am having fun taking my time on it. This was my grail kit, and all the time I've put into it will make it worth the end result.

I did get the Comic Con B-wing, so I am going to switch gears in a couple of days to put that together and cleanse my palate of having to carve tiny bits of styrene and the drilling of .25 holes for fiber.


I like how you painted the back of the Galactica. do you have some more pictures and what base color did you use?

Thanks!!

I'll have to take some more a bit later for you, and it was really just a quick build not long after I got back into the hobby. I used rattle cans for the primer and paint and I think I ended up using Krylon Fusion White matte for the top color and then sealed the entire model in Future from the new airbrush kit I had just gotten back then.

Since 've been introduced to lighting and have been witness to the incredible skills of the masters here on this board - if I make another one I will light it. So I will be watching your build with great interest.
 
WOW the detail is incredible!! It's going to be well worth it when it's all done. Glad to hear you will be doing something else to get you away from greeblie hell. That should be fun and reenergizing.

For the Battlestar I'm going to spray a light coat of Corax white over the dark primer and hope to get some shading in the recesses and corners.


I soooooooo regret having been gifted the high resolution ILM 8 footer pics taken at one of the Identities exhibits. It's made my life a daily tedium of greeblie hell, because I am so intent on trying to mimic at least in parts what the photos show. Most of the tedium is because I am having to carve and craft a large bunch of parts from scratch to mimic it. For example:

View attachment 835173

View attachment 835176

I'm having to wear a head magnifier to see to do this work. I had thought the nightmare of the trenches was over - then I got a look at the wedding cake sections in high res. Oh well, I've read that some model masters spend a good year on a model kit so, I am having fun taking my time on it. This was my grail kit, and all the time I've put into it will make it worth the end result.

I did get the Comic Con B-wing, so I am going to switch gears in a couple of days to put that together and cleanse my palate of having to carve tiny bits of styrene and the drilling of .25 holes for fiber.


I'll have to take some more a bit later for you, and it was really just a quick build not long after I got back into the hobby. I used rattle cans for the primer and paint and I think I ended up using Krylon Fusion White matte for the top color and then sealed the entire model in Future from the new airbrush kit I had just gotten back then.

Since 've been introduced to lighting and have been witness to the incredible skills of the masters here on this board - if I make another one I will light it. So I will be watching your build with great interest.
 
Installed the yellow FO banks on the front port and starboard sides of the engines. Will paint the center engine diffusion panel Tamiya clear red tonight and fit the paragrafix grille in the engine bays. The back lighting will be finished but not sealed up until I get the center and front done.


20180807_205440smaller.jpg20180807_205407smaller.jpg20180807_205349smaller.jpg20180807_205341smaller.jpg20180807_205329smaller.jpg20180807_205322smaller.jpg20180807_205316smaller.jpg
 
Looking very nice.

I'll tell you what: I don't have a lot of finished models on my selves, but of the ones I do, the Battlestar almost always catches my eye.
 
Thanks!!

The Galactica is one of the coolest ships especially when they show it arching down and banking to the left. You get a nice side and back view of it....

Looking very nice.

I'll tell you what: I don't have a lot of finished models on my selves, but of the ones I do, the Battlestar almost always catches my eye.
 
Outstanding effect with the engine lighting, absolutely perfect! :thumbsup
Did some light testing on the engines with cool white flickering LEDs and yes the center top engine will be in red. It has a very nice diffused glow and does not show the round outline of any of the LEDs.


View attachment 835309 View attachment 835310 View attachment 835311
View attachment 835312 View attachment 835313 View attachment 835314
View attachment 835315 View attachment 835316 View attachment 835317
 
Quick update:

All Fiber optic done except for the bridge. Landing bays sealed up and back is attached to the mid-section. Will be attaching the bridge to the main hull tonight and then run the FO. Hopefully tomorrow attach the front to the midsection.


20180819_165228smaller.jpg20180819_165106smaller.jpg20180820_232914smaller.jpg20180819_174626smaller.jpgQuick update:
 
My thoughts exactly...I like both and said the same thing you said. The second one is my choice. I like that it is offset and fills that area better.


man that's a tough one...I like both, but...if it was my build I think I'd go with the 2nd one...less bare area...or...the first one with it moved more to the center? JMO
 
and again, your approach to lighting is brilliant, always just the right amount of it and as I've said before neat, tidy and organized:thumbsup...my stuff is all over the place :wacko:lol
Quick update:

All Fiber optic done except for the bridge. Landing bays sealed up and back is attached to the mid-section. Will be attaching the bridge to the main hull tonight and then run the FO. Hopefully tomorrow attach the front to the midsection.


View attachment 838916View attachment 838917View attachment 838918View attachment 838919Quick update:
 
The best/easiest way for me to install FO is to first glue little evergreen tubes where you will be running the FO. It may take some time to figure out where you are putting them but once done it makes it a 100 times easier. You feed the FO through the tubes to the drill holes or vise-versa and they stay in place. You don't have this tangle of FO springing all over the place making it a disaster to straighten out.

and again, your approach to lighting is brilliant, always just the right amount of it and as I've said before neat, tidy and organized:thumbsup...my stuff is all over the place :wacko:lol
 
I have to admit to not having done any heavy FO since the ISD adventure :lol but I certainly plan to incorporate your methods on the next for sure:thumbsup The PG Falcon will be fairly littered with it and the way Bandai's are engineered, doing it your way is a must. Needless to say, going forward it's that way or no way :thumbsup
The best/easiest way for me to install FO is to first glue little evergreen tubes where you will be running the FO. It may take some time to figure out where you are putting them but once done it makes it a 100 times easier. You feed the FO through the tubes to the drill holes or vise-versa and they stay in place. You don't have this tangle of FO springing all over the place making it a disaster to straighten out.
 
This thread is more than 5 years old.

Your message may be considered spam for the following reasons:

  1. This thread hasn't been active in some time. A new post in this thread might not contribute constructively to this discussion after so long.
If you wish to reply despite these issues, check the box below before replying.
Be aware that malicious compliance may result in more severe penalties.
Back
Top