Mk1 Arc Reactor - Pixace controlled - Video Page 1

mutznutz

New Member
Evening all

Long time lurker on here and thought I'd give prop building a crack

I wanted to build a mk1 so it can sit on my shelf and look awesome, I'll build a mk3 eventually and hopefully an armour but that is very much in the future

I borrowed/used a lot of the ideas I've used by watching the youtube video that hybridconcepts did and also some ideas from james at xrobots

Anyway ... on with the pictures

PART 1

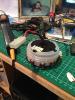
Started off with pringles lids, circular cut out the centre, filled with glue


The circular piece in the center is the inside of some water / plumbing connections I had lying around


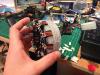
I bought a splatter sheild from the 99p shop to supply the mesh and added that to the centre. I also tried to use some chip holders around the edge to make it easier to solder onto (They weren't that helpful in the end but look cool I think)


As I wanted to stop the light coming through I used some foam strips under the chip holders, this also gave me something to sit the chips on while I wound the copper wire


Last edited:
Re: My Mk1 Arc Reactor - Pixace controlled (PIC HEAVY)

PART 2


I tried to give the top a bit more detail with the bottom of the pringle lid, but it turned out a bit cr*p so I had a rethink


I wrapped the holders and foam with the copper cable, its some thin jewellery wire copper coloured rather then using the expensive real stuff :)

 
Re: My Mk1 Arc Reactor - Pixace controlled (PIC HEAVY)

PART 3

I wanted the reactor to be able to power up and down with some cool effects

I did electronics at college and uni but a bit out of touch with it so I went and got a couple of picaxe prototyping boards

I ended up with a 14 protoboard and an 8 protoboard as I wasn't sure at the time whether I could drive all of the leds I needed to with the 8 (or with the circuit I'd designed). As it turned out the 08 as up the job


I redsigned the top detail part with some perspex I found that was left behind by the previous owner of our house. I wasn't going for movie accurate or anything but wanted to get close. I used a dremel with a diamond cutting disc to cut the initial shape and then tidied up with a regular sanding drum


A test fit of the new parts


I setup a test circuit on a breadboard to make sure the led circuit would work. I used an npn transistor as a switch on the 10 leds, this way I could use one output from the picaxe to turn them all on and off at the same time. Because I wanted them to pulse and flash I'd be using the pwm function on the picaxe so needed a transistor setup that could keep up with the rapid switching

 
Re: My Mk1 Arc Reactor - Pixace controlled (PIC HEAVY)

PART 4

I wanted to keep the size of the circuit and battery small so I wanted to use a 9v battery, I've since found alternative size batteries I could have used but this will have to do for now


As the piaxe has a maximum voltage of 5v I used a voltage regulator to bring the voltage down to 4.5v to power that while supplying the standard 9v to the leds. The whole circuit on the breadboard as below


Back to the detail I colored the perspex black with a sharpie type thick end pen


I also added the inner and outer ring wires

 
Re: My Mk1 Arc Reactor - Pixace controlled (PIC HEAVY)

PART 5

I cut the heads off some small screws and glued them onto the upper detail parts


All the parts together


Glued the lights into the back


Got it all hooked up to the lights and tested


I've taken a video of the power on / power off but haven't uploaded it yet. If there's any interest in the thread I'll put it up add the picaxe code etc. Understandable if not though, amongst so many other awesome projects and so many mk1s done before, at least I gave it a go

If you've got this for thanks for reading :)
 
Re: My Mk1 Arc Reactor - Pixace controlled (PIC HEAVY)

Hey, this looks great. I like the diffused light the pringles lid gives off :)
 
Re: My Mk1 Arc Reactor - Pixace controlled (PIC HEAVY)

I think Its wonderful. and would like to see the video too. great work.
 
Re: My Mk1 Arc Reactor - Pixace controlled (PIC HEAVY)

Thanks for that

I'll get the video uploaded later today then :)
 
Re: My Mk1 Arc Reactor - Pixace controlled (PIC HEAVY) Video Test pg1

Ok I uploaded the test video earlier on as below


It doesn't show the flicker off very well in the video but I'm updating the timings later anyway
 
Last edited by a moderator:
Re: My Mk1 Arc Reactor - Pixace controlled (PIC HEAVY)

PART 6

The idea was that this should be wearable, I made the mistake of putting the controller on the back of the arc reactor as below

IMG_1864.jpg


It looked awful and stuck out so far it looked like I had one giant boob that lit up in the middle of my chest

I ended up removing the circuit and swapping it out for the back of a solar light, and the battery pack for my old tyco r/c. The up side of this was it was smaller but also a similar connector to the arc in the film (just more bulky)

IMG_1868.jpg


End results aren't perfect but for the wearable side of things its fit for purpose

IMG_1869.jpg


- - - Updated - - -

PART 7

A quick video (in the dark) underneath a black vest, apologies for the noise, the cat was hungry :)

Quite pleased with the result of this


Thanks for reading all of this so far
 

Attachments

  • IMG_1864.jpg
    IMG_1864.jpg
    73.9 KB · Views: 142
  • IMG_1864.jpg
    IMG_1864.jpg
    73.9 KB · Views: 152
  • IMG_1868.jpg
    IMG_1868.jpg
    72.3 KB · Views: 140
  • IMG_1868.jpg
    IMG_1868.jpg
    72.3 KB · Views: 157
  • IMG_1869.jpg
    IMG_1869.jpg
    72.2 KB · Views: 133
  • IMG_1869.jpg
    IMG_1869.jpg
    72.2 KB · Views: 153
Last edited by a moderator:
I just found this thread (new to the site) and I have to say this is AWESOME!
I love that most of its construction are items you found on the cheap.

I really would love to build one for my desk at work. This has inspired me to get busy and get it done!
Thanks for posting!!
 
Exellent, seems awesome. Want to make one of these, but a wearable version, so will need to trim things down a bit.
 
Back
Top