Master Shake (Aqua Teen Hunger Force) resin figure [WIP]

nightsnotover

New Member
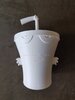
Just ordered a 3D print of Master Shake, one of the most iconic Adult Swim characters of all time. I'm so excited to try out resin casting, and Shake should be pretty easy to mold given his simple shape!

Do any of you guys have any experience making casts "hollow" to save on resin? Would something like this work?:
  1. Make a two part mold with the bottom exposed
  2. Take out the master and make a layer of clay
  3. Pour more silicone in to make a rod-like third part to the mold.
  4. Cast resin through holes on the third mold part.
I made a basic diagram to help you understand.
20200916_150500.jpg
 

Attachments

  • 2117657_77934_37bc77dc9e290f8eb171903f8787845b_1200x1200.jpg
    2117657_77934_37bc77dc9e290f8eb171903f8787845b_1200x1200.jpg
    122.8 KB · Views: 1,232
Last edited:
Thanks basementdweller! But I'm a little afraid of messing it up, especially since the trial pack I ordered has a really short work/cure time.

Alternatively, what about something like this?:
  1. Make a standard two part mold of the figure
  2. Separate the halves, line them up with clay at my desired wall thickness
  3. Pour silicone over each of the mold halves.
  4. Ending up with a two part mold for the front half of the figure and a two part mold for the back half.
 
There is a much simpler way of doing this though. I think you are over thinking stuff... Make the hands, straw and lid seperate parts. Make the cup a 2-part cylindrical mold so that you have the bottom of the cup facing up with a negative part (inside space) and a cover part with a hole in the top for the resin pour. More pieces, but they will be so much easier pours with less wasted material in miscasts etc as I think the most sensitive part is the straw.
milkshake.png

Edited so I could attach a quick mockup. This is a midsection analysis so it's easier to understand what I mean.
 
Last edited:
I managed to saw off the hands and straw with little trouble, but I couldn't saw off the "lid" without destroying the facial details so I left it as is. In hindsight, I should have the 3D print guy print them all separately, but oh well.

Do you think primer (specifically Tamiya's) would help to fill up the tiny layer lines? I don't think I can get any smoother sanding by hand.
 
Last edited:
I didn't have enough pourable silicone to make a mold... so that was a disaster. I'll have to try a brush-on mold with a plaster shell next.
 
My brush-on mold was a success! The very first cast is a little rough, but nothing putty can't fix! I guess I'll try rotocasting now to see if I can't save even more resin.
 
Last edited:
This thread is more than 3 years old.

Your message may be considered spam for the following reasons:

  1. This thread hasn't been active in some time. A new post in this thread might not contribute constructively to this discussion after so long.
If you wish to reply despite these issues, check the box below before replying.
Be aware that malicious compliance may result in more severe penalties.
Back
Top