So, I've been working on my Martian Spacesuit for a while now, machining parts here and there, and decided to make the wrist computer. In the film the wrist computer is used to show the status of the suit as well as the other Ares III suits.

The original from the film was 3-D printed in a couple separate parts and build around an I Phone 5s. However, although I do have ready access to a 3-D printer that could make one, and there are files online, I wanted to make one out of cereal boxes to make it a thing that basically anyone could do. I have made many helmets and other props out of cereal boxes and have perfected my "art" to a few techniques. Also I based mine off of an I phone 4 as I am not the same size as Matt Damon is and wanted better scale. This was going to be great!
I started off by going through the Martian Space Suit thread on the RPF. I found a member who had posted a picture of the wrist computer from a commercial of some sort(shown above) in which the computer was almost perfectly perpendicular! They then used this to make a template. I would partially use his template as well as the original picture in making mine.
Below is the original pic and his Photoshop recreation.


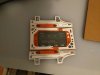
I started off by breaking up the whole thing into layers. If you really look at it you can see how the white part seems to go on top of the orange section. Anyhow, I based out all the shapes and began cutting. I sadly didn't take many photos while cutting all the parts, but but I do have pictured of all of it cut out. When I cut them out I also used an xacto #22 blade to carve all the line details. Most of the sides were based off pictures taken by Frank Ippolito of the Martian suit on display.above) Its really amazing how a few simple details make it look so space ready.(like the rest of the suit)
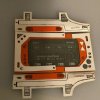
Here are the main white and orange parts as well as the buttons cut out:


 *sorry for the blurriness, bad phone camera*
After the parts were all cut out, I started putting scotch tape in all the areas where glue would connect the surfaces. That way when painted, the cardboard could later be bonded to itself, not the paint. After this, all the parts were given a brush coat of PVA glue to help the cardboard not absorb the paint and to give it a good finish. Next up, Paint time!!!")
The original from the film was 3-D printed in a couple separate parts and build around an I Phone 5s. However, although I do have ready access to a 3-D printer that could make one, and there are files online, I wanted to make one out of cereal boxes to make it a thing that basically anyone could do. I have made many helmets and other props out of cereal boxes and have perfected my "art" to a few techniques. Also I based mine off of an I phone 4 as I am not the same size as Matt Damon is and wanted better scale. This was going to be great!
I started off by going through the Martian Space Suit thread on the RPF. I found a member who had posted a picture of the wrist computer from a commercial of some sort(shown above) in which the computer was almost perfectly perpendicular! They then used this to make a template. I would partially use his template as well as the original picture in making mine.
Below is the original pic and his Photoshop recreation.
I started off by breaking up the whole thing into layers. If you really look at it you can see how the white part seems to go on top of the orange section. Anyhow, I based out all the shapes and began cutting. I sadly didn't take many photos while cutting all the parts, but but I do have pictured of all of it cut out. When I cut them out I also used an xacto #22 blade to carve all the line details. Most of the sides were based off pictures taken by Frank Ippolito of the Martian suit on display.above) Its really amazing how a few simple details make it look so space ready.(like the rest of the suit)
Here are the main white and orange parts as well as the buttons cut out:
*sorry for the blurriness, bad phone camera*After the parts were all cut out, I started putting scotch tape in all the areas where glue would connect the surfaces. That way when painted, the cardboard could later be bonded to itself, not the paint. After this, all the parts were given a brush coat of PVA glue to help the cardboard not absorb the paint and to give it a good finish. Next up, Paint time!!!
Attachments
Last edited:


