Mando bucket, finished inside

Valor

Sr Member
RPF PREMIUM MEMBER
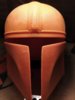
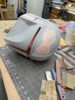
Jumping on The Mandalorian helmet bandwagon here. I did not make the 3D file. It is by TheBrokenNerd. I printed out the file on my 3D printer, but I modified the ear cups to be more screen accurate. (Although I see he has just posted a revised file with correct ear cups). The paint was a new technique for me. After I painted a base coat of Rustoleum Dark Steel, I rubbed graphite powder into the dried paint. It provided a really deep metallic look.

I clear-coated everything with Alclad Aqua Gloss. Then everything was weathered.

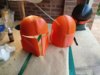
I hate when you pick up a cool helmet and the inside is blank. So I wanted to finish the inside properly. Also, the hero on the show never removes his helmet so I got to make up what I think the inner structures, padding, and mechanicals might look like.


IMG_1905.jpeg
IMG_1894.jpeg
IMG_1903.jpeg
IMG_1898.jpeg
IMG_1897.jpeg
IMG_1899.jpeg
 
That was 3D printed. Very nice. I dont see the stepped lines that I normally see in 3D work

How long would you say it took to print, and how much, material wise, do you think it cost to make?
 
Found online. It’s a visor for a welding face mask
I tried a couple of search queries on ebay and couldn't find what you all using. Can you help?
Also, I thought asking you where you did seem, but just noticed them from inside the helmet. Funny how it now looks legit, like welding seam.
 
I am in following you, Valor ;-)
Did first pass of 80 grid. Took me a couple of hours. Do you have in-progress pics of yours?
 

Attachments

  • IMG_20200111_134229.jpg
    IMG_20200111_134229.jpg
    1.3 MB · Views: 188
  • IMG_20200111_123301.jpg
    IMG_20200111_123301.jpg
    2.1 MB · Views: 135
  • IMG_20200111_120318.jpg
    IMG_20200111_120318.jpg
    2.2 MB · Views: 172
  • IMG_20200111_224204.jpg
    IMG_20200111_224204.jpg
    736.2 KB · Views: 137
I am in following you, Valor ;-)
Did first pass of 80 grid. Took me a couple of hours. Do you have in-progress pics of yours?
Looking great man. I only took a few in progress pics.BB61B523-D5A3-4362-BE85-1F133F051CE5.jpeg68C5D21F-4BD6-4A98-A54D-1A05E53A4879.jpeg
 

Attachments

  • CC40093E-24EC-411D-9941-92BD615DB857.jpeg
    CC40093E-24EC-411D-9941-92BD615DB857.jpeg
    1.4 MB · Views: 165
  • D8CBB5A3-147A-4024-AAE8-F4647F424B1C.jpeg
    D8CBB5A3-147A-4024-AAE8-F4647F424B1C.jpeg
    1.4 MB · Views: 203
  • 7428AD60-DCF4-4003-8B9F-E904D34AC79E.jpeg
    7428AD60-DCF4-4003-8B9F-E904D34AC79E.jpeg
    1.3 MB · Views: 204
  • D8714FE5-F43C-40D6-BB6D-A45885FC6772.jpeg
    D8714FE5-F43C-40D6-BB6D-A45885FC6772.jpeg
    1.9 MB · Views: 205
Dark red is bondo? (we don't have it in AU) What's the dark black goop between section? What's light red (on last pic)?
Funny how mine has orange filament as well )
 
Okay, materials.

FILLAMENT:
I print in PETG, not PLA. PLA is b*itch to sand. PETG sands MUCH better. Why? Highermenting temp means it doesn't gum up when you sand. I'm telling you it was a game-changer.

GLUE:
Super glue can bond 3D pieces, but for something big like this I use JBWeld Quick Set. (That's the black stuff) ... It sets in 5-10 minutes and remains a bit flexible. Meaning it won't snap and crack like Superglue. The JBWeld that oozed out on the inside simply looks like welds once I paint.

PRIMER:
I can't stress this enough. Prime before you sand. And use a good Filler Primer – this kind has a higher particulate and will build up and fill all the print lines. Spray 3-4 light coats 15 minutes apart. Wait an hour and sand. Sanding primer is 10 times easier than sanding filament. Doing this means you are not sanding all the print lines DOWN. You are sanding the primer pack to the to of the print lines.

FILLER:
This is Bondo glazing and spot putty. Good for getting the deeper imperfections

PAINT:
Rustoleum Dark Steel Metallic. This is really close right out of the can.

GRAPHITE:
After the topcoat cured I rubbed the helmet doewn with hardware store graphite powder, using a cotton ball.

CLEAR COAT:
Alclad Aqua Gloss, applied with my airbrush
 
Nice. Thank you!

FILLAMENT:
My Orange is also PETG. Yeah, I know about sandability (Panished Propes - where I heard about it the first time). Now with Heated Chamber I often do ABS and vapour smoothing if design allows (not in this case, for example).

GLUE:
I've used super glue this time with accelerant only after I made sure it's aligned. Usually, if there are no alignment pegs this is when I screw up. Not this time, surprisingly. What I did differently this time is spot glueing first (like I saw they do in welding). So secure one side at least aligned with tiny a bit of glue, and then other, and then all in between. That was one thing I self-learned on this project so far - super proud of it. All the wider gaps that left I filled with glue and then sprinkled Baking soda inside (thx, Adam Savage).
Said all that I would rather use something else for glueing. I will research the substance suggested by you (hopefully it can be bought in AU). Until then, I've quickly designed in Meshmixer extra reinforcement flat part that I will glue in on from inside between cheek part and whole back part. I don't trust super glue there.
IMG_20200112_101622.jpgIMG_20200112_101610.jpg

PRIMER:
Yes, I do know about filler primer. And I even have one. But I've run out of it and don't have another close by. =\ I thought I will do 80 grid first, then normal primer to see all imperfections and continue with filling/sanding/priming.

On Paint, I found a place where exactly what you have can be bought. Will see. I also have graphite powder already and Alclad Aqua Gloss that I can clear coat.
Btw, you forgot about weathering step =) I bought a couple of oil paints recently, but I think I've made a mistake and bought non-water-soluble. Need to play with them on some test subjects to find a feel for how this is done.

Oh! One thing. I've made this visor bracket, that I thought I will put while I am sanding and working with the piece and not worry about cheek parts breaking off.
IMG_20200112_101701.jpg
 
This thread is more than 4 years old.

Your message may be considered spam for the following reasons:

  1. This thread hasn't been active in some time. A new post in this thread might not contribute constructively to this discussion after so long.
If you wish to reply despite these issues, check the box below before replying.
Be aware that malicious compliance may result in more severe penalties.
Back
Top