Mandalorian Diorama for 1/6 scale Hot Toys Mandalorian/IG-11

catboat

Member
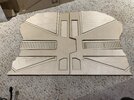
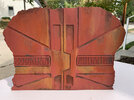
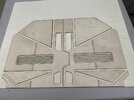
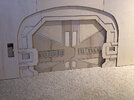
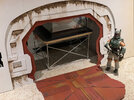
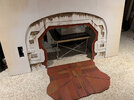
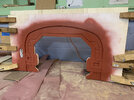
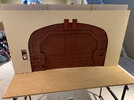
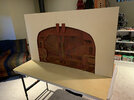
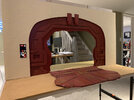
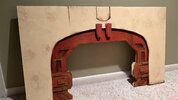
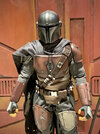
Ok I am brand new here to the forums. So hello everyone. I have the 1/6 scale Mandalorian and IG-11 figures from Hot Toys on order and am working on a display for them. I thought about getting a Cricket to cut out the layers needed to recreate the scene after they blow the blast door open in their quest to find baby Yoda. I also thought about joining a local maker space to gain access to a laser cutter to do the same thing.

As I am brand new here and very much a novice, I thought I would reach out to everyone here and get your input on how to make this. Am I on the right track or should I be going another direction.
 

Attachments

  • outlines-01.jpg
    outlines-01.jpg
    1.2 MB · Views: 291
  • outlines-02.jpg
    outlines-02.jpg
    670 KB · Views: 296
Looks good. Id probably suggest the maker space before the cricut just because you are going to need to cut out foamboard or something with thickness. Would be time consuming but you could just print those out and get a exacto knife and start cutting.
 
While a machine might make it simpler, you can totally do this at home with a cutting mat and a fresh set of blades + a steel ruler. Buy some sheets of pvc foam if you can as it's superb for this type of stuff. You could also do with some insulation foam (extruded polystyrene aka XPS) that comes in a few different thicknesses, but generally thicker than what you want for the very thin layers. Also grab some sheets of styrene for the thinner layers if you can't find PVC foam easily. I recommend a signage shop or office type depo to get sheet material cheaply. You can use a mild spray adhesive to tape on your printouts and then cut out the stuff you need and then remove the paper.

Check out this guy's site as a one stop shop for techniques and material from an architect's perspective. He does awesome stuff that are totally applicable for our hobby. His site is also a fantastic repository of knowledge for material and adhesives etc.

 
Here are photos of the process to where I am now.
 

Attachments

  • IMG_5783.jpg
    IMG_5783.jpg
    2.9 MB · Views: 179
  • IMG_5782.jpg
    IMG_5782.jpg
    2.4 MB · Views: 157
  • IMG_6104.jpg
    IMG_6104.jpg
    664.8 KB · Views: 156
  • IMG_6103.jpg
    IMG_6103.jpg
    475.6 KB · Views: 157
  • IMG_6111.jpg
    IMG_6111.jpg
    645 KB · Views: 148
  • IMG_6163.jpg
    IMG_6163.jpg
    681.1 KB · Views: 160
  • IMG_6162.jpg
    IMG_6162.jpg
    576.2 KB · Views: 148
  • IMG_6374.jpg
    IMG_6374.jpg
    560.5 KB · Views: 151
  • IMG_6596.jpg
    IMG_6596.jpg
    484.5 KB · Views: 158
  • IMG_6597.jpg
    IMG_6597.jpg
    496.8 KB · Views: 160
  • IMG_6598 2.jpg
    IMG_6598 2.jpg
    532.8 KB · Views: 161
  • 75D83DC5-81E8-4EE1-95A6-FD766FAF0302.JPG
    75D83DC5-81E8-4EE1-95A6-FD766FAF0302.JPG
    1.7 MB · Views: 175
  • IMG_6382.jpg
    IMG_6382.jpg
    1 MB · Views: 193
I ended up using 1/16 and 1/18 birch plywood I got from the hobby store and the woodcraft store. cut everything on the laser cutter. It got a little wobbly when I was gluing the two sides together and actually partially fell apart with the weight of all the clamps. In hindsight I would have built more a structure to glue everything on instead of sandwiching thin layers of plywood together. If I do this again, I will try the foam. I have been watching some YouTube lately and it is amazing what they can do with it.
 
This thread is more than 3 years old.

Your message may be considered spam for the following reasons:

  1. This thread hasn't been active in some time. A new post in this thread might not contribute constructively to this discussion after so long.
If you wish to reply despite these issues, check the box below before replying.
Be aware that malicious compliance may result in more severe penalties.
Back
Top