Mandalorian AT-ST Raider

styreneguy

New Member
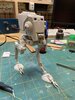
I've had this old AT-ST model for ages- it's an original MPC from Return of the Jedi. Not a great kit- a snap-tite job that kind of fits together. I half heartedly started putting it together years ago with the intention of making it more accurate and realistic. I glued the head together and did a little seam filling and then tossed it back in the box for about 20 years.

IMG_1802.JPEG


Recently I was looking for a new build and thought I'd give it another go. I put it together but it just had some many shortcomings. The eye ports are sealed shut and don't even get me started on how they molded the hip joints (they aren't even the same shape). I was about ready to throw it into the box again when I had the inspiration to try and make the AT-ST from the Mandalorian. That one was pretty beat up already, so who would notice if I cut a few corners?

First step was to cut out the eye holes. I didn't want to lose the size of the covering since I'd have to scratch new flaps, so I rubbed a pencil on a post-it over the 'eyes' to capture their shape. Then I carefully drilled them out and sanded down the edges.

IMG_1803.JPEG


I didn't like the giant seam running down the side of the head, so I covered each side with a roughly equivalent piece of styrene. After consulting some reference pictures (there are not many), I noticed that the CGI model has extra armor panels in this area, so I was on the right track.

After a lot of trial and error, I managed to get a decent looking railing made out of some wire that was soldered into shape and super glued into small holes on the top.


IMG_1820.JPEG


More to come...stay tuned!
 
Great idea
Making a custom MANDALORIAN Raider AT-ST is on my list too, but I plan to use the BANDAI kit instead.
I will keep my eyes on your as I am curious what the old MPC will come up with.
 
Spoiler alert, I've already finished this build and decided that after a long hiatus it was time to try and give back to this forum. Unfortunately I made that decision after all the work was done and looking back I don't have as many pictures as I remember taking. I had a ton of fun doing this build- probably because I wasn't very worried about how it would come out.

I was unhappy with the detail bits on the head, especially the main guns. What comes with the kit is really laughable by today's standards and I figured I could do better.

IMG_2046.jpeg


I kept the main structure but cut off the barrels and everything inside the vertical 'struts' beneath the guns. I replaced the barrels with 1/64 brass tubing and some small plastic rod. On my reference pictures it looked like there were some stacked plates vertically beneath the guns so I re-used some spare tank wheels glued together that fit nicely.

IMG_2045.jpeg

On the right 'cheek' is a small cylinder that looks like a Gatling gun. The one in the kit is pretty awful so I scratched a new one out of spare bits and rod.


IMG_2061.jpeg


I put it all back together and started to think through how I wanted to light it up. On the show, the AT-ST has these super evil red eyes and a white spotlight next to the main gun. That's just two LEDs- but I'd already glued the head shut two decades ago...

The solution was to cut off the back panel where (thankfully) the machinery details where not yet glued on. This gave me full access to light block the interior and install a small red LED under the main hatch and a 3mm white LED next to the gun.

I made a new back panel and added the machinery details (plus a few extra greeblies to fill it out).

IMG_2062.jpeg


For the spotlight next to the gun, a 3mm LED was just too much at this scale and I didn't have anything smaller. So I dipped it into Tamiya flat black a few times until no light came out. I figured once all the painting was done I could scratch out a small pinhole in the front.

My original plan was to use a small button cell to power the LEDs but after some thought I reconsidered. Never been a big fan of putting batteries in models since the number of times I run the lights is so infrequent compared to how long its going to sit on a shelf. The head of the model just fits snugly over the top of the neck (which is hollow), so it was straightforward to just run the wires through the hips and down the back of each leg into the heel of each foot.

IMG_2065.jpeg


Here's an initial lighting test.

IMG_2066.jpeg


The hips posed a few challenges. First of all, they are immovable- the pose you get out of the box is it unless you're up for some serious re-building. The second issue is that they are not even closed completely- you can clearly see they are hollow looking into each side. The third issue is that they have different shapes. The right hip has an "L" shape and the left hip is just a straight rectangle.

The first thing I did was use my razor saw to try and re-create the "L" cut-out in the left hip. Then, I covered the open interiors of each hip with some sheet styrene and added some assorted greeblies to make it look busier. They still look pretty lousy, but better than before.

IMG_2063.jpeg


Next step...painting!
 

Attachments

  • IMG_2064.jpeg
    IMG_2064.jpeg
    649.7 KB · Views: 166
Very cool!

I built one of these a several years ago before Bandai released one as it was the only game in town for a near 1/48 scale AT-ST (This is around 1/53 I think).

I did many of the same mods and they really do make a huge difference
 
Unlike a nice clean Imperial AT-ST, the reference pictures for the Raider show that it's rusty, dusty and beat up. It's also got some extra bits and pieces over the standard Imperial model.

Just prior to painting, I added a few more random 'armor' panels to each side of the head. Total artistic license here since I couldn't find any good reference pictures for the right side. I just cut up some sheet styrene into semi-random shapes to look like scrap metal plates and adhered to the side over some small strip styrene so it would stick out a bit.

I also added on new 'eye flaps' which were cut out of some very thing sheet styrene using the rubbings I took earlier. I used a small piece of round styrene rod on the top to simulate a hinge.

Did a base coat of Vallejo light rust as a starting point. There isn't a ton of exposed rust on the Raider but I wanted options since I wasn't going for screen accurate.

IMG_2075.jpeg


Once the rust dried for a day, I used a brush to dab on water where I wanted the rust to show thru and sprinkled on some table salt.
IMG_2077.jpeg


IMG_2078.jpeg


Then an overcoat of Tamiya Neutral Gray- it looked pretty close to an original AT-ST color and it was what I had on hand.

IMG_2080.jpeg


Now it's starting to look like the real thing! When the salt was rubbed off, you get a nice effect with the rust showing through.

IMG_2081.jpeg


The legs on the Raider are different colors. I like to think that they were replacement legs from other AT-STs that they just welded on (kind of like when you see an older car with a door with a different paint job). The left leg got plain Tamiya Red with a little bit of black added. The right leg below the knee got Tamiya Burnt Sienna.

IMG_2082.jpeg


I noticed something interesting after painting the legs. My gray base coat was very even when I first laid it down but after a day or so it looked like it was fading. I think this was actually some of the salt 'bleeding thru' the paint. Since I didn't actually wash the salt off with water (I just scrubbed it off with my finger), there must have been a lot of really small particles still on the surface that got covered by the paint. This became obvious a few days later when I returned to the model- the weather has been hot and humid and I noticed small beads of condensation all over the model!

Luckily, this thing is supposed to look old and beat up, so the fading effect was actually pretty welcome. I noticed that it also happened on the newly painted legs after a while.

IMG_2093.jpeg


After the colors were dried for a day or two, I applied a coat of Tamiya Flat Clear which must have really activated the salt because all of the colors became very muted once it dried.

Then came the most challenging part of this build- adding the 'warpaint'. In the show, it's clear that the AT-ST has white markings on the face, cheeks and legs- like
some primitive warrior. I did some practice runs on cardboard scrap using Tamiya White with a few drops of Neutral Gray and then just winged it.

With the warpaint added, I did a few passes here and there with a muddy/black oil wash. This toned down the warpaint and started to tie it all together. Then I hit some of the corners on the legs with some weathering pastels to simulate chips. I also liberally covered the feet with brown weathering pastels to simulate dust/mud.

IMG_2098.jpeg

IMG_2099.jpeg

IMG_2100.jpeg


On the regular AT-ST reference pictures I noticed a set of black hoses that cover the front 'pelvis' of the machine. I had some old guitar wire which was about the right scale and I was able to bend into shape and paint black (it doesn't show too well in the pictures unfortunately).

Also I noticed that the Raider has a net hanging from the left leg joint. I took some black thread and made a little net that sort of worked out.

IMG_2094.jpeg


But after trying for a while to get it to attach to the leg and hang correctly I just gave up. At this point I'd had enough fun with this one and was ready to call it finished. I made a little wooden base with holes for the power wires under each foot. I took the USB cable from a dead computer mouse and re-purposed that to supply power. Lately I've been using 5v USB for my model lighting since you can find those power supplies anywhere and it's plenty of voltage to light up even a large scale model.

IMG_2118.jpeg

IMG_2124.jpeg

IMG_2127.jpeg


I called it done and it went on the shelf. Thanks for looking!
 
That looks great, nice build! That table salt idea is amazing, I am using that on a build for sure.
 
That looks great, nice build! That table salt idea is amazing, I am using that on a build for sure.
Thanks! Try to pick a day when the weather is dry- hopefully you won't get moisture on your model like I did. It's a super easy technique that works really well.
 
This thread is more than 3 years old.

Your message may be considered spam for the following reasons:

  1. This thread hasn't been active in some time. A new post in this thread might not contribute constructively to this discussion after so long.
If you wish to reply despite these issues, check the box below before replying.
Be aware that malicious compliance may result in more severe penalties.
Back
Top