Next pour some plaster of paris on a portion of it and when it dries, peel it off and you end up with a hard negative mold. Pour some thick Elastomeric paint on it, let dry, then perhaps another layer. For some strange reason, my local brand has a red that really pours really thick.
Peel off film and repeat process several times until you get several skins of texture. I made a mistake of pouring gold paint on the plaster mold. Looking back, it would have been perfectly fine to pour plain paint on the mold and paint it with acrylic gold paint later.
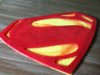
View attachment 211645 Cut the double ovals using craft foam. To get the indentations, I first scored
the oval with a pen then slowly sanded the edges down to look curved and rounded. Glue the skin to the sculpey then the double ovals on top. Paint gold then antique with diluted black acrylic.
Next, cut the belt using thin craft foam. Glue skins on top leaving the edges exposing the foam.
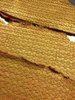
For connections, cut the skin diagonally and follow the pattern on the
next skin as you move through the length of the belt. The belt is actually
two mirrored pieces with curved pointed edges. View attachment 211646
I realized that one sheet of craft foam was not enough so I stuck it to another sheet and cut oversized.
Then painted the foam with metallic light
blue acrylic tinted with a bit of black. When dry, antique the gold with
diluted black acrylic paint.View attachment 211649