You are using an out of date browser. It may not display this or other websites correctly.
You should upgrade or use an alternative browser.
You should upgrade or use an alternative browser.
Malcolm Reynolds pistol from Firefly
- Thread starter brushbrushbrush
- Start date
brushbrushbrush
New Member
Only had about 5 minutes free today so hunted out in my garage and found a piece if scrap mdf and started tracing the templates out, will hopefully have them cut out tomorrow and upload some pictures ")
MignolaFan
Active Member
Only had about 5 minutes free today so hunted out in my garage and found a piece if scrap mdf and started tracing the templates out, will hopefully have them cut out tomorrow and upload some pictures
Hooray! Can't wait! I started working on the sights last night but i was held back by a lack of super glue.
brushbrushbrush
New Member
What did you decide to do for the sights? Also, thanks very much for the templates, they're awesome
MignolaFan
Active Member
I am using the pen idea, that mixed with some acrylic sheeting and bondo should do the trick.
brushbrushbrush
New Member
Nah, can't even remember where I came up with the name haha
brushbrushbrush
New Member
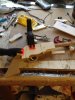
Started officially working on the prop last night and got the main shape of the gun template cut out but I ran into some difficulty along the way. First of all, I decided that the easiest course of action would be to use my band saw to cut out the shape roughly then sand it until it is the correct shape so I went to my band saw, set it up and started the first cut and wouldn't you know it, I broke the bloody blade. So I had a think and saw my Jig Saw lying in my garage and thought, I'll give it a go. No luck, bent that blade and ended up with a cut that was at about a 45 degree angle haha. Then I had the luck of finding a jig for my router that my dad probably made a while back which was ideal. So after trying out a few different bits (the wood was burning rather than cutting haha) I found the right one and got the basic shape cut out. I then refined it with a hand saw and started sanding it to the correct dimensions. That was as far as I got last night, have a bit of time today so shall work more on it then


.JPG")
.JPG")
brushbrushbrush
New Member
Sorry that the thread has been a bit stagnant for a few days, haven't had much time as I was getting A-Level results yesterday and ended up celebrating 'til pretty late. I have about a month until I start Uni now so will have a bit more time to work on the build and hopefully get it finished pretty soon, shall be working on it today at some point and getting some other parts cut out and sanded but because I don't have my band saw things are taking ages to get right.
MignolaFan
Active Member
Oh man, I would have gone nuts if I didn't have my band saw. Hopefully you can get it running again soon! Do you have a dremel tool? I found putting a sanding head in the dremmel made shaping the curves a dream.
brushbrushbrush
New Member
Oh man, I would have gone nuts if I didn't have my band saw. Hopefully you can get it running again soon! Do you have a dremel tool? I found putting a sanding head in the dremmel made shaping the curves a dream.
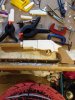
Yeah man it has been a bitch not having the band saw to do the brunt of the work but I stumbled upon a build saving invention called PVC haha. Found some strips of different widths and started cutting out the parts with those and ended up getting one side of the gun almost finished in about 2 hours just need to neaten up the edges a little. This has made the build infinitely easier to complete as I was having great difficulty getting some of the finer curves cut but with the PVC its a breeze. Also man nice work on your pistol, the paint work looks awesome, how did you manage that with the Rub 'n' Buff?
.JPG")
.JPG")
.JPG")
.JPG")
.JPG")
.JPG")

MignolaFan
Active Member
I learned a very valuable lesson. DO NOT CLEAR COAT RUB N BUFF!!! It dulls down the colour quite a bit, and you lose the shine. I attempted to sand through the clear coat to expose the brass layer, and i ended up sanding right down to the primer. This resulted in sanding down the whole gun back to primer, well, as much as I could. Because of all the nooks and crannies, the sanding job is awful and it shows. I have since repainted the black and started adding rub n buff as a top layer. I'm going to have to weather the gun quite a bit to hide the sanding job underneath. But, I was going to do that anyway. So I do suggest adding the brass colour last.
brushbrushbrush
New Member


Sorry guys, I've really been neglecting this build in my preparations for uni and its been over a month since my last update. Dunno why but I got up this morning with the burning desire to work on the prop and actually ended up spending about four hours on it, granted most of that was spent waiting for stuff to dry but that's not the point haha. I started off, trying to think of a way of making the little octagonal ring around the barrel and finally settled on some pretty strong card stock that I had lying around my room for some reason. Got that cut out which was a bitch as it wouldn't bloody fit haha, had to redo it about three times. Once that was done, I started gluing the PVC parts onto the MDF and clamped them to allow them to dry (I found walking the dog gave it ample time to dry fully as it was a sort of super gluey epoxy). I don't know how well the epoxy will hold and if it does fail I have some heavy duty plumbers epoxy I could use but it's really messy so would rather not have to use it. Hopefully I will have another work at it tomorrow after I get home from Uni and it will be part of my routine again
.Attachments
brushbrushbrush
New Member
Oh I also attached the barrel to the main body of the gun using an old drill bit that I had which I broke in half. I then drilled holes in the barrel and body and used the drillbit and some superglue to stick them together.
brushbrushbrush
New Member


The gun is really getting along
I've attached al of the major parts, made a magazine and attacked the sights. I think I've got everything sorted bar the thumb screws at the end of the gun which sadly I've been unable to find anywhere. Now he next step is to spray paint the gun black and apply the rub 'n' buff that I bought which is autumn gold colour which I hope will look like the gun in the show nicely. I then have to carve the grips out of an old plank of mahogany that I have lying around. I really hope to keep working on the gun and finish it in the coming weeks. I'm really pleased with it so far, especially for it being my first build MignolaFan
Active Member
The way I found best to get an accurate scale, is to find the specs on the underlying gun. In the case of Mal's gun, it's a taurus model 85. Use photoshop to bring an image of the gun up to scale, and then overlay a picture of Mal's. Then just take all of you length measurements from that. Also check out the link earlier in this thread, great reference.
PeterLC
Sr Member
Dude, this looks shinny. how did it turn out in the final product?
I need to get the accurate measurements as Aussie laws do not let us import replicas from overseas. So I am going to clay build mine then hopefuly silicon mould and resin cast the pieces....
you can import them depending on where in Oz you are. I live in Qld where owning some replicas is legal but needed an import permit to clear Australian customs.
anakin69
New Member
you can import them depending on where in Oz you are. I live in Qld where owning some replicas is legal but needed an import permit to clear Australian customs.
Thanks for the heads up Peter, I live in NSW... so might look into it....
Similar threads
- Replies
- 16
- Views
- 834
- Replies
- 10
- Views
- 524