bluerealm
Well-Known Member
Scottjua here posting for BlueRealm. We set out to build the most accurate Star Wars (ANH) Millennium Falcon Dejarik Chess table we could and here's how we did it.
Philip Wise from RebelScum.com is the driving force and source for the research and development for accuracy and engineering the parts and processes to make these things.
Here at Blue Realm, we're in full production mode making these, and since they're for sale in the Project Runs, we thought it would be a great idea to show how we're doing it.
Here's the table as seen on set of the first Star Wars movie. We're replicating the table in its original ANH form before the lights were redone and greeblies added for ESB.


Here's the table after the first movie as it was changing. First in an early pre-production shot for ESB

Here's a nice ESB closeup. The base table is the same, but the greeblies and light bezels have changed

Here it was most recently on display. Notice it's labeled incorrectly for its iteration, although it is the same table overall.

After getting as many measurements and all the reference possible it was time to start making the table.
The table top is the most complicated part as the shapes and compound curves really make for interesting and unique surfaces. Ours are all wood and fiberglass composites turned in sections on a large lathe.
The two parts are joined and worked... worked, and reworked until we have about as perfect a surface as you can get by human hands. The total amount of hours that went into each table top to make everything super nice is staggering and actually uncountable.
The tables are then marked and holes drilled out in the precise spots using custom templates.

That's a lot of wood chips!


Filling and surfacing


The Pedestals are made from giant PVC tubes, that are cut and then routed down to the correct height. It didn't end there, as each one was meticulously sanded, filled, and re sanded to remove any surface imperfections.


The bases are also made from custom lathe turned wood. As you'd guess, any seam lines or imperfections were filled and sanded to a super high level, leaving glass smooth surfaces.

One of the more simple but time consuming parts to finish are the aluminum table top surfaces themselves. The raw aluminum discs are CNC cut on the perimeter to eliminate any uneven cut lines. Then they are hand surfaced. The process is difficult as it requires a good amount of force and many passes to get a pretty, consistent, and uniform grain. Each one took a variable amount of time due to surface imperfections or blemishes. I had one take 1.5 hours, and the one pictured in the video probably one of the fastest turn arounds took about 35-40 minutes. The time lapse video doesn't do it justice to show the amount of time and how slow each pass was. From here they go to aludyne coating and then the final checker board pattern put on.
Raw on Left... after lots of time and pressure on the right. All those scratches on the raw disc have to be removed...

Closeup of grain quality. I hand turned all of these personally so I'm pretty happy with them of course. ^_^


This is a prototype top used for illustration purposes, so not one of the production pieces, but it gives you an idea of the final look of the checker pattern. Obi ANH by scottjua. ^_^


Next up were the light bezels. These are made from custom brass tubing and laser cut acrylic discs. They are then bead blasted inside to diffuse the light properly from the leds that go into a custom bung at the base of each light housing. The wiring for each light also takes a considerable amount of time.


The keys that go on each side of the table were first made in aluminum for the masters, and then molded and cast in plastic. Each key then received a CNC program to remove flashing, mill a glue pocket, and mill two holes for stainless steel pegs that will allow precise alignment and fitment on the table. We went through about 1500 stainless steel pins so far putting these keys together. Later decals will be applied for each unique key.


All of the knobs that go into each player's side control panel are all cnc lathed aluminum, which is treated with alodine to prevent oxidation. We got them as accurate as possible and they're beautiful.

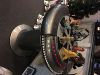
And an unfinished table mockup for size:

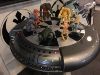
and a finshed table example:


Hope this is fun to look at. These are a real labor of love and we're stoked with how they've turned out.
Feel free to ask any questions.
Philip Wise from RebelScum.com is the driving force and source for the research and development for accuracy and engineering the parts and processes to make these things.
Here at Blue Realm, we're in full production mode making these, and since they're for sale in the Project Runs, we thought it would be a great idea to show how we're doing it.
Here's the table as seen on set of the first Star Wars movie. We're replicating the table in its original ANH form before the lights were redone and greeblies added for ESB.
Here's the table after the first movie as it was changing. First in an early pre-production shot for ESB
Here's a nice ESB closeup. The base table is the same, but the greeblies and light bezels have changed
Here it was most recently on display. Notice it's labeled incorrectly for its iteration, although it is the same table overall.
After getting as many measurements and all the reference possible it was time to start making the table.
The table top is the most complicated part as the shapes and compound curves really make for interesting and unique surfaces. Ours are all wood and fiberglass composites turned in sections on a large lathe.
The two parts are joined and worked... worked, and reworked until we have about as perfect a surface as you can get by human hands. The total amount of hours that went into each table top to make everything super nice is staggering and actually uncountable.
The tables are then marked and holes drilled out in the precise spots using custom templates.
That's a lot of wood chips!
Filling and surfacing
The Pedestals are made from giant PVC tubes, that are cut and then routed down to the correct height. It didn't end there, as each one was meticulously sanded, filled, and re sanded to remove any surface imperfections.
The bases are also made from custom lathe turned wood. As you'd guess, any seam lines or imperfections were filled and sanded to a super high level, leaving glass smooth surfaces.
One of the more simple but time consuming parts to finish are the aluminum table top surfaces themselves. The raw aluminum discs are CNC cut on the perimeter to eliminate any uneven cut lines. Then they are hand surfaced. The process is difficult as it requires a good amount of force and many passes to get a pretty, consistent, and uniform grain. Each one took a variable amount of time due to surface imperfections or blemishes. I had one take 1.5 hours, and the one pictured in the video probably one of the fastest turn arounds took about 35-40 minutes. The time lapse video doesn't do it justice to show the amount of time and how slow each pass was. From here they go to aludyne coating and then the final checker board pattern put on.
Raw on Left... after lots of time and pressure on the right. All those scratches on the raw disc have to be removed...
Closeup of grain quality. I hand turned all of these personally so I'm pretty happy with them of course. ^_^
This is a prototype top used for illustration purposes, so not one of the production pieces, but it gives you an idea of the final look of the checker pattern. Obi ANH by scottjua. ^_^
Next up were the light bezels. These are made from custom brass tubing and laser cut acrylic discs. They are then bead blasted inside to diffuse the light properly from the leds that go into a custom bung at the base of each light housing. The wiring for each light also takes a considerable amount of time.
The keys that go on each side of the table were first made in aluminum for the masters, and then molded and cast in plastic. Each key then received a CNC program to remove flashing, mill a glue pocket, and mill two holes for stainless steel pegs that will allow precise alignment and fitment on the table. We went through about 1500 stainless steel pins so far putting these keys together. Later decals will be applied for each unique key.
All of the knobs that go into each player's side control panel are all cnc lathed aluminum, which is treated with alodine to prevent oxidation. We got them as accurate as possible and they're beautiful.
And an unfinished table mockup for size:
and a finshed table example:
Hope this is fun to look at. These are a real labor of love and we're stoked with how they've turned out.
Feel free to ask any questions.
Attachments


Last edited by a moderator: