Making the Carlyle Elysium SMG

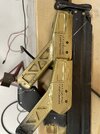
At this point I don't think I can even imagine the possibilities. One thing at a time. Lets get some stickers done for this gun!

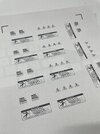
Waiting for my "printables" to arrive (transfer, printable sticker stuff, various colored vinyl).
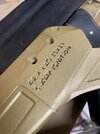
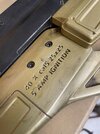
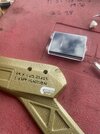
Takes "greens" advice and preped another handle to try both sticker and transfer on. See what they do when cleared.

Will post pics when I have more.
 
Ok. Positive vibes from the cutter. It can do “detail”. I think I might need more on the circle outside the D. But this is all good. This is very cool. Progress towards finishing the gun!!!!!!
 

Attachments

  • IMG_1971.jpeg
    IMG_1971.jpeg
    1.4 MB · Views: 63
Ok. Positive vibes from the cutter. It can do “detail”. I think I might need more on the circle outside the D. But this is all good. This is very cool. Progress towards finishing the gun!!!!!!
They have some different cutter heads. I never used anything but the standard slant blade but if you get really really small, maybe they have a smaller blade that won't lift the weeding while cutting. I you ever use thick vinyl you can either slow the cutting or set it to multipass. Older and larger machines will fail on multipass and create stringy second cuts that won't land on the first cut. However most desktop modern machines do fine. This allow you to cut harder, thicker matetial without the need for increasing pressure. I don't like increasing pressure because if I forget I did that, next I'll be cutting into the print bed. My favorite thicker material was the metal foil outdoor stickers for machinery. Beautiful legit looking silver ID tags for machines.Might come in handy for replica work.
 
When you get to time to put on your transfer tape you definitely want a squeegee. If none are available, a plastic ot teflon kitchen spatula works exceptionally well or a plastic paint/drywall scraper but NOT the brittle kind. You want strong but flexible. For smaller and uneven areas, the felt pad shown is used as it forms to contours. You can make your own out of similar material.


This company is a good source for videos but RolandUSA is really the holy grail of technique libraries.
 
Ok. Positive vibes from the cutter. It can do “detail”. I think I might need more on the circle outside the D. But this is all good. This is very cool. Progress towards finishing the gun!!!!!!
A good technique to use on ultra small weeding is the use of toothpicks to hold down material that should not be lifting but is. Lightly pin it with a toothpick held in one hand (not stabbing, just holding it down) and picking/weeding with the other hand. Don't push down too hard on the toothpick or the sticker you are holding down will begin to slide away from its origin. It's like playing pick-up-sticks and Surgery at the ssme time.
 
Thanks - I'll try to remember all this through the haze of "new" :)

Took a look at the other vids you posted, seems sensible (transfer tape, 1/4 application thereof). Have squeegie + pointy things + more vinyl on order. Hopefully I am in a resonable position to make some stickers and not f*uc*t it up.
 
Nothing magically new. Thought I would post pics of a .6mm vs .4 mm nozzle after spray.

Granted I didn’t take as much care on the “one that you can tell isn’t 0.4mm”.

Still. Looks like text should be done in 0.4mm

Btw: this is my test piece for stickers. I’ve sanded. Primed. Top coated. Same paints. Different time tho. This top coat will not have 2+ weeks cure time before I apply stickers.

Comment at will :)
 

Attachments

  • IMG_1972.jpeg
    IMG_1972.jpeg
    2 MB · Views: 76
  • IMG_1973.jpeg
    IMG_1973.jpeg
    1.9 MB · Views: 71
  • IMG_1974.jpeg
    IMG_1974.jpeg
    1.7 MB · Views: 72
You are going to love having your own cutter for these projects. Cut positives, cut negatives, pinstriping and pinstriping negatives (applying pinstriping, paint the whole gun and then remove the pinstriping), stickers, acid wash stencils for glass, on and on. Youn can even stencil electrical connections for conductive strips that take up no space.
Yep, hours of endless fun:love::love:(y)(y)
 
Nothing magically new. Thought I would post pics of a .6mm vs .4 mm nozzle after spray.

Granted I didn’t take as much care on the “one that you can tell isn’t 0.4mm”.

Still. Looks like text should be done in 0.4mm

Btw: this is my test piece for stickers. I’ve sanded. Primed. Top coated. Same paints. Different time tho. This top coat will not have 2+ weeks cure time before I apply stickers.

Comment at will :)
Really looking pro that piece:cool::cool:(y)(y)
 
Nothing magically new. Thought I would post pics of a .6mm vs .4 mm nozzle after spray.

Granted I didn’t take as much care on the “one that you can tell isn’t 0.4mm”.

Still. Looks like text should be done in 0.4mm

Btw: this is my test piece for stickers. I’ve sanded. Primed. Top coated. Same paints. Different time tho. This top coat will not have 2+ weeks cure time before I apply stickers.

Comment at will :)
Two thoughts, yes on finer nozzle needed on the text (clear proof), but how are you getting such large pieces finished so quickly? Are you running more than one printer? What layer thickness are you running? Do you increaae your "travel" above default? Now I need to roll back through this thread and fouble check if you already mentioned all this. And ya that's more than 2 so..... wandering back up the thread.
 
Oh great, now I'm hooked. Are these letters inset on the original hero prop? I ask because inset, 90 degree corners are near impossible in actual metal. The only true 90s that I know of are laser etched or very shallow stamped. I feel like you are going to say, "Oh well the letters are stamped in the original" and Politely tell me I know little of the original prop but it won't deter me from saying, "OK, but how did 'they' get 90 degree corners on their letters?"
 
The letters are there on the original.

Elysium-Movie-Prop-Stun_t-Gold_Protection_Droids-SMG-768x753.jpg


For the test of stickers, I chopped off the bottom of the handle.
IMG_1975.jpeg

Print wise, for larger parts I use a 0.6mm nozzle, and 2 perimeters, infill 15%. The 0.6 (and going from 3->2 perimeters) reduces print time quite a bit. Less so on a modern (MK4S or similar) with a high flow nozzle. But it's still quicker. Only downside is, as you can see, less detail is possible.
Oh; and I raise the layer height to 0.4mm as well. You get MUCH more ... "liney" prints, but if the item is being sanded/filled/primed then doesn't matter.

I would say for this project, you DO want 0.4mm, with probably 0.2mm layer height.
There's LOADS of tiny small details all over the thing.
 
The letters are there on the original.

View attachment 1911366

For the test of stickers, I chopped off the bottom of the handle.
View attachment 1911367

Print wise, for larger parts I use a 0.6mm nozzle, and 2 perimeters, infill 15%. The 0.6 (and going from 3->2 perimeters) reduces print time quite a bit. Less so on a modern (MK4S or similar) with a high flow nozzle. But it's still quicker. Only downside is, as you can see, less detail is possible.
Oh; and I raise the layer height to 0.4mm as well. You get MUCH more ... "liney" prints, but if the item is being sanded/filled/primed then doesn't matter.

I would say for this project, you DO want 0.4mm, with probably 0.2mm layer height.
There's LOADS of tiny small details all over the thing.
Ya, that would mean the original would be a cast part to have such clearly defined lettering. That would make perfect sense for a production line item in the real world.

Thank you for the specs on the fast turnout. This is all new to me (3d printing in general) so this helps greatly. So fill material is expected and then sanding.

If you fill lettering or detail (even a little), what tools do you use to clean it back out?
 
I don't. I make the lettering FAT (a pt size larger, or bold). Then it seems to sort of sort itself out :) (filled by paint)
 
This is just a black white test. Off to my mate with the color laser and some sticker paper!
 

Attachments

  • image.jpg
    image.jpg
    1.7 MB · Views: 68
This is wrong color. I don’t have black vinyl yet. But it wirks!

I’m going to fill this with sticker types, then see what clear does to it all
 

Attachments

  • image.jpg
    image.jpg
    2.3 MB · Views: 67
First stickers. The print came out… average. It’s a bit light. The letters in text do t stand out enough.
image.jpg
Cutting was ok. Not absolutely perfect but I think I’d be happy enough.
 
Aaannnnd $1.50 down at the local print shop later….

The yellow sticker on the rhs is the new one
 

Attachments

  • IMG_1976.jpeg
    IMG_1976.jpeg
    3.9 MB · Views: 110
Aaannnnd $1.50 down at the local print shop later….

The yellow sticker on the rhs is the new one
Is the print being reloaded into a secondary cutter via target marks? There seems to be a consistent shift to the left before cutting. The yellow one would work fine because you can trim the white from the left hand side but the other small one seems to be cut very close to the C. This is nitpicking of course because at anything over a foot away they will look wonderful. Question on the first batch of printed ones, the dashed lines throughout would likely mean the image was printed at a lower dpi than the image you provided. Possibly a conversion step is dropping the quality? Again, only going to notice with one eye nearly touching the plastic but it is there
 
Back
Top