put your second clear layer on before cutting the shape and before adhering to the surface.
So the stickers should be over the clear? (I had intended to put them on, THEN clear coat)
put your second clear layer on before cutting the shape and before adhering to the surface.
Depending on the type of sticker/decals you'll put on, the paper quality (or the transparent plastic film) might be impacted by your clear coat...now or overtime.So the stickers should be over the clear? (I had intended to put them on, THEN clear coat)
") . Guess that's how one learns!
. Guess that's how one learns!Wow! Thanks greenmachines, awesome info! I hadn't even *considered* printing them myself. I don't currently have an inkjet or color laser, but those are cheap(er) now. I'm assuming I can get hold of the materials you mention (though I havn't checked locally).
For a clear cover over the sticker, does it have to also cover over the edge of the printed sticker part?
Second Q is if the sticker has a non rectangular shape - how do you cut the clear vinyl for the top (cover) so it doesn't look .... crap? Is it a case of a sharp scalpel?
I've only just tonight gotten around to asking 3 local places for quotes / feasibility. We'll see how they turn out. I don't know as yet what materials those people I've asked for quotes would be using.
This is all after taking some time off to change out the clutch on my car (which I had never done before). It turned into a 4 day job because I made a 101 mistake with the clutch fork and had to ... take it all apart and do it a second time
Thanks for that mini-tuto greenmachines; really helpful for sureThe cutting results are the actual reason for waiting to cut until you have placed the clear over the print. Only when they are cut together (clear already applied) does it look legit. The sticker will need to stay on its backer sheet after printing. Lay the clear over it. Then squeegy out any bubbles if needed. Then cut. After the cutting is complete to the final shape, you can peel the sticker off the backer paper and apply. There are techniques to each step so videos are your friend. For larger stickers, I use soapy water on the surface I am sticking to which allows it to be lifted and adjusted until you are happy with placement, then pin down one edge and slowly squeegee the water out. Take several runs at it and all the water will be gone. For the full sticker run through where exact placement is needed an over sheet of light tack tape is used but this is more technique than you need for these small ones.
If you are lucky enough to have all straight edges needed, use a cutting guide/straight edge rather than eyeballing it.
Most of the materials are readily available at office supply and automotive supply stores (paint shops). And Staples will print them for you and sell you the cover clear as well.
And ALWAYS practice on a sample board or plank rather than on your work.
This will of course be much more than you need but read all the way through for anything useful.Stickers: [x] TICK. Whew. Had to recreate them using an SVG editor. Took a bit of time, but now I have them!
So we have 3 x full color. And then a bunch of transfers. greenmachines, how are transfers normally handled?
(by transfer I mean something applies with some transfer tape, where there are non-joined but 'gee I really do want to be aligned' pieces)
View attachment 1909306
When my father was applying transfer letters to glass (for window displays for stores/restaurants, etc...) he always used the soap trick to play with, sometimes, huge decals/transfers.took me quite a while to find a video that was correct and this lady nails it:
slow start but she tags each of my normal steps except the soapy water which is a hard surface only trick and not for crafters
Sounds like you got the same apprenticeship I did. To those who have lived the sticker life, I say strange things, like, "that was about as easy to read as black on glass".When my father was applying transfer letters to glass (for window displays for stores/restaurants, etc...) he always used the soap trick to play with, sometimes, huge decals/transfers.
I would say fire up another thread. I'm *trying* to make this one just about building the Carlyle SMG - unsure how well I'm succeeding at that, but that's the ideaSpeaking of..... I have a few more walls to knock down in my quest for 3d printer knowledge, scornflake so shall I post here or pm? I badly need a full 3d worldview thread where we drag our 3d pros kicking and screaming to help save humanity.... or at least our polymer replication of it.
. I'm happy to share what I do, 3d wise, if it's any use?!Throw up some pics and sources when you get to the printing stage. I would love to see the production of the stickers. You must have some crazy good design skill in those fingers because the stickers look official. What software did you use for your vector art?I would say fire up another thread. I'm *trying* to make this one just about building the Carlyle SMG - unsure how well I'm succeeding at that, but that's the idea
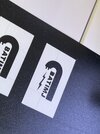
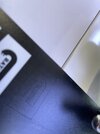
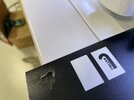
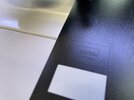
I miiiiight have just bought a vinyl cutter.
Still learning. But after three cuts got a “weed” (cutter world word!) that gave me a good transfer. Of course you could weed (sounding fancy again) the negative and spray that on the thing.