You are using an out of date browser. It may not display this or other websites correctly.
You should upgrade or use an alternative browser.
You should upgrade or use an alternative browser.
Making my first prop: The Mandalorian Helmet
- Thread starter Numitor
- Start date
Numitor
New Member
Update:
The plaster bandages for making the hardshell didn't work out. Should've known that after an hour, when it didn't set well, something was up. The plaster was still soggy the next day so I decided to remove it; it didn't keep form at all.
Sooo, ordered some plasti-paste and did it the regular(?) way.
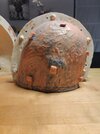
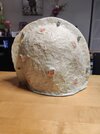
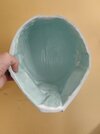
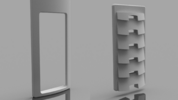
And then today on X-mas day, i could unwrap a great present: the mold turned out perfect!
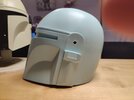
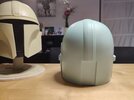
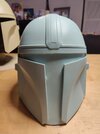
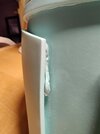
I had to cast it to see the result: first time rotocasting went well all in all. It pooled up a bit in the front but that will be ok once I cut out the visor.
Maybe i'll try to cast a second one, a bit thinner and more uniform...
Got some paint for my airbrush in the mail today so everything ready for the next step. I coated the mold with babypowder so hopefully the primer will go on smoothly.")
The plaster bandages for making the hardshell didn't work out. Should've known that after an hour, when it didn't set well, something was up. The plaster was still soggy the next day so I decided to remove it; it didn't keep form at all.
Sooo, ordered some plasti-paste and did it the regular(?) way.
And then today on X-mas day, i could unwrap a great present: the mold turned out perfect!
I had to cast it to see the result: first time rotocasting went well all in all. It pooled up a bit in the front but that will be ok once I cut out the visor.
Maybe i'll try to cast a second one, a bit thinner and more uniform...
Got some paint for my airbrush in the mail today so everything ready for the next step. I coated the mold with babypowder so hopefully the primer will go on smoothly.
Attachments
-
 IMG_20201225_192629.jpg2.4 MB · Views: 142
 -
 IMG_20201225_192450.jpg2.6 MB · Views: 125
 -
 IMG_20201225_193154.jpg3.7 MB · Views: 126
 -
 IMG_20201225_192846.jpg2.3 MB · Views: 132
 -
 IMG_20201225_193034.jpg2 MB · Views: 140
 -
 IMG_20201225_193115.jpg2.1 MB · Views: 122
 -
 IMG_20201225_192936.jpg2.3 MB · Views: 141
 -
 IMG_20201225_192947.jpg2.6 MB · Views: 149
 -
 IMG_20201225_193649.jpg3.8 MB · Views: 153
Last edited:
Numitor
New Member
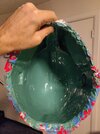
Yes, way too thick, mostly in the front. Top and rear are quite good. I guess i need to learn the mold: smaller batches of resin next time and make it pool mostly in the ears.Looks like a very thick cast, but very sharp too.
Numitor
New Member
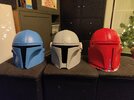
So, after a couple of castings, here are my findings...
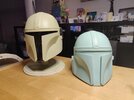
The first one (Teal one in previous post) was way too thick, only useable for a display piece or so...
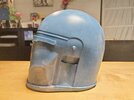
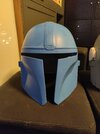
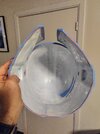
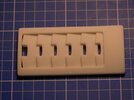
Second one (blue one) was way better: I used about 950ml of resin in 7 layers, 5 batches of 150ml and 2 of 100ml. This seemed to be the perfect amount. I didn't seem to have mixed in the coloring well, hence the darker specks, though this wouldn't affect the final result.
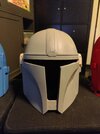
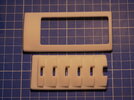
Third one (gray), even better, nice and even thickness. I didn't cut out the visor part totally as you can see, this makes it a bit sturdier and the visor can be fitted in front of this piece so no worries...
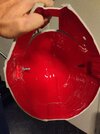
I did a fourth cast (red) just to see if i could still improve, got about the same result.
Still deciding if i'm going to use the gray or the red one.
The first one (Teal one in previous post) was way too thick, only useable for a display piece or so...
Second one (blue one) was way better: I used about 950ml of resin in 7 layers, 5 batches of 150ml and 2 of 100ml. This seemed to be the perfect amount. I didn't seem to have mixed in the coloring well, hence the darker specks, though this wouldn't affect the final result.
Third one (gray), even better, nice and even thickness. I didn't cut out the visor part totally as you can see, this makes it a bit sturdier and the visor can be fitted in front of this piece so no worries...
I did a fourth cast (red) just to see if i could still improve, got about the same result.
Still deciding if i'm going to use the gray or the red one.
Attachments
-
 IMG_20210101_181007.jpg4.5 MB · Views: 109
 -
 IMG_20210101_181033.jpg4.5 MB · Views: 98
 -
 IMG_20210101_181042.jpg4.2 MB · Views: 100
 -
 IMG_20210101_181050.jpg4.5 MB · Views: 104
 -
 IMG_20210101_183046.jpg4.5 MB · Views: 83
 -
 IMG_20210101_182947.jpg4.1 MB · Views: 79
 -
 IMG_20210101_183024.jpg4.6 MB · Views: 106
joberg
Legendary Member
Beauty and the roto-casting process is really difficult to achieve; too much speed during rotation: not good. Too watery: not good either...and so on and so forth. Eager to see your next casting/updateUpdate:
The plaster bandages for making the hardshell didn't work out. Should've known that after an hour, when it didn't set well, something was up. The plaster was still soggy the next day so I decided to remove it; it didn't keep form at all.
Sooo, ordered some plasti-paste and did it the regular(?) way.
And then today on X-mas day, i could unwrap a great present: the mold turned out perfect!
I had to cast it to see the result: first time rotocasting went well all in all. It pooled up a bit in the front but that will be ok once I cut out the visor.
Maybe i'll try to cast a second one, a bit thinner and more uniform...
Got some paint for my airbrush in the mail today so everything ready for the next step. I coated the mold with babypowder so hopefully the primer will go on smoothly.
Numitor
New Member
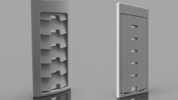
As the casting of the helmet is done, i'm focussing on the ears and vent now.
I gave them a good layer of glossy black primer and started to paint them with some Alclad chrome. I wasn't really satisfied with the result: those damned layer lines still visible in the chrome... aaaargh!
I got a new resin printer last week, so I thought it would be better to resin-print the pieces and start the sanding process all over . Got a much better result but still not perfect: it's so hard sanding those little corners!
Sooo..., i went back to the drawing board, trying to redesign them for easy sanding and printing directly on the bed.
Will print them tomorrow, see what gives...
Attachments

Last edited:
kaitoukiller
New Member
how the result?So the moulding went ok yesterday, I was fighting a bit with the silicone; the more Thivex i added, the messier it got
Making the hard shell I did this morning. I hope it will be strong enough...
Now watching it dry... *sigh*
Similar threads
- Replies
- 3
- Views
- 369
- Replies
- 9
- Views
- 1,371
- Replies
- 5
- Views
- 1,065
- Replies
- 5
- Views
- 338