Magic of Myth ( MoM ) Luke RotJ Hero ( cave build ) lightsaber research, images, reference, & collaborative model builder's discussion.

Might be a good time to remind/ mention that we fully intend to do a static Hero perfect for display and are finally ready given….

We now have all the ingredients confirmed to include in the kit to replicate the perfect cave hero which is something I’ve been holding out for.
-Ultra Refined hilt geometry based on latest reference.
-Confirmed donor board replicas for the reveal.
- confirmed electronics assembly in the box
- And now confirmed Luke’s tools for activation.
(Which I’m hoping to dub the Energy Matrix Dampener)
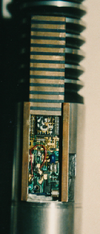
You had me at Static. It's been a joy watching this team develop this hilt over the past few years. From Fx to Static, you can't go wrong.
 
Nice work Bryan! Looks great! A vinyl stencil would definitely be a good option for getting them consistent if you were doing a lot of them, like Danny says. Or if you were wanting to send something out to help people do it themselves. They're proving to be a good option with the pommel damage, which I'm applying with a rotary tool. (y)

As for the dark spot/shadow "behind" (?) The buttons... I agonised over this for quite some time, as I thought it **could** be a hole in the face of the control box. I decided it just wasn't conclusive enough, and could just as well be a small chip/sharp edge on the plastic buttons (if they are plastic of course).

It's still hard to say for certain, but the box is well lit from the right hand side/front, so I'd say that rules out that it's a shadow.

I think I still lean towards it being a part of the actual button.

Something I've never considered (until right this second) is that the buttons could be wrapped in black tape?? Perhaps the little sliver in the top corner is the end of the tape hanging over the edge slightly. If that makes sense?

BOXSHOT2.jpg


Just some thoughts. Great work as always Bryan. :)
 
Great information about the board guys! :)

Now I'm looking for an accurate board including lights and circuit board.
Anybody offer something?
Thank you very much
 

Attachments

  • Screen Shot 2019-05-24 at 4.24.53 PM~01.png
    Screen Shot 2019-05-24 at 4.24.53 PM~01.png
    298 KB · Views: 61
Working on my one and only weathering commission (for a special board member we all love and appreciate) with one of the MOM Gen2’s.

Hope you enjoy the translated marking hereView attachment 1579959
Took a second look at this today - looks like my early attempts at making a better surface to glue to… rough it up with a dremel

Do we know for sure if the Yuma box was machined out of one piece, or if the lever was a separate piece? That weird possible hole behind the front button could be some sort of pin hole or remnant if the lever was separate.

Smooth aluminum hastily glued to another smooth aluminum surface wouldn’t stick, I’ve done this and had better results with more topography… pins or at least a buzzed surface
 
Do we know for sure if the Yuma box was machined out of one piece, or if the lever was a separate piece? That weird possible hole behind the front button could be some sort of pin hole or remnant if the lever was separate.
The one *great* Yuma reference I know of is the high res chin shot… but of course that’s the other side anyway high res or not. I can’t tell from film stills… but I do firmly believe the lever was severed somehow and marred both the bottom of the lever and the face of the button section. If you look at the *top* of the buttons in the references- I believe assertions can be made that it was marred at the same time with the same tool in a mirrored pattern.


Now:
I can’t believe I forgot to cross post!

Thread 'Thin Neck Thanksgiving- Luke Cave Found Parts Revealed!'
Thin Neck Thanksgiving- Luke Cave Found Parts Revealed!
In this thread I reveal the parts I found late 2021 and early 2022.
Wrapping up 3 items in the “cave build” found parts section.
E6430AE8-FA9D-47BB-B936-EBB0E0C4BDBD.jpeg


I believe the last item to find will be the hard won actual clamp card seen with visible clear conformal coating.

And bets are open if the arrows are found parts or fabricated still.

And of course: a belated Happy New Year! To everyone who’s watching this thread. Best to you all!
 
Piggy backing off BRRogers post, I was lucky enough to acquire the correct vintage cave tool and Casio Reveal card for my personal collection

23D3C86E-EF67-42A1-AF7C-EBC0453D7785.jpeg


But in an effort to create a fully complete hero box, I was also able to find a Vector Board (as Bryan stated still on the lookout for the perfect conformal coating)

79A2B3AD-CB3E-435B-9656-5BF983201B4B.jpeg


But best of all, was also able to acquire some ILM production used Death Star II Brass for the internals

C043C1CA-FA48-40EC-A980-D74FF6BAA781.jpeg


Excited to figure out the assembly and wiring of the control box to finish it off
 
absolutely beautiful, congrats! calc looks to be in great shape and its amazing to see the brass in person!!!

BRRogers Do you have a shot showing the mirrored damage handy? or the specific photos and I can dig them up myself, having trouble picturing this. I know the damage under the buttons, which I was thinking was from sloppy cutting or added texture for glue to grip but the other damage I must have missed
 
And bets are open if the arrows are found parts or fabricated still.
What kind of tools / machine was needed back in the 80s to make such small triangle holes in the aluminum plate? Isn't it just too much effort to build from scratch what essentially is auto-reverse indicator, instead of taking one from some tape player? Or compared to just drilling 2 simple round holes , putting 2 3mm leds in them and be done with it?
I'm sure other people already have spent countless hours looking at vintage car tape players, etc. so I'm not going to, but just from the effort prespective to make a control box with 2 blinking lights looks like it was most likely a found part.
 
I currently prefer the Hero control box black buttons to have real scars on the bottom rather than glue. I had completely compromised when I made it on the box. It reminds me of the scene when the crew used a file to trim the switches on the Yuma box. Of course the yuma control box still looks very broken in that high resolution.

323008347_750991225857864_5972747825320200568_n.png


322987382_5905120776207517_263349779470500337_n.png
323069289_685858243071421_7767446695267031496_n.jpg
321527142_694795505482882_3929380571380954146_n.jpg
321298697_736073517933779_5524861593685321_n.jpg.png
 
What are the dimensions of your control box? I had to shave the walls on mine (7chambers) from the inside so the board fits properly that If I make such a deep scar on the outside it will make a hole for sure.
 
What are the dimensions of your control box? I had to shave the walls on mine (7chambers) from the inside so the board fits properly that If I make such a deep scar on the outside it will make a hole for sure.

The MOM box is indeed a bit small, if you want to put the Vintage circuit board into the MOM control box, then you need to trim down the thin walls on both sides of the MOM box to the same size 1.5MM thickness at the same time, then the Vintage circuit board can be installed properly! Unless your Vintage board is larger in size than mine, then it will require more trimming to fit properly. At least I'm currently 1.5MM thick on both sides.


20230110145434.jpg
20230110145436.jpg
20230110145438.jpg
20230110145430.jpg
 
I didn't measure, but I guess the walls on mine were at least 1.5mm to begin with. Now are at 1mm to have enough space on the sides of the chip to match what I'm seeing here:
1673336613172.png


On the outside the box is 18.23mm wide, so that leaves 16mm for the board.
 
Last edited:

Your message may be considered spam for the following reasons:

If you wish to reply despite these issues, check the box below before replying.
Be aware that malicious compliance may result in more severe penalties.
Back
Top