Mad Max: Fury Road - Immortan Joe's Respirator

Sinned

Well-Known Member
RPF PREMIUM MEMBER
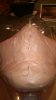
At least, I think it's a respirator. Something to that effect anyway. All I know is, it's damn cool, and I want one! I've been lurking around for a while, and figured it was time to post something-- I think this is my overall first post, so hopefully I do it right. I've seen a few people working on one of these, but this is my take.

I'm getting ready for Halloween . . . running a bit behind, but hopefully will get it done in time. One problem with doing something from a movie that hasn't come out yet, I'm not sure anybody will know who I'm supposed to be, until they realize it later this spring. :)

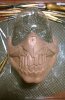
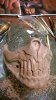
There aren't many reference images available for Immortan Joe, but I found a few, and grabbed a few screens from the trailer. Sculpting is coming along pretty good; still working a bit on symmetry, and finalizing details. I have a few things I can't decide on though:


  • I'm trying to decide if I should incorporate the "pins" that hold the teeth in place as part of the original sculpt, or add them separately to the cast piece. More work that way, but might look better, plus avoid issues with air pockets.
  • What to do with the hoses that come off the mask. I have considered building up a model of the fitting for 3D printing, or just skipping it, and attaching the hoses directly (I did a test-look picture of the latter).
 

Attachments

  • WP_20140921_001.jpg
    WP_20140921_001.jpg
    1.5 MB · Views: 136
  • WP_20140926_005 1.jpg
    WP_20140926_005 1.jpg
    1.2 MB · Views: 135
  • WP_20140926_003 1.jpg
    WP_20140926_003 1.jpg
    1.5 MB · Views: 105
  • WP_20140926_002.jpg
    WP_20140926_002.jpg
    2.5 MB · Views: 110
  • WP_20140925_002 1.jpg
    WP_20140925_002 1.jpg
    1.5 MB · Views: 127
  • WP_20140924_006 1.jpg
    WP_20140924_006 1.jpg
    1.8 MB · Views: 100
  • WP_20140923_003 1.jpg
    WP_20140923_003 1.jpg
    1.9 MB · Views: 138
  • WP_20140921_003 1.jpg
    WP_20140921_003 1.jpg
    1.6 MB · Views: 123
Thanks! I'm happy with it so far. Trying out a different head form, and it has worked out pretty well, although I find the shape to be a little off. Kinda neat being able to "try it on" as I'm working on it though.

Finalized the form of the right side last night, now just have to make the left side match--proving to be more difficult than I thought it'd be. Anxious to get on to final texture and embellishments...

Definitely excited for the movie. Mad Max was one of my favorites as a kid, I really hope this lives up!

WP_20140930_001.jpg
 
Oh, cool! How is yours going zanefielding? Have you decided how to go with the pins, and hoses. I'm still undecided on hoses, but have pins all figured out, I think.
 
Finally finished final form on both sides, and basic cleanup. Used mineral spirits and brush/finger to smooth out tooling marks, and make things look a little more natural last night, as well as some texturing, and start with the hardware. Still a few embellishment pieces to add tonight, and then finalize all the hardware.

I found some pins that I think will work well for the teeth, and got those ready last night. They were a little too perfect, so clamped them in the vise and dinged them up a bit with a ball peen hammer. Did the same thing with some brass screws for the cheek pieces.


WP_20141006_015.jpgWP_20141006_017 2.jpg
 
Oh, cool! How is yours going zanefielding? Have you decided how to go with the pins, and hoses. I'm still undecided on hoses, but have pins all figured out, I think.
I had to take some time off mine for a couple weeks but it was going well.. I think :) I will post pics soon.

I am going to have pins and the hose connectors but no hoses.

- - - Updated - - -

BTW. I love your teeth. I struggled for so long to get them right, and still not there. You really captured them.
 
Nice! I wound up taking a bit of time off as well; several other distractions popped up. October is crazy busy around here. :)

Haha, I'll have hoses, but not connectors. I tried 3D modeling the connectors, but gave up for now; not enough time to finish those before Halloween; they'll have to go into v2.

Thanks about the teeth, those were a bit of work. I finally just lucked into something that looked close enough. :) Finished everything else last night, and started molding. I'm not happy with the nose bridge-- decided I have that a bit too broad. Will see how it looks after painting, but might shave down and mold it again.

WP_20141011_044 1.jpgWP_20141011_045.jpgWP_20141011_046.jpgWP_20141011_050.jpgWP_20141011_056.jpgWP_20141011_063.jpgWP_20141012_004.jpg
 
thats looking so awsome! would you mind telling me what sort of clay your using or even just the brand name please?? and is that transparent head your sculpting on something that you bought or did you make it yourself?
 
thats looking so awsome! would you mind telling me what sort of clay your using or even just the brand name please?? and is that transparent head your sculpting on something that you bought or did you make it yourself?

Thanks! The clay is Monster Clay. Available quite a few places online, but I usually order via Amazon (not sure what best options are for Australia). If you haven't used it before, it's an oil-based clay which softens very easily, yet hardens enough to hold an edge, and good detail. It is interesting stuff...not oily at all, and feels kind of like a plastic clay. Hard to describe. Probably categorized somewhere between medium, and hard. I like it quite a bit, but sometimes wish it was just a little harder. It can be frozen with canned air, and sanded (lightly), and also smoothes well with Mineral Spirits, which is what I have used the most. They sell a special smoothing agent (isoprophyl myrustrate, or something like that) but I wouldn't recommend using it. It softens up the clay way too much, and makes it slightly gooey for a while. It has its uses, but I don't like it.

The clear head form is something I found online a while back. Trying to find the link for it in my email; will post if I can track it down. It was definitely handy for mask making, but not my favorite base I've used.

Plus:
* You can "try on" the mask as you're working on it.
* Light weight
* Built-in tray for holding tools, and collecting scraps
* Built-in catch base for molding
* They sell 2 different "depth" sizes. This is the deep one; there is another with a much shallower profile, meant for masks that don't extend beyond the ears.

Minus:
* The overall form is a little weird. It is vacuformed, with no undercuts, so you have to guess at chin, ears, and actual jaw line. The chin is the worst bit. I almost took a heat gun to it, and pressed in an undercut there. But I didnt want to risk messing it up, and jeopardizing my timeframe for this. :)
* Unless you have an easel, you're always sculpting from a top-down viewpoint.
* Being clear is a positive for trying it on as you go, but it's also a negative for working with, because it is hard to make out exact location of facial features. Before I started, I drew on important references with a marker, but was still missing some context.


WP_20140920_011.jpg

WP_20140920_011.jpg
 
Last edited by a moderator:
Last few process pics to round it out. Support shell was done with Free Form AIR, because I was out of Plasti-Paste, and had some of this sitting around. I thought it would be a bit of a waste to use it, but turns out I really like it. The resulting shell is super light (obviously), but it was also really easy to form and smooth. Simple to build a little pedestal for it to sit on between slush cast layers as well.

WP_20141013_003.jpgWP_20141017_005 1.jpgWP_20141017_008 1.jpg
 
Casting went quite well, and drilling for hoses and straps. I'm short on time for Halloween, so not going to make the hose attachment fittings for this version, instead the hoses will go right into the mask directly. It fits quite well, but I'll have to line it with a little padding, for comfort. Next up, paint!

I've never done teeth, or bone before. Any tips?

WP_20141018_013.jpgWP_20141018_016.jpgWP_20141018_017.jpgWP_20141018_032.jpgWP_20141018_035.jpg
 
Last edited:
On to paint. I decided, after spraying the primer, that I wanted to file out some of the larger holes between the teeth. After doing some on the middle, it became clear that was going to be a lot of work, and should have been done prior to primer, so I stopped with that; something to consider for the next one. At least I can fit a small straw through the middle teeth now though. :)

I'm not sticking 100% with the screen colors, opting to make the upper jaw more red.

WP_20141019_024.jpgWP_20141019_011.jpgWP_20141020_003.jpgWP_20141019_019.jpgWP_20141020_006.jpgWP_20141019_022.jpgWP_20141020_007.jpg
 
Last edited:
A little more paint progress. The teeth aren't quite as yellow as the picture shows (weird light?), but they're still way more yellow than I'd like. I'm just not sure what color to use to get that old, "tooth" type look, and still differentiate from the jaw. Any ideas?

WP_20141021_025.jpg
 
Seriously bad ass, This mask caught my eye in the trailer and I wanted to attempt it just have had 0 time between all my other stuff. Glad to see someone rocking it!
 
Thanks!

This mask caught my eye in the trailer and I wanted to attempt it just have had 0 time between all my other stuff.

Definitely, as soon as he flashed on the screen, I knew I had to have the mask. But time.....LOL, yeah, I think my wife's had about enough of me dinking around already, this Fall.
 
This thread is more than 8 years old.

Your message may be considered spam for the following reasons:

  1. This thread hasn't been active in some time. A new post in this thread might not contribute constructively to this discussion after so long.
If you wish to reply despite these issues, check the box below before replying.
Be aware that malicious compliance may result in more severe penalties.
Back
Top