I think everything is looking great. My only question ( and please accept my apologies if this has already been brought up), what about the extruding ring on the bottom of the pommel?

-
Welcome to the Project Runs Forum!
This forum is intended for interest gauging and active runs. Due to the transient nature of this forum, please keep all research and ongoing discussion in one of our main forums so your information is not lost.
Only Premium Members can start a new run.
You are using an out of date browser. It may not display this or other websites correctly.
You should upgrade or use an alternative browser.
You should upgrade or use an alternative browser.
Limited Run Luke's ROTJ Static Yuma/ISYHCANL/Hero Variations Kit Parts Run (Sign up closed/In Production)
Hi. It has been debated elsewhere. There is a debate over whether it's raised or not. I don't believe it is personally. There is definitely a mark there, and it is in roughly the place where you would expect a highlight if it were raised. I think this is an illusion though. All other references suggest that it's flat, with a mark made by the lathe chuck. BRRogers has a section on it over on the Mom thread.I think everything is looking great. My only question ( and please accept my apologies if this has already been brought up), what about the extruding ring on the bottom of the pommel?
View attachment 1282286
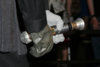
With the flash in this photo, and at this angle, if the feature in question were raised, I'd expect it to be catching the light:
May not be much but think there is definitely something there. Like you mentioned it could be a tooling mark but there is something. Here are some level adjustments to that image:

some more comparison from the two angles show that the highlights and the shadows match.

There's definitely something there. It would be very easy to add to the model. I'm just a bit reluctant to add it to the actual physical model if it's only a cosmetic mark. There's a layer of clear coat on there that's fogging. It could be that it's missing from the inner circle, and has built up around whatever was used to secure for spraying? I'm willing to make adjustments still. I just want to be sure the model is 100% accurate. I'll have a play/think today and get back to you.some more comparison from the two angles show that the highlights and the shadows match.
View attachment 1282293
Cheers,
Dave
Wow, that's a sharp image! Nice! Yeah. It's still visible, just barely, but I'd say that it's caused by a difference in surface roughness. Probably to do with the clear coat.I think is flat. In some pictures it seems raised, but in other definitely not, like the one Dave posted, and this one. The tweaking in the control box arrows is definitely great, Thanks
Are you happy for it to be left flat juajn7fernandez ? Based on that image?
No problem at all Inigou. It's worth making these little changes before I get the parts ordered. I'll update the CAD drawings over the weekend to make sure they match up to the models.
I've decided to increase the size of the hole in the base of the pommel ever so slightly too based on the checks I did last night. Wanting this to be absolutely perfect in every detail!
")
Cheers!
Dave
I've gone back and forth over this.... at this point.
Dan (starkiller) has said he had a chance to hold and examine the Hero (supervised), on a couple occasions and has commented that he has felt a lip there on the pommel... as a notable remembrance. The way he (and others like nicksdad) have translated that is by making it raised.
Considering that argument (but difficulty in finding DEFINITIVE High Res photos of that angle).... along with what we DO have in photos. I can definitely say that the raised pommel *at least* has been too tall on those replicas.
I can't say how tall since I don't own one of those: But certainly no thicker than a thin sheet of paper (which your finger will catch). I think the idea there is it's just enough to feel... but barely enough to see (or capture photographically)
That is a very fine line of 'do or do not' in terms of machine spec.
The other theory is a scratch from a lathe chuck... or drill chuck which you can 'feel' as well (although not raised) and looks similar under photography.
Still trying to find new photos all the time to see the unseen if possible and make sense of that.
Thanks Brian.I've gone back and forth over this.... at this point.
Dan (starkiller) has said he had a chance to hold and examine the Hero (supervised), on a couple occasions and has commented that he has felt a lip there on the pommel... as a notable remembrance. The way he (and others like nicksdad) have translated that is by making it raised.
Considering that argument (but difficulty in finding DEFINITIVE High Res photos of that angle).... along with what we DO have in photos. I can definitely say that the raised pommel *at least* has been too tall on those replicas.
I can't say how tall since I don't own one of those: But certainly no thicker than a thin sheet of paper (which your finger will catch). I think the idea there is it's just enough to feel... but barely enough to see (or capture photographically)
That is a very fine line of 'do or do not' in terms of machine spec.
The other theory is a scratch from a lathe chuck... or drill chuck which you can 'feel' as well (although not raised) and looks similar under photography.
Still trying to find new photos all the time to see the unseen if possible and make sense of that.
It's driving me round the bend! I'm still back and forth on it! I'll have a closer look again this evening (again!
). Really need to make a decision on it now. I'm back to 50/50! It's a tough call. I can see in some images that the surface looks flat, but even on those images you can see there is something catching the light and casting shadow. Which makes two of the theories absolutely plausible: A- the clear coat edge, if there was something holding the hilt causing a paper thin edge. B- A tooling mark gently wedged in by the lathe or a drill press. Both of which could be felt with your finger, as brought up by BRRogers
I have one of Nicksdad hero hilts and as amazing as it is, I agree that the ring at the bottom is a bit too tall ( extrudes too much).
I will be happy with whatever you decide in the end and grateful that you are willing to listen to opinions and consider them.
I have one of Nicksdad hero hilts and as amazing as it is, I agree that the ring at the bottom is a bit too tall ( extrudes too much).
I will be happy with whatever you decide in the end and grateful that you are willing to listen to opinions and consider them.
Thanks, Juahn. Appreciated. I'll make a post at some point over the weekend to say which way I've decided to go. Still very much 50/50!It's a tough call. I can see in some images that the surface looks flat, but even on those images you can see there is something catching the light and casting shadow. Which makes two of the theories absolutely plausible: A- the clear coat edge, if there was something holding the hilt causing a paper thin edge. B- A tooling mark gently wedged in by the lathe or a drill press. Both of which could be felt with your finger, as brought up by BRRogers
I have one of Nicksdad hero hilts and as amazing as it is, I agree that the ring at the bottom is a bit too tall ( extrudes too much).
I will be happy with whatever you decide in the end and grateful that you are willing to listen to opinions and consider them.
Just want to keep everyone updated...
I'll be placing the order on Monday if that's ok with everyone. Just want to give everyone a chance to respond and confirm their order. In the meantime, I'll be doing one final pass of the models over the weekend. No drastic changes, so nothing to worry about. Just a couple of things to increase screen accuracy by that final 1%:
The step up to the channels in the pommel is a fraction too tall. Or rather, the channels aren't quite deep enough. We're talking a fraction of a mm, but I've been asked if I can alter, and on close inspection, I agree.
Also, the diameter of the hole for the Tri-Ring is a touch too big. This is resulting in it being slightly too close to the top of the pommel cube. These are very minor alterations, but again, on close inspection I agree.
This is the last chance to get this 100% screen accurate, and I think its well worth the extra effort. It does mean updating all the CAD drawings too before sending off to be manufactured.
As for the ring on the pommel. I'll be leaving flat. On balance, I believe that the actual aluminium is flat and that the mark is caused by a difference in surface texture. My reasons for coming to this conclusion are as follows:
1) There are various points on the pommel where a build up of clear coat can be seen. What looks like a highlight in the photo actually matches the colour and brightness of these other marks. It just happens to be where you would expect a highlight if the ring was raised.
2) All other photos appear to confirm that the mark, although still visible in some, is flat
3) If the ring was raised, due to the turning process, you would expect it to be a continuous circle and to be centred. You can see at the bottom edge of the circle that it is broken, with the outer circle bleeding in to it. I believe that this indicates that there are simply two different surface textures (probably caused by the application of clear coat. Could it be that the clear coat built up at the point where the hilt was in contact with some sort of support?
4) The circular mark is not centred either, which leads me to believe that it is not the result of the turning process.
Anyway, as promised, that's my decision, and my reasoning. Hopefully that's acceptable to everyone.
I'm going to sign off now until Monday, to get these changes done.
On Monday, I'll be posting a final preview of the models with these last couple of changes. I'll then send out payment requests to everyone.
As soon as all payments are in, I'll place the order.
So very excited to get this run in to production! A HUGE thank you again to all who have gotten involved and shown their support throughout.
Have a great weekend everyone and stay safe out there. Well, not out there! STAY HOME!
All the best,
Dave
I might be interested. I am pretty pleased with mine from the first run, but always like to upgrade when possible.
Please take a look at the diameter of the emitter hole. It was slightly too wide on the last run. You can see the mismatch in the overlay below.
Transitions from the pommel cubes to the hilt shouldn’t be angled. They are in fact perpendicular cuts if you go back and look at all the reference.
I also believe there is an ever so slight raised lip around the hole on the pommel. You are correct that the other replicas made it too prominent.
Thanks Chris.I might be interested. I am pretty pleased with mine from the first run, but always like to upgrade when possible.
Please take a look at the diameter of the emitter hole. It was slightly too wide on the last run. You can see the mismatch in the overlay below.
Transitions from the pommel cubes to the hilt shouldn’t be angled. They are in fact perpendicular cuts if you go back and look at all the reference.
I also believe there is an ever so slight raised lip around the hole on the pommel. You are correct that the other replicas made it too prominent.
View attachment 1282774
Happy to take another look at these before placing the order.
I've actually been having a discussion with someone on FB about the step on the pommel.
I'm sure it's angled. Although mine is definitely too tall at the moment. The reason I believe that it's angled is that the flat channel cut in to an angled step creates the curve at each end of the channel. If it were a 90 degree step, the end of the channel would be a straight edge. Please let me know if you're happy with that explanation, and that I've made sense there. It's hard to explain, but the model produced those curves naturally which kind of confirmed for me that the step is angled.
Like I said though, my step needs to be reduced before sending off to be manufactured.
I'll certainly take another look at the emitter for you too.
Thanks.
I understand the explanation as it’s a conversation I had with other makers. The end of the channels are straight edges and the side looks different depending on which cube you look at. Some of the channels are actually cut deeper than others.
I sent you a FB messenger request. Figured that would be easiest if you want to talk.
I sent you a FB messenger request. Figured that would be easiest if you want to talk.
Last edited:
Thanks, Chris. They are indeed all cut to different depths. Something I've noticed too. This is why my previous run is closer to some references than others. I've based mine on one of the more pronounced references, whereas the step is almost none existent on some. I'll add this to my final accuracy pass too. Cheers.I understand the explanation as it’s a conversation I had with other makers. The end of the channels are straight edges and the side looks different depending on which cube you look at. Some of the channels are actually cut deeper than others.
I sent you a FB messenger request. Figured that would be easiest if you want to talk.
Martin Sabers
Active Member
Great kit.
May be a stupid question but does the original MoM prop had blinking triangle leds with corresponding electronic or the blinking has been added post production?
And if the original prop had blinking LEDs, is the PCB the one allowing the blinking or it is just a fake PCB and the corresponding electronic is underneath the PCB?
Thanks is for your light and good luck with this beautiful kit
With kind regards
Clement
Hi Clement,Great kit.
May be a stupid question but does the original MoM prop had blinking triangle leds with corresponding electronic or the blinking has been added post production?
And if the original prop had blinking LEDs, is the PCB the one allowing the blinking or it is just a fake PCB and the corresponding electronic is underneath the PCB?
Thanks is for your light and good luck with this beautiful kit
With kind regards
Clement
That's a good question. I'm convinced the answer is both. BRRogers did some great work slowing down the footage and adjusting the contrast to show that there is a reflection on the body (I was under the false impression that there was no reflection). This would suggest that the lights are actually blinking. I believe there's a post process effect rotoscoped over the top too though.
As for the circuitry, the card that's visible in the shot is cosmetic. My 3D printed insert is a reproduction of the cosmetic PCB.
Cheers,
Dave
**Update is incoming....**
Sorry for the delay for those who are waiting. All model changes are done! Currently putting some renders together to explain some of the new features of the models.
All very subtle differences, but I believe we've got something that's pretty damn close to 100% screen accurate!
Thanks for your patience....
Similar threads
- Replies
- 9
- Views
- 1,167
- Replies
- 56
- Views
- 7,955