Luke Macrobinoculars Build

Collektor

Well-Known Member
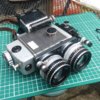
After a few years of hunting down parts I've finally finished my build of Luke's macrobinoculars. They're as close to screen accurate as I could get, considering a few parts couldn't be found. I had to build the viewer hood mounting box out of sintra and styrene as I couldn't get my hands on the vintage part, although I was able to track down a vintage viewer hood. This is the one build that took the longest, but was also the most satisfying watching it all come together bit by bit. My graflex lightsaber build wasn't nearly as satisfying as that was mostly several years of hunting around the local area to turn up a vintage graflex then slapping on the grips and calc bubbles and it was over.
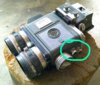
Also a big thanks to Trooper for supplying the lenses and mystery box.
1022259

1022260

1022261


The irony here is that I set out to make one set of macrobinoculars and wound up building three pairs.
1022262
 
Awesome piece! Question for you, how did you mount all the knobs and other parts? I’m at the stage where I have everything but no idea how to assemble the damn thing. [emoji23]
 
zsherman: I mounted all the knobs and greeblies in different ways depending on the part. The small round knobs are all drilled out of the frame of the Eumig body, the larger knob was mounted with two small screw holes that hold the base of the knob to the Eumig body while allowing the rest of the knob to rotate. The lens plate is bolted to the frame behind the lenses with a coulple of M3 screws. The mystery box is just held on with double sided tape.

My best advice is when you go to drill into the body of the Eumig, get some step bits and a center punch, then go slow drilling out the holes. Also, where ever possible make a paper template using the parts that are going to be attached. When I mounted the viewfinder hood, I had to mark off on the body where the box would be and figure out where to put in the screws so they would grip the Eumig body without causing problems. Its definitely one of those builds where you're going to want to 'dry fit' the parts a few times before you commit to drilling into it.

I ran into a problem when I was mounting the lens plate to the body, the body of the Eumig drilled out easily, but the battery compartment behind it was much tougher to drill into, so I had to resort to drilling in a separate pilot hole and screw hole in the battery compartment once I was through the body.

WIth the lenses I got from Trooper, I only painted the base ring that mounts to lens plate with Alclad aluminum. When it came time to filling in the markings on the lenses, I just busted out a set of crayons and grabbed the colors that most closely matched the pics and filled in the engravings with them, then wiped down the surrounding plastic with a tissue and Q-Tip. Much easier than trying to get paint into the engravings.
 
Last edited:
Actually nicer to see alternate macros than the old favourite. Nice builds.

The alternate builds were born of not having the right parts, but I gotta admit it was fun going through my box of camera parts and finding odd bits that would work with the design while still keeping to the original aesthetic. One of my favorite greeblies on the alternate build is the dial where the screen accurate build has the bubble strip, just adds a more tactile element to the prop with a dial you can adjust with your fingers without looking away from the view finder.
 
With 660s impossible to find for realistic money custom macros are the way forward for me personally. If I can get a cool piece and get enjoyment out of the process AND not bankrupt myself that's just fine.
 
One question about the side knobs

Are there references which show what knobs are used there? I see builds with different knobs. Like the one in the picture.
 

Attachments

  • A138D6BB-46E4-4E66-9EE2-E2A1D9AE4A1E.jpeg
    A138D6BB-46E4-4E66-9EE2-E2A1D9AE4A1E.jpeg
    137.3 KB · Views: 177
Saifai , those are wrong, There are 2 sets of Kalimar 660 knobs used on the Hero macros. The only Macros with Seagull side knobs are the stunts.

Bold statement. There are different opinion on that. Both versions, Seagull and Kalimar, were available to the builders - and there is no proof which version was definately used.

Sure, there are people who believe they see more in the blurry pics than other, but that´s just personal opinions, and not a proof.

Nothing bold about it at all. Just fact. There is no way to make a Seagull knob look like this no matter how blurry you may think it is . It is a top knob section with a thin shaft and the base. You can see his shirt behind it on the top and his finger on the bottom. Its a Kalimar knob. This same argument comes up every year and every year i post this same pic. There is an undercuut below the top knob part, something you cant do with the Seagul knob.

9sqzoPs.jpg
 
And the second knob in that pic looks high and massive - something you cant have with a Kalimar at the same angle.

Depending on some pics i see why people believe to see Seagull knobs, depending on other pics i understand why people believe to see Kalimar knobs - and there are other pics, like the above, where 2 different versions can be seen. :D

How many macros have been made (bombproof)? 1 Stunt and 1 Hero for sure, but any more?
 
This thread is more than 4 years old.

Your message may be considered spam for the following reasons:

  1. This thread hasn't been active in some time. A new post in this thread might not contribute constructively to this discussion after so long.
If you wish to reply despite these issues, check the box below before replying.
Be aware that malicious compliance may result in more severe penalties.
Back
Top