wgdesign
Active Member
Howdy Makers!
Welcome to my first post here! Recovering Industrial Designer / Scale Modeller / Prop-maker, just making the transition into replica prop-making after spending the past 4 years predominantly making sci-fi scale models.
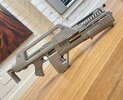
Decided to jump in the deep end and go for a big project - the M41A Pulse rifle from the Aliens franchise!
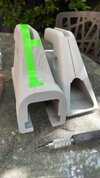
All parts were 3D modelled in Onshape, 3D printed on a Prusa i3 Mk3s, paints are from Mr.Hobby and Archive-X


More pix to follow.....
Welcome to my first post here! Recovering Industrial Designer / Scale Modeller / Prop-maker, just making the transition into replica prop-making after spending the past 4 years predominantly making sci-fi scale models.
Decided to jump in the deep end and go for a big project - the M41A Pulse rifle from the Aliens franchise!
All parts were 3D modelled in Onshape, 3D printed on a Prusa i3 Mk3s, paints are from Mr.Hobby and Archive-X
More pix to follow.....
")