Logan's Run Sandman DS Follower ( tracker )

calico1997

Active Member
There's not much merch out there for Logan's Run. I loved that movie because when first advertised on TV for the CBS television premier, they boldly announced it as a "Prelude to STAR WARS" or "..with the Impact of STAR WARS!". Being a little kid, I somehow thought it was actually connected to STAR WARS, which I hadn't seen yet. As an 8 year old, I really wanted to be a Sandman - but no toys or costumes in the stores. : (

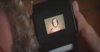
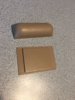
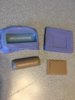
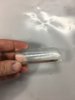
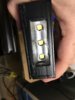
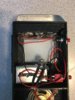
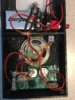
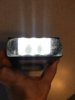
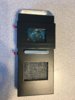
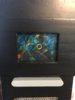
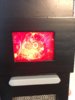
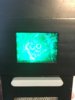
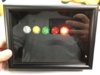
I recently decided to produce my own runner tracking device, known as the DS Follower. It seems simple enough as it's basically a black box with a few details. Making this into a working prop was also a part of the project and fairly easy. Disclaimer: I'm a not very skilled or experienced, so please excuse the crude quality.

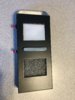
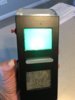
There are only a few good images of the DS Follower around. It was shown in close detail near the start of the movie when Logan called in a termination of a runner. This was a hero unit for close-ups with a snap-on overlay, basically a slide for the video screen of the device, used for in camera effects. Non hero devices have the clip on slide overlay removed. The device basically was seen as a communications device, tracker, data device, flashlight, signaling unit, etc. Sort of like our smart phones of today, but with the clunky look of a 1970's scifi prop. Other images of genuine movie prop piece are found at RacProps Issue 5 - Logan's Run, The Follower It has a satin black finish, clear rounded prism glass at the top, two small red pushbuttons on the left side a white frosted video screen, and a silver mesh speaker grill with a gray bar in the center. Pretty basic.
 

Attachments

  • 2019-05-10 14_27_28-Window.jpg
    2019-05-10 14_27_28-Window.jpg
    147.4 KB · Views: 212
  • 2019-05-10 14_28_39-Window.jpg
    2019-05-10 14_28_39-Window.jpg
    186.6 KB · Views: 196
  • 2019-05-10 14_23_57-Window.jpg
    2019-05-10 14_23_57-Window.jpg
    118.8 KB · Views: 278
On Thingiverse, Virkmastare provided a free to use 3D printable model of a DS Follower that's pretty good. The files include all the parts you need to make one. I found only a few issues with this, as the back panel didn't fit well with the box. I had to extensively file down some parts to get these two key pieces to fit. Also the LED lamp holder piece inside the box was a bit tight and needed some grinding.

I'm not an experienced 3D printer, but this turned out well in my opinion. I used wood fiber PLA filament because the wood tends to be more sandable and paintable than straight PLA plastic. In order to print the main box with a smooth finish, I had to turn the box in the file 180 over to print the face side up instead of down on the build plate. That meant adding a ton of support structures, all done in CURA.
 

Attachments

  • 2019-05-10 10_57_54-Window.jpg
    2019-05-10 10_57_54-Window.jpg
    280.8 KB · Views: 161
  • Photo Apr 21, 7 45 11 AM.jpg
    Photo Apr 21, 7 45 11 AM.jpg
    1.9 MB · Views: 206
  • Photo Apr 21, 10 39 40 AM.jpg
    Photo Apr 21, 10 39 40 AM.jpg
    1.3 MB · Views: 222
For the top rounded prism glass piece and front view screen, I sanded these printed parts smooth and coated them with clear acrylic to make them even smoother. Then, I cast them in silicone resin and from that, poured clear epoxy resin in the molds to make clear pieces that look like acrylic or glass. I did get a few small bubbles in them, but not too bad.
 

Attachments

  • Photo May 10, 10 50 37 AM.jpg
    Photo May 10, 10 50 37 AM.jpg
    2.1 MB · Views: 170
  • Photo May 10, 10 51 37 AM.jpg
    Photo May 10, 10 51 37 AM.jpg
    2.3 MB · Views: 178
  • Photo May 04, 8 44 04 PM.jpg
    Photo May 04, 8 44 04 PM.jpg
    1.1 MB · Views: 140
The top of the device has an LED bar where one would normally install white domed LEDs of the old school type. I opted instead to install 5050 smd LEDs that I have around for pinball machines. They are very bright, have built-in resistors and rectifiers, and run well on a 9v battery. They were wired together in series-parallel and controlled by the upper red pushbutton. I had to drill the holes just a little bigger to get these to fit. I painted the LED bar "reflector" area silver.
 

Attachments

  • Photo May 04, 8 43 11 PM.jpg
    Photo May 04, 8 43 11 PM.jpg
    1.4 MB · Views: 235
Last edited:
For the "video" screen, I glued a piece of frosted mylar over it to give more of a dull, non see-through look that was white when no light is emitted. For the light source behind it, I again used a pinball LED connected to the same 9v battery and activated with the lower pushbutton. For the screen I used a fast color changing 5050 smd LED so the screen will basically pulse between Red, Green, Blue. This will help to create a sort of animation effect on the screen when the overlay is applied.

So I had a heck of a time with the two red pushbuttons. The upper one is just the usual red spst pushbutton that you'd get from Radio Shack back in the day. I actually think mine was from the 1970's - so probably period correct. But the lower red button needed to be a spdt switch. Reason being that I wanted the lower button to activate the color changing LED on the 9v battery, but also simultaneously activate a lower voltage button cell sound board. I could not find the right kind / size of pushbutton in spst (4 poles), so I had to pull off the big button it came with and hand epoxy a matching small red pushbutton that I sawed off a standard pushbutton like the upper button. It turned out okay.
 

Attachments

  • Photo May 10, 10 47 01 AM.jpg
    Photo May 10, 10 47 01 AM.jpg
    1.7 MB · Views: 153
The lower area of the device is the sound area. It has a silver mesh screen and I don't know where to get a small, cheap piece of silver speaker grill. I opted instead to get a piece of stainless steel mesh from Home Depot in the plumbing department. It's used as a filter material for washing machines. $3. Works okay but hard to glue in. The electronics were simple: I ordered a good quality greeting card sound board with speaker and aux jack from ebay. About $10. Batteries were included, fits perfectly in the prop, loud, good sound quality. Installed with a glue gun. I had to get a good DS Follower sound effect for this. I captured the audio from the movie where Logan is in the cathedral area tracking a runner (middle of the movie). It goes from low tone, to faster louder tone and then finds the runner. Edited it as an .mp3 file and recorded it on the board with an aux cable.
 

Attachments

  • Photo May 10, 10 47 03 AM.jpg
    Photo May 10, 10 47 03 AM.jpg
    1.9 MB · Views: 111
Here the whole mess together with the back panel. I added silver tape to the inside of the back panel. This helps reflect the light from the color changing LED forward to the video screen.
 

Attachments

  • Photo May 10, 10 46 47 AM.jpg
    Photo May 10, 10 46 47 AM.jpg
    2 MB · Views: 185
Here you can see the device put together with all parts and working - but no hero video transparency slide yet. If nothing else, it's an LED flashlight. I made sure to paint the silver mounting bolts of the two pushbuttons black, as that seems to be the case on the movie prop.
 

Attachments

  • Photo May 10, 10 47 33 AM.jpg
    Photo May 10, 10 47 33 AM.jpg
    2.2 MB · Views: 260
  • Photo May 10, 10 48 14 AM.jpg
    Photo May 10, 10 48 14 AM.jpg
    1.2 MB · Views: 153
  • Photo May 10, 10 47 45 AM.jpg
    Photo May 10, 10 47 45 AM.jpg
    1.5 MB · Views: 175
For the hero tracking slide image, I screen grabbed from the movie where Logan goes to Sandman HQ and watches them track a runner on a big screen. I cropped this image and turned up the brightness and contrast of this with Photoshop. The Red, Green, and Blue colors on the image will illuminate differently (or not at all) when the RGB LED behind it turns different colors. This creates a primitive animation effect. Some folks have built spectacular props using real digital screens and video. I opted for this cheap, simple, and perhaps more period-correct type of practical effect.

I printed this image on a frosted transparent AVERY label material with my color laser printer. Laminated it to a piece of clear mylar and glued it in to the snap on hero view screen piece. It worked out pretty well.
 

Attachments

  • Sandman Tracking high contrast and cropped Runner screen.jpg
    Sandman Tracking high contrast and cropped Runner screen.jpg
    908 KB · Views: 344
  • Photo May 10, 10 48 44 AM.jpg
    Photo May 10, 10 48 44 AM.jpg
    1.9 MB · Views: 231
  • Photo May 10, 10 48 58 AM.jpg
    Photo May 10, 10 48 58 AM.jpg
    2 MB · Views: 167
  • Photo May 10, 10 49 34 AM.jpg
    Photo May 10, 10 49 34 AM.jpg
    1.4 MB · Views: 232
  • Photo May 10, 10 49 32 AM.jpg
    Photo May 10, 10 49 32 AM.jpg
    1.6 MB · Views: 237
  • Photo May 10, 10 49 34 AM (1).jpg
    Photo May 10, 10 49 34 AM (1).jpg
    1.4 MB · Views: 265
This thread is more than 4 years old.

Your message may be considered spam for the following reasons:

  1. This thread hasn't been active in some time. A new post in this thread might not contribute constructively to this discussion after so long.
If you wish to reply despite these issues, check the box below before replying.
Be aware that malicious compliance may result in more severe penalties.
Back
Top