You are using an out of date browser. It may not display this or other websites correctly.
You should upgrade or use an alternative browser.
You should upgrade or use an alternative browser.
Logan's Run DS Gun - TV version
- Thread starter maxspr1
- Start date
It would'nt be the same Big difference between the two
Anyone thought of powering these things with butane?
Delmustator
Sr Member
Butane would definitely last longer being a liquid. You could probably add some other gas to give it a green flame. Using a refillable gas chamber could work but welding Acetylene actually burns very dirty. The gun would be spitting black soot with every shot.
Pump some liquid hydrogen in there and see what the flame looks like.. LOL
Pump some liquid hydrogen in there and see what the flame looks like.. LOL
I don't think Butane would look as good.
Acetylene is the way to go.
As far as a power source that's easy Ry's Guns use 2 AAA Batterys
Acetylene is the way to go.
As far as a power source that's easy Ry's Guns use 2 AAA Batterys
Which two.I would want to follow the original version except for maybe a different power source. We have come along ways in battery's sense then....
Don't know, I think the Valve would have something to do with the sound as well and that is the often overlooked Heart of this Prop
I wonder if a different gas would create a different sound.
Delmustator
Sr Member
The sound is created by a combination of gas pressure, the fact that it's actually burning, and the design of the muzzle. An Oxygen/Acetylene cutting torch makes the same sound, especially when you kick in the main cutting jet.
I'm sure that you could get a gas mix that would work without having to use CC rocks and water. Any welding supply dealer can mix gases.
I would even go as far to run a remote from a 12oz or 16oz bottle to feed the DSFG. Probably get 30-40 shots out of it. Just hide the tank connect in the gas chamber. Remove to cap to fire repeatedly.
P.S. Got my Sandman shirt ready for tonight's party.. Two t-shirts, some seam glue, and walla..
Last edited:
Sean
Master Member
the sound is created by a combination of gas pressure, the fact that it's actually burning, and the design of the muzzle. An oxygen/acetylene cutting torch makes the same sound, especially when you kick in the main cutting jet.
I'm sure that you could get a gas mix that would work without having to use cc rocks and water. Any welding supply dealer can mix gases.
I would even go as far to run a remote from a 12oz or 16oz bottle to feed the dsfg. Probably get 30-40 shots out of it. Just hide the tank connect in the gas chamber. Remove to cap to fire repeatedly.
P.s. Got my sandman shirt ready for tonight's party.. Two t-shirts, some seam glue, and walla..
sweeeeeeet!
maxspr1
Well-Known Member
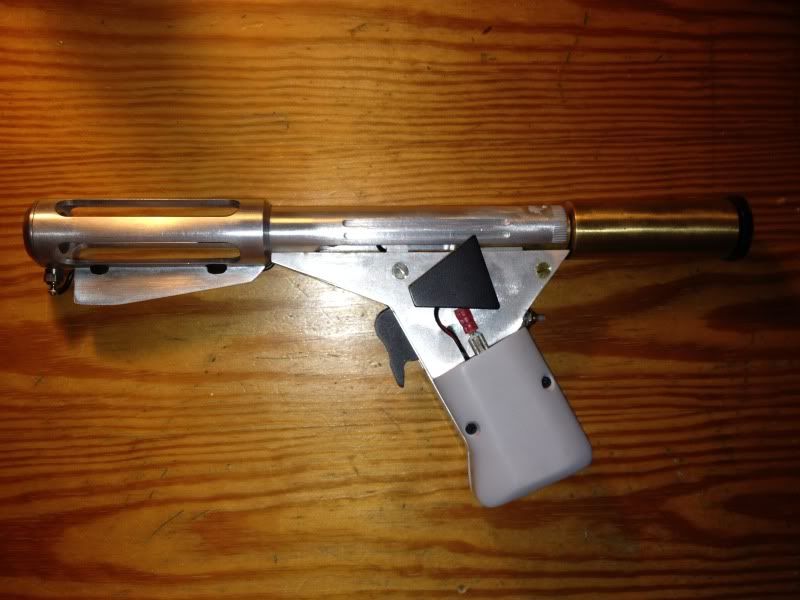
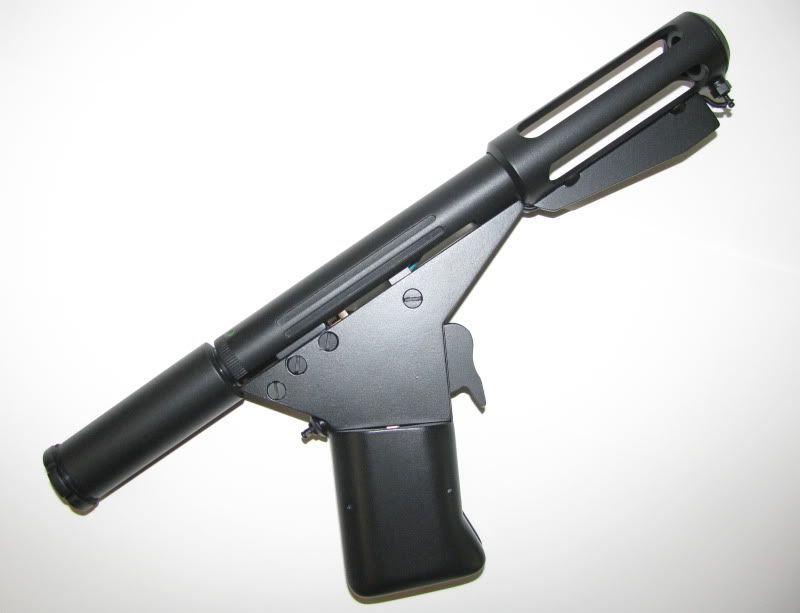
Hi, everybody! It's been ages since i started this thread and my project to restore & accurize my TV version replica prop, but I think I'm finally finished!
Last time I posted pics, I'd done all I could using the reference I had and the tools I had available. My goal was to get it looking as close to a set-used prop a I could, and comparing my replica to the reference I had, I could tell I had some work left to do. The handgrips and the fin weren't right in many ways, and I wanted to really accurize the side panels and include some details like the color setting indicators that I had originally shied away from. Luckily, during my down-time, I was able to study loads of new high-rez photos of a set-used TV prop (inside and out), some provided by rpf member lb634 and others posted by alexis on his site. These pics were unbelievably useful! Unfortunately, the photos pointed out so many mistakes I had made and areas where I hadn't gone far enough with my alterations that it looked like it would take a major chunk of time to actually make the changes. It did, and after several months of slow work, it looks like I've gone as far as i can (for now--anybody out there able to cast aluminum or some other white metal?). I incorporated the original construction materials wherever possible (on all but two areas of the thing) and I'll detail it all in my future posts.
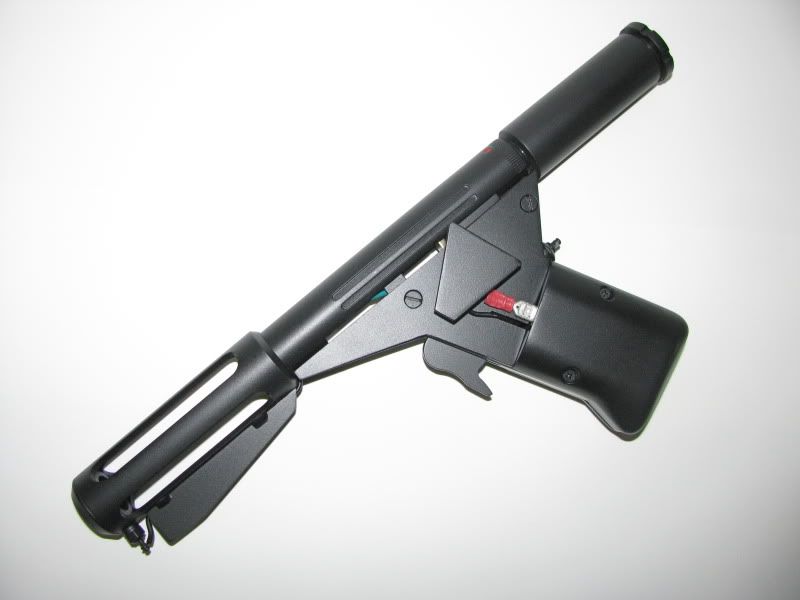
I'll post more pics later, but below is a quick pic of the finished piece. My thanks to rpf members delmustator for the new parts and to alexis and to lb634 for their fantastic photos.
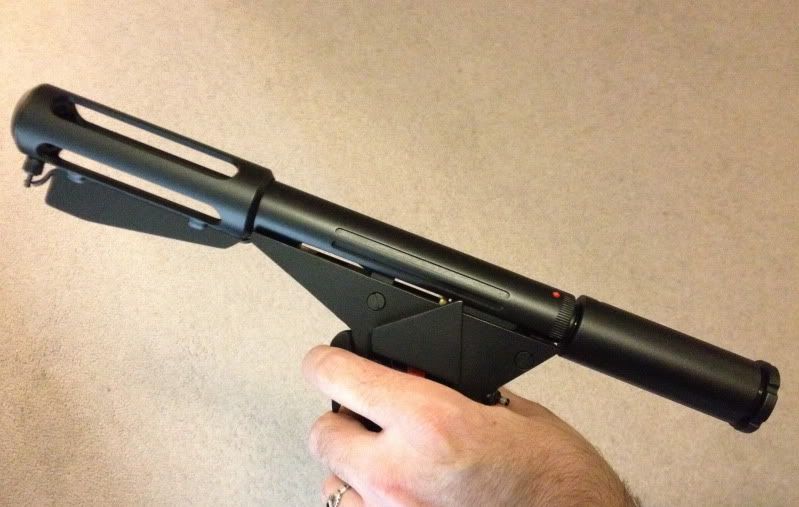
I know it doesn't look much different at first glance, but it is--nearly every single part has been modified in some way or replaced. Like I said, more later...
http://age-de-cristal.fr/site_en_1024/DSGun1024_eng.html
Last time I posted pics, I'd done all I could using the reference I had and the tools I had available. My goal was to get it looking as close to a set-used prop a I could, and comparing my replica to the reference I had, I could tell I had some work left to do. The handgrips and the fin weren't right in many ways, and I wanted to really accurize the side panels and include some details like the color setting indicators that I had originally shied away from. Luckily, during my down-time, I was able to study loads of new high-rez photos of a set-used TV prop (inside and out), some provided by rpf member lb634 and others posted by alexis on his site. These pics were unbelievably useful! Unfortunately, the photos pointed out so many mistakes I had made and areas where I hadn't gone far enough with my alterations that it looked like it would take a major chunk of time to actually make the changes. It did, and after several months of slow work, it looks like I've gone as far as i can (for now--anybody out there able to cast aluminum or some other white metal?). I incorporated the original construction materials wherever possible (on all but two areas of the thing) and I'll detail it all in my future posts.
I'll post more pics later, but below is a quick pic of the finished piece. My thanks to rpf members delmustator for the new parts and to alexis and to lb634 for their fantastic photos.
I know it doesn't look much different at first glance, but it is--nearly every single part has been modified in some way or replaced. Like I said, more later...
http://age-de-cristal.fr/site_en_1024/DSGun1024_eng.html
maxspr1
Well-Known Member
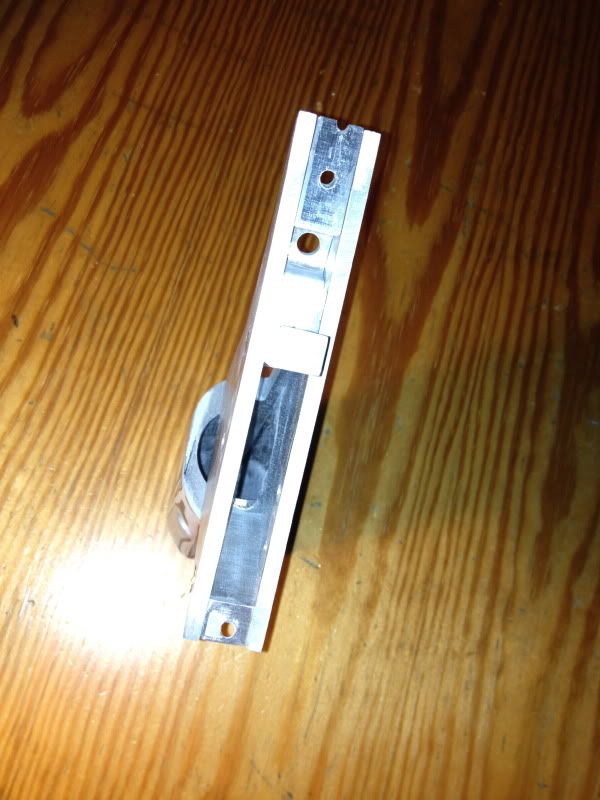
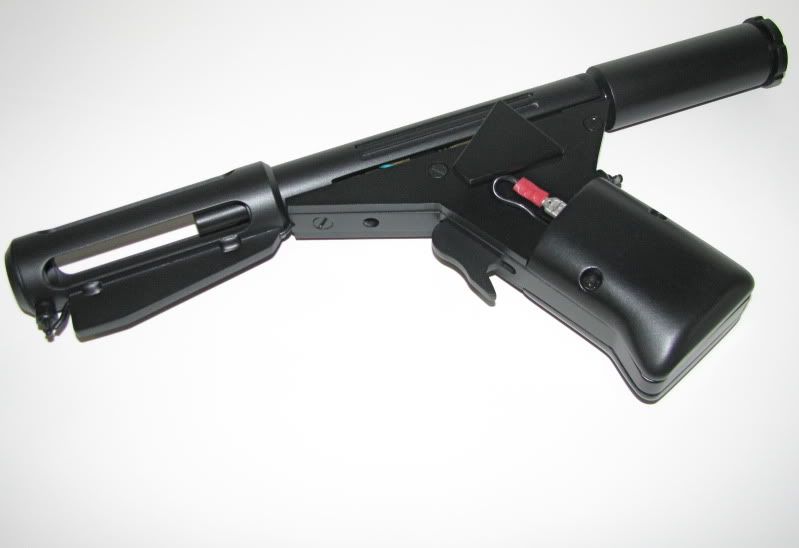
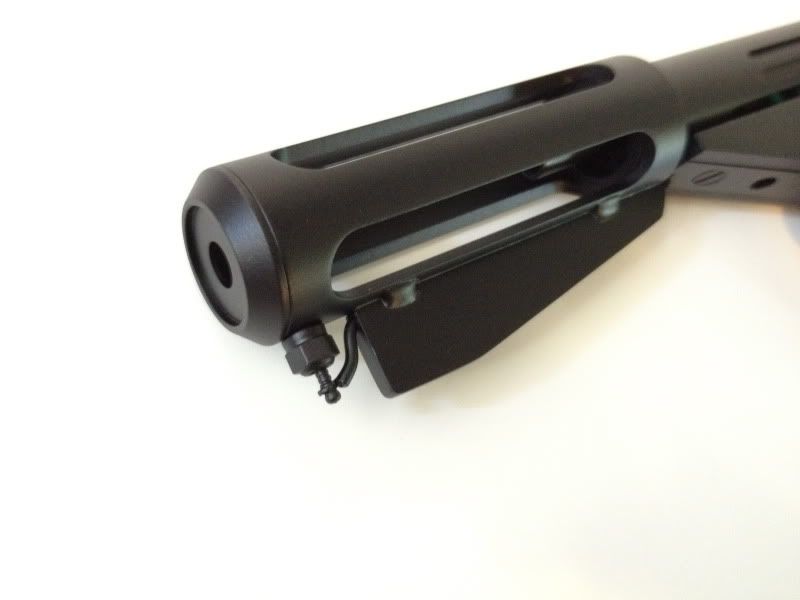
Okay: one of the things I learned from those new photos of a set-used prop (I mentioned them in my last post) was that the fin under the muzzle and one of the side panels were fabricated from aluminum, remade for the TV version (the same parts on the movie versions were made from phenolic resin). The side panel with the belt clip is the one that was remade--they just retained the phenolic panel on the other side, but they drilled out screw holes to secure the internal parts (the movie versions look like they just had brass pins through the panel that were meant to hold the parts in place). One of my beefs with my replica was the placement of those screw holes on that side panel: they were too low, in line with the other two screw holes, when they needed to be placed higher, almost at the top edge of the panel. So, I decided my first step would be to fix one side panel and have the other panel and the fin cut out of aluminum. Board member delmustator came to my aid, fabricating perfect copies of both side panels out of aluminum and cutting a new more accurate aluminum fin for me. I asked him to do both side panels because I wasn't sure the phenolic panel would be sturdy enough after puttying in the incorrectly placed holes and drilling new ones so close to the old ones. Later I decided to use the phenolic one anyway since that's how it was done in the reference photos--so far it's held up perfectly. Here are some pics of the tear-down and reconstruction in progress:

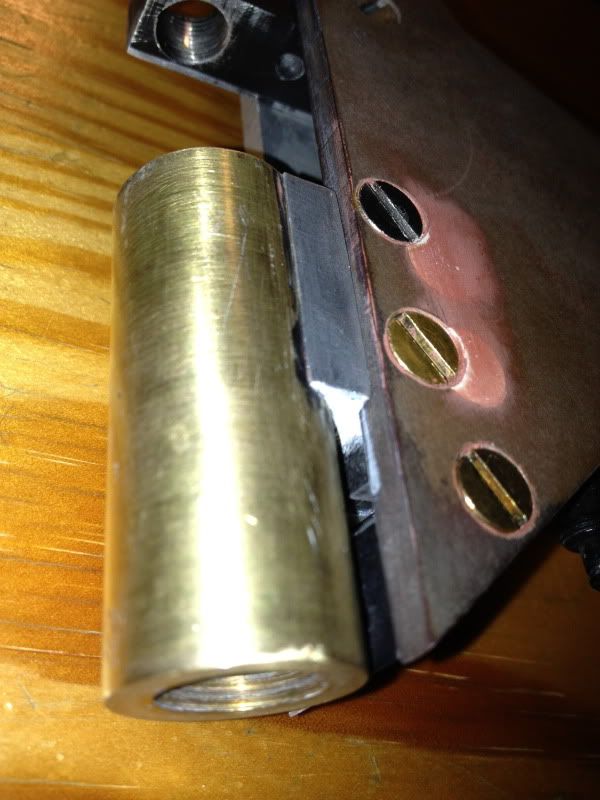
The muzzle cap parts and the brass trigger, stripped of all paint
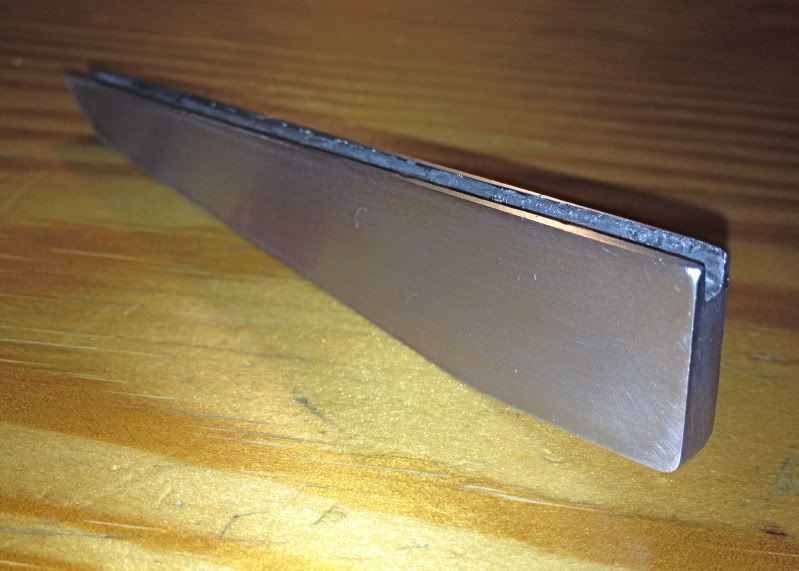
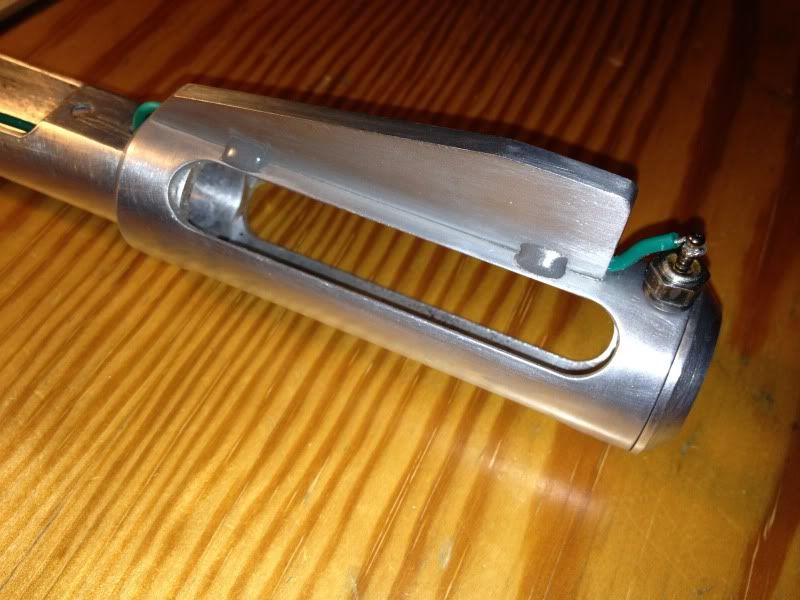
The new aluminum fin, with the groove I carved out by hand running along the top edge--the wire to the glow plug will go through this groove
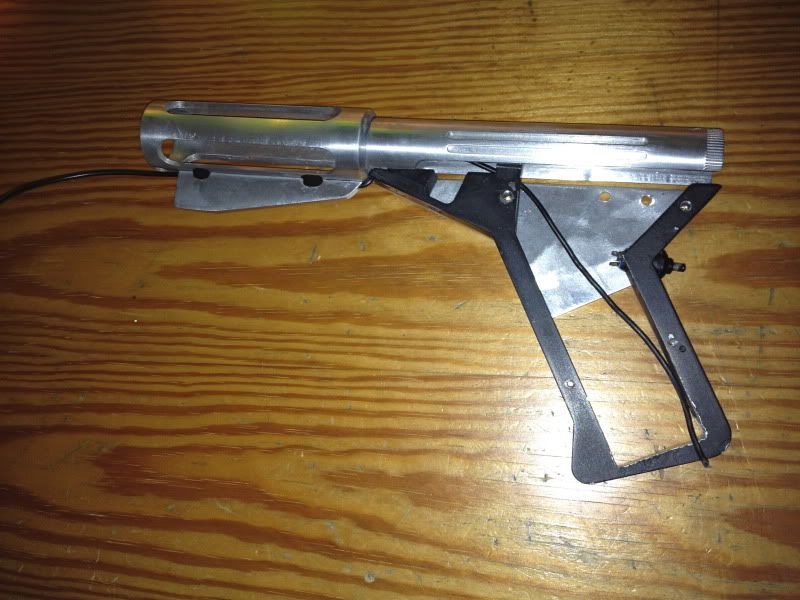
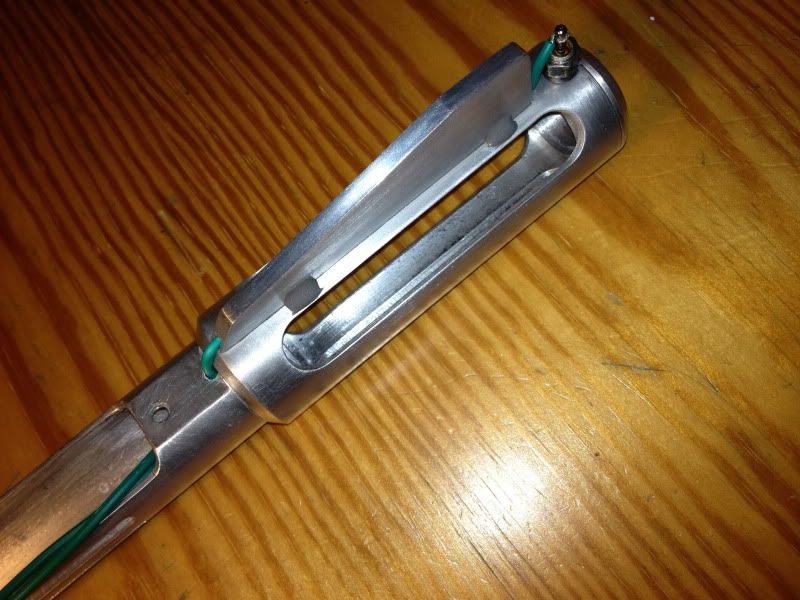
Early parts test fitting with a wire running through the fin and one of the aluminum side plates in place; I later ended up taking off all of the paint and re-doing the blobby things on the fin, which lb364 informed me were weld points on the set-used gun
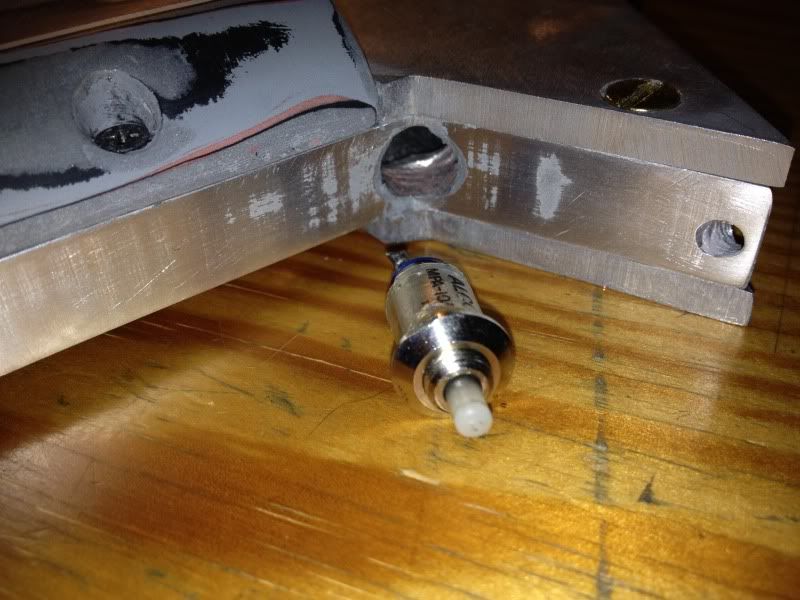
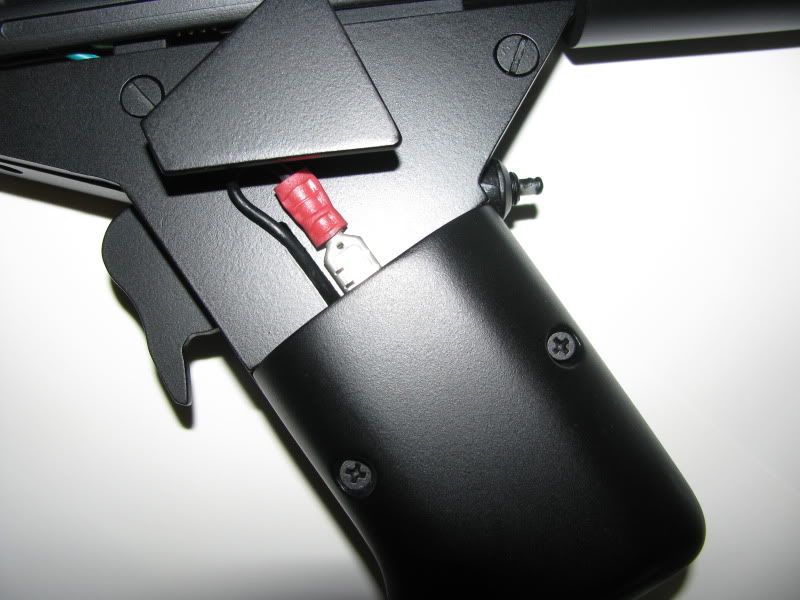
Here's the Alco switch unpainted and ready to be re-epoxied in place in the grip frame
More parts test-fitting: here I'm making sure the grips and side panels are tight and that there's plenty of room for the battery

Battery test-fit w/aluminum side panel

I'm still working on the grips at this point, but making sure they fit snugly in place
The muzzle cap parts and the brass trigger, stripped of all paint
The new aluminum fin, with the groove I carved out by hand running along the top edge--the wire to the glow plug will go through this groove
Early parts test fitting with a wire running through the fin and one of the aluminum side plates in place; I later ended up taking off all of the paint and re-doing the blobby things on the fin, which lb364 informed me were weld points on the set-used gun
Here's the Alco switch unpainted and ready to be re-epoxied in place in the grip frame
More parts test-fitting: here I'm making sure the grips and side panels are tight and that there's plenty of room for the battery
Battery test-fit w/aluminum side panel
I'm still working on the grips at this point, but making sure they fit snugly in place
maxspr1
Well-Known Member
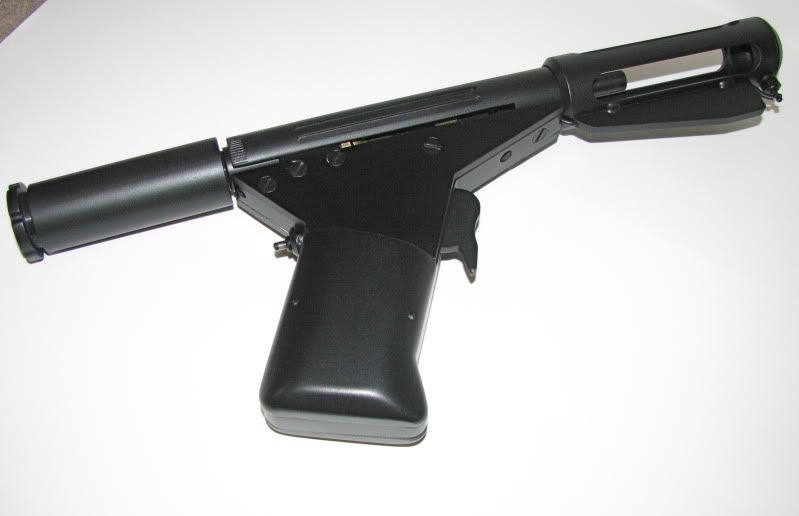
Test-fit of all parts; the belt clip has been moved forward to match the reference photos of one of the screen-used pieces--it wasn't like this on all of the props, but enough have the belt clip relocated that I decided to include this TV modification
The other side; I haven't finished the grips here--this one is meant to be held on by screws running from the other side of the grip frame out through this grip; the screw heads were never meant to be seen as they were covered up by the grip on the other side--complicated to explain, but check out the photos of the original on alexis' site and it'll make sense; the only visible sign of the screws holding this grip on will be the pilot holes for the screws drilled all the way through the grip
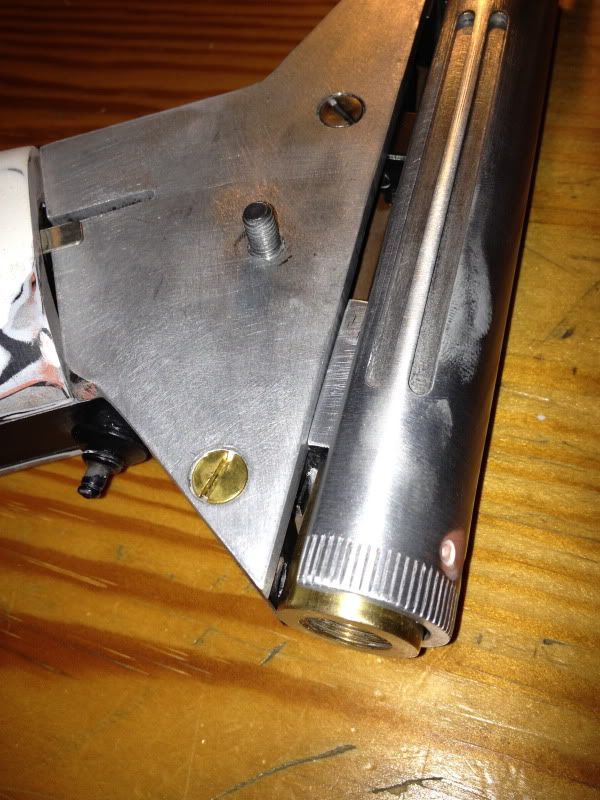
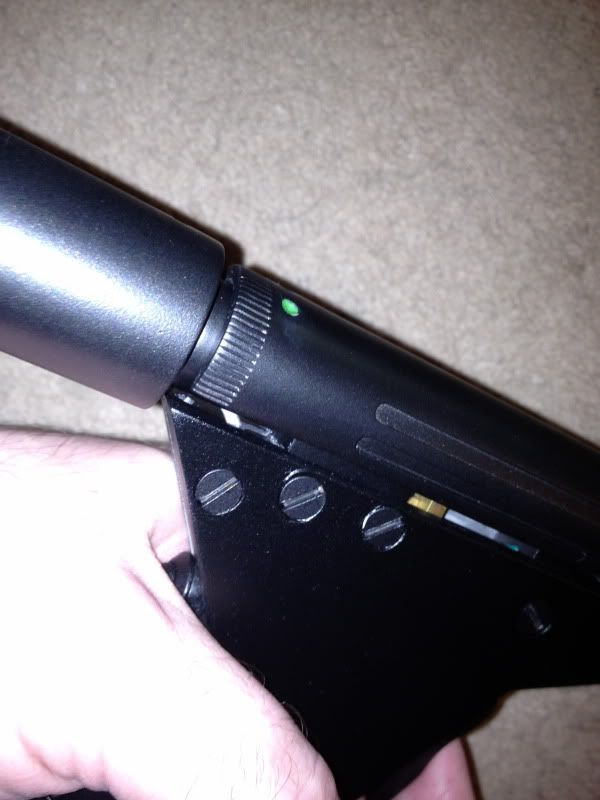
This shows the bolt the belt clip is attached to, and you can see where I've finally drilled the indentations on the body tube that will eventually be the settings indicators
Here's a parts test-fit with the phenolic resin side panel in place and the old screw holes puttied over; I've also done some cosmetic work on the internal components here (the silver rectangular part just above the screws and attached to the cylindrical brass part), trying to get them to look a little more accurate
This shows my final attempt at making JB Weld faux weld points
My weld points aren't sloppy enough to exactly match the originals, but I just couldn't figure out a better way to simulate the look or to actually weld aluminum parts together myself
maxspr1
Well-Known Member
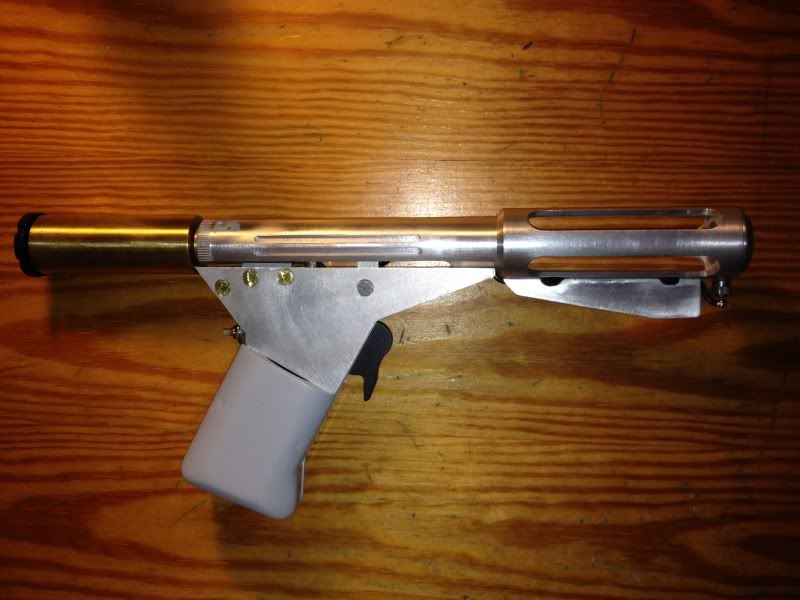
...and finally, more photos of the finished prop:
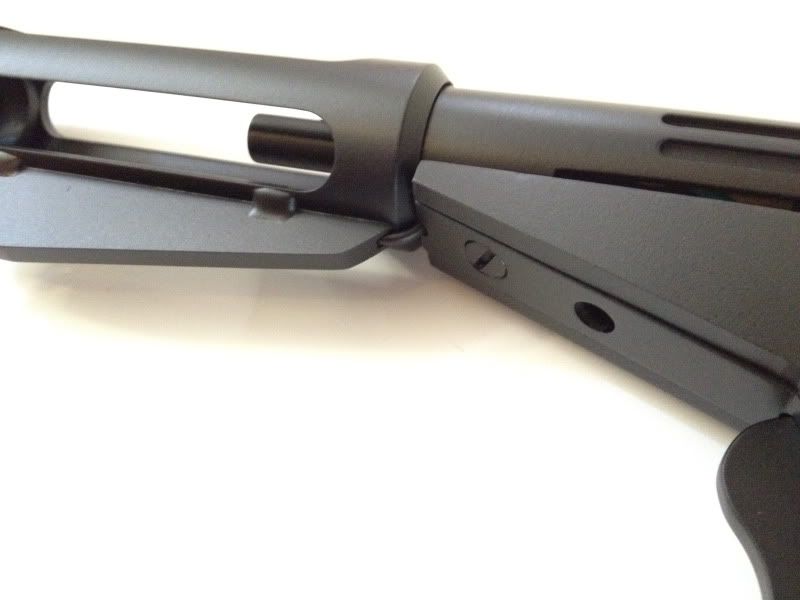
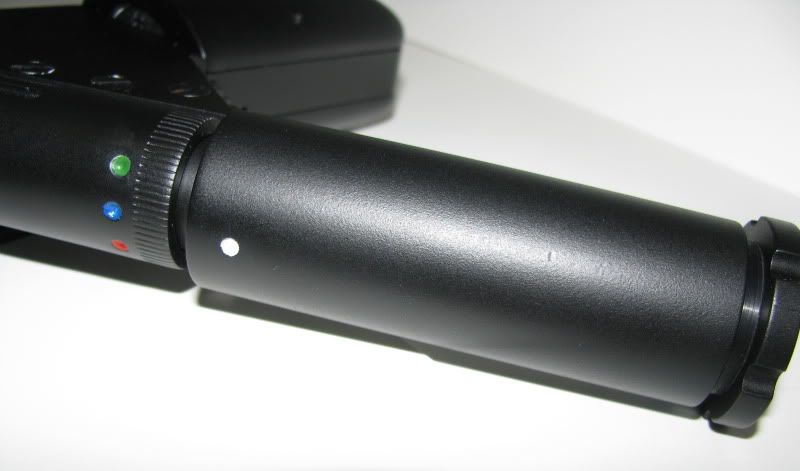
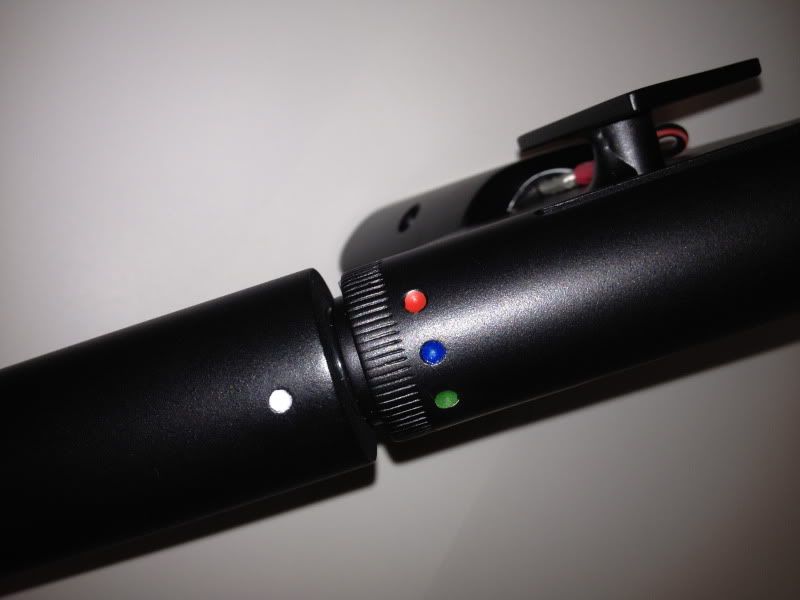
The color settings indicator dots, something I hadn't attempted last time; you can also see the more screen-accurate large flat-edged rubber washer between the end cap and the gas mixing tank (the original rubber washer supplied with this replica was a small rounded washer that probably worked better but didn't match any of the original props)

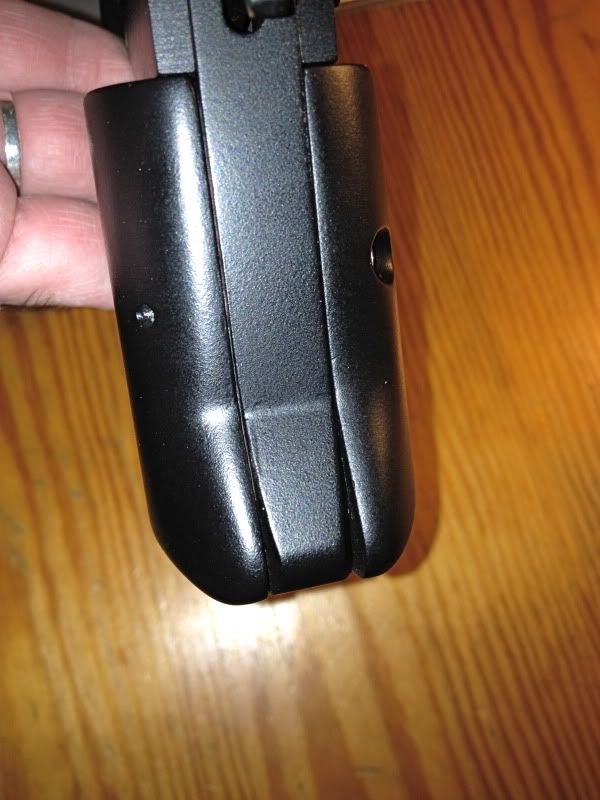
A head-on look at the grips & the grip frame; the photos of a set-used prop that lb364 shared with me show the grip frame was slightly tapered at that front point and the Richard Coyle replica I own--cast from an original movie prop--also has this tapered look, which I tried to match; the original TV props had cast and/or machined aluminum grips which were perfectly flat on the inside edge and left the gap between grip and frame here in the lower front, at least in the reference photos I used.
The grips were actually the most problematic part of this entire project for me, as they're the only parts I couldn't replicate out of the same materials as the original (if you don't count the fake weld points) and they were a beast and a half to do! My grips are the original resin grips that came with the replica, HEAVILY modified, since they were way too small as they were and not quite shaped right. I augmented the grips with bondo and filed/sanded them into the correct shape, matching the outline of the grip frame exactly. I made a couple of lame attempts at finishing the grips before I saw the photos of the set-used piece on alexis' website and figured out exactly how they were attached to the grip frame and where the screw holes had to be drilled. They look pretty good now, accurate as I could get 'em, but they seem flimsy and a little weak when attached to the nearly all metal prop. I hope they stand up over time, but I'm afraid they may crack at some point. maybe one day I'll figure out how to have them inexpensively done in metal, but for now, they'll have to do.
The color settings indicator dots, something I hadn't attempted last time; you can also see the more screen-accurate large flat-edged rubber washer between the end cap and the gas mixing tank (the original rubber washer supplied with this replica was a small rounded washer that probably worked better but didn't match any of the original props)
A head-on look at the grips & the grip frame; the photos of a set-used prop that lb364 shared with me show the grip frame was slightly tapered at that front point and the Richard Coyle replica I own--cast from an original movie prop--also has this tapered look, which I tried to match; the original TV props had cast and/or machined aluminum grips which were perfectly flat on the inside edge and left the gap between grip and frame here in the lower front, at least in the reference photos I used.
The grips were actually the most problematic part of this entire project for me, as they're the only parts I couldn't replicate out of the same materials as the original (if you don't count the fake weld points) and they were a beast and a half to do! My grips are the original resin grips that came with the replica, HEAVILY modified, since they were way too small as they were and not quite shaped right. I augmented the grips with bondo and filed/sanded them into the correct shape, matching the outline of the grip frame exactly. I made a couple of lame attempts at finishing the grips before I saw the photos of the set-used piece on alexis' website and figured out exactly how they were attached to the grip frame and where the screw holes had to be drilled. They look pretty good now, accurate as I could get 'em, but they seem flimsy and a little weak when attached to the nearly all metal prop. I hope they stand up over time, but I'm afraid they may crack at some point. maybe one day I'll figure out how to have them inexpensively done in metal, but for now, they'll have to do.
Last edited:
alexis
Member
Very impressive working ! I'm very happy that my little website help you ! :thumbsup
I hope that I will have the authorization to use yours news pictures for put on my website...")
A very great DS Gun tv version you have now !
Little question, when we will see the gun in action with the flame ?
I hope that I will have the authorization to use yours news pictures for put on my website...
A very great DS Gun tv version you have now !
Little question, when we will see the gun in action with the flame ?
Very nice work.
I could not spot any link to my article on these guns, so if your interested here it is:
RacProps Issue 4 - Logan's Run: The D.S. Pistol - Page 1
Rich
I could not spot any link to my article on these guns, so if your interested here it is:
RacProps Issue 4 - Logan's Run: The D.S. Pistol - Page 1
Rich
Similar threads
- Replies
- 33
- Views
- 2,956
- Sale
- Replies
- 2
- Views
- 280