My parts got a spa day!

You are using an out of date browser. It may not display this or other websites correctly.
You should upgrade or use an alternative browser.
You should upgrade or use an alternative browser.
Let's Build Greeblie Pack #12 - A Skyhopper Group Build
- Thread starter Blitzkreig
- Start date
Good deal. They are ready for assembly.
Last edited:
Well, that was enjoyable. Completed the engine area. Minus the Transtar hub which will be added later after paint. All pieces went on fairly smooth. I used CA sparingly to glue on the parts. One tip I would mention is to maybe glue on part R3 before adding R16 (See above).
Also found a great way to hold the model level during assembly using the 1-2-3 blocks (See the bottom photo). Love these blocks. So many uses. If you're interested, you can get a pair of them on Amazon for about 17 bucks.
Anyway, below are a couple more pics of my build along with some of the better reference photos I could find. Don't forget to take a look at Jason's site for lots of great reference photos from just about every angle.
My build
Studio Model - Colin Cantwell
Jason Eaton
Last edited:
Well, I was rocking until I discovered the error in the orientation of parts A11 in the instructions. I missed Blitzkrieg’s post about it. Now I’m at a complete standstill as there’s no real recovery. I sent an email with some photos explaining what happened and hopefully they’ll send me some replacement parts so I can start over.

It's looking great. I would just keep building. You could try and carefully pry the piece off. But acrylic snaps pretty fast under pressure. Or order the parts. I understand if you want it just right. You're not too far in and the second time around goes much smoother.Well, I was rocking until I discovered the error in the orientation of parts A11 in the instructions. I missed Blitzkrieg’s post about it. Now I’m at a complete standstill as there’s no real recovery. I sent an email with some photos explaining what happened and hopefully they’ll send me some replacement parts so I can start over. View attachment 1636756
Last edited:
You're right - I am mortified, apologize, and I need to amend the instructions. Parts still fit (as I apparently built it like that with the piece flipped?) but I need to make clear that A13 does down first as shown but not mentioned in that pic on page 1). Timing is bad for this coming to my attention as I have hand surgery #5 in the AM so bear with me...
Well, I was planning to start my build this week, but I discovered that I was missing B2 after doing a part inventory. Masterpiece Models hasn’t replied to my email yet and is apparently moving and is shut down until the end of the month.
Lewis,
John from Masterpiece Models sent a message asking me to let ya know he has sent you an e-mail regarding B2.
FYI, I had to replace a couple parts I lost and they were great with helping me get the parts I needed.
Last edited:
Excellent, I'll update the earlier post once the PDF is amended. ThanksAmended, I think? What say you. I'll push the update to Masterpiece so when he's back it's reflected.
Last edited:
No worries, Jason. I know you’re a stand up guy and mistakes happen. I sent an email to John and he’s sending me the replacement parts. Hope your paws heal quickly and you get back to the bench soon.You're right - I am mortified, apologize, and I need to amend the instructions. Parts still fit (as I apparently built it like that with the piece flipped?) but I need to make clear that A13 does down first as shown but not mentioned in that pic on page 1). Timing is bad for this coming to my attention as I have hand surgery #5 in the AM so bear with me...
Exactly. Those parts aren’t going anywhere. Thanks, Weld-On 3!It's looking good. I would just keep building. You could try and carefully pry the piece off. But acrylic snaps pretty fast under pressure. Or order the parts. I understand if you want it just right. You're not too far in and the second time around goes much smoother.
I was wondering about that as I was assembling it. Do you start with a “soft” model using matte board to work out the measurements and fit before moving to plastic?If it helps in commiserating, I had to build the parts five times to get it right, that first scracth build
")
So, what do you think? Does he break the stand when he sets it down? Does the front leg slip off the table? Or something else?
I found this image online and it shows the incident. But if you haven't watched the film in a while. Check it out. The ship clearly falls forward when he sets it down. Thoughts?

I found this image online and it shows the incident. But if you haven't watched the film in a while. Check it out. The ship clearly falls forward when he sets it down. Thoughts?
Last edited:
Hmmmm. At first I thought the stand broke loose and went up through the model but maybe one of the legs bent.So, what do you think? Does he break the stand when he sets it down? Does the front leg slip off the table? Or something else?
I found this image online and it shows the incident. But if you haven't watched the film in a while. Check it out. The ship clearly falls forward when he sets it down. Thoughts?
View attachment 1637676
Back in business! Big shoutout to John at Masterpiece Models for the excellent customer service and getting me the replacement parts so quickly.

modelmaker
New Member
Thank you for pointing out the mistake in the instructions, Jason sent me over a corrected version that will go out with the new kitsBack in business! Big shoutout to John at Masterpiece Models for the excellent customer service and getting me the replacement parts so quickly.View attachment 1637780
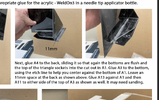
I spent a little time this evening cutting and attaching these two rectangular panels below the wings. I would suggest maybe adding these before gluing on part A19. They appear to angle down a little on the studio model (see below). So, I added a little droop to mine. The size of the pieces I cut were 18mm x 15mm. But the more I look at it here they might be a little long. Try maybe 16mm x 15mm? Take a look at it.
Also, again below I tried to add some more good reference photos.
Anyone else start building their Hopper yet? I know bcgd will be back at it soon. I'm really enjoying this part of the build.
Jason Eaton
Studio Model - Colin Cantwell
Last edited:
Similar threads
- Replies
- 121
- Views
- 8,092
- Replies
- 4
- Views
- 576