dashy
New Member
Been hesitant to post my work here, intimidated by the amazing work of others. Have lurked here occasionally, going to be more active from now on.
Inspiration: Legion is a fascinating character and I love the design.
Time: Way too long, I dread to think how many hours, started almost 2 years ago. Heaps of trial and error.
Cost: Should have kept track, some materials I already had at home such as upholstery foam and latex.
Most proud of: Not giving up on the project despite struggling so much.
Tips:
Costume parts summary:
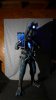
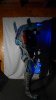
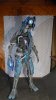
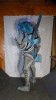
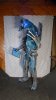
Chest armour: MDF silhouette base, filled in partially with expanding foam, sculpted with WED clay, that cracked badly, repaired with Klean Klay, molded with Ultra Cal 30 and cast with tinted brush latex which was reinforced with Chux and eva foam. Upholstery foam was used for the edge of the inner layer. Base colour was sponge-brushed with Angelus leather paints then I airbrushed a mottled effect with transparent blue Createx.
Rest of the armour: Made eva foam templates in Illustrator of some parts (tracing reference images), for the side + outer back piece I half sketched the shape on paper and made mock ups to test it. Head templates created from a card + tape mock up around a cast of my head. Heat gun shaping involved. Same paint treatment as chest.
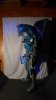
Body suit: Bought a spandex zentai suit then airbrushed it with Createx. Wearing a 2nd body suit (cotton) underneath. Upholstery foam shapes shoved underneath the outer body suit for muscles.
Eye: Is an animation displayed on my iPhone. Created it from scratch using Illustrator, Photoshop and After Effects.
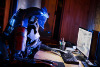
Head flap movements: Micro servo mounted under each flap, all controlled by a Pololu Maestro controller. Used their software to program sequences, synchronizing them to an audio track of his voice (extracted some original audio files from the game series then made a single track containing them all with 10 second gaps using the program 'Reaper') which were then saved as a script and uploaded to the controller, plays on start up. Unfortunately they haven't stayed in sync, this could have been caused by the flaps getting stuck. Now regretting not experimenting with the idea of mounting them further back in the head with push rods, springs, etc. First time I had worked with servos, am an electronics novice.
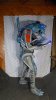
Feet: Jika-tabi boots as a base, upholstery foam to make toes, covered in spandex then gesso (completely forgot about latex at the time, should have tried that instead). Createx and Angelus paints used.
Gloves: Tried to keep these as simple as possible because I hate sewing. Traced around hands with fingers in pairs, added seam allowance, transferred template to spandex (black matte metallic because it was left over from a Liara costume) with silver marker, sewed along the line with an overlock stretch stitch then cut it out. Tips stuffed with pillow stuffing. For the detailing I taped paper templates to a glove whilst wearing it to check length, alignment, etc, cut out the shapes from eva foam, beveled the edges with a dremel then hot glued them on whilst wearing. Sponged on paint to give the fabric texture.
Tubing: 2 larger ones are 'poly drain pipe', thinner ones are 'gap filler/backer rod' with twine wrapped around. LED strings are inside clear vinyl tubes defused by wrapping tracing paper around.
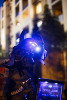
Hole-through-chest illusion: Achieved by a very bulky field monitor with a spy camera mounted on my back. I wanted to use a thinner tablet as a monitor but based on some research this didn't seem possible (even with a web cam). I've seen someone set up a video chat between 2 iPads for this effect (that is what inspired me to do this) but I didn't want to buy 2 tablets. Wasn't fully convinced about the monitor but kids were entertained by it when I wore this briefly at EB Games Expo. It looks better during daylight. (Also made appearances at PAX Australia and D*Con, so many malfunctions there, would have been a nightmare without assistance!).
Gaming pad: Inspired by the ME3 data pad design. Last minute idea before a con, regret making it in such a rush. Ideally the screen should be laser cut. I scored and snapped the edges of a clip board, broke part of it. Had trouble etching the small lettering in with a file. First wired up some left over LEDs to a button cell battery holder which I stupidly just taped on because I wasn't sure about it, fell off at a con. Currently has a 2xAAA pack glued on which is too bulky - that should be completely concealed inside the frame which is eva foam, should have at least covered/disguised the tape. If I were to make this again the frame would be a rigid 2 part shell and I would try surface mount LEDs.
How it is worn: Chest & back is like a vest, one side is permanently attached (explained later). Secured by 2 kinds of buckles and velcro. Shoulder armour, N7 chest plate and monitor are attached to it with more buckles and velcro. The head is held in place by the 'spine' tube which has a large neodymium magnet epoxied into an eva foam plug; easy to put on/take off but the head is no longer flush with the back - before it was secured with snaps and velcro but it was too difficult attaching and detaching whilst wearing.
All battery packs and the iPhone are held in place by taut elastic.
Some of what I would do differently on a 2nd version:
I don't have a build thread here (now regret not posting one) but here is one elsewhere: N7 Elite ? View topic - Dashy's Legion build
Also documented parts of the build on my FB page: Dashy
Testing the servos and phone:
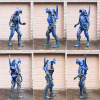
*EDIT* UPDATE: Here's some more recent photos of the costume, have made some improvements (the attached thumbnails at the bottom are the original / older photos).

Photography: Ryan Daquioag

Photography: Sarah Hillier Photography

Photography: Bree Lee
Tali: Lady Juna Cosplay
Planning to improve it further to wear again at Dragon Con (2015). Needs an overhaul. Going to try re-making the head smaller somehow. Not happy with the feet so those need to be re-done, will use wedge heels as a base for extra height.
Inspiration: Legion is a fascinating character and I love the design.
Time: Way too long, I dread to think how many hours, started almost 2 years ago. Heaps of trial and error.
Cost: Should have kept track, some materials I already had at home such as upholstery foam and latex.
Most proud of: Not giving up on the project despite struggling so much.
Tips:
- During the planning stage ask yourself questions such as:
- How can I make the overall silhouette and proportions work for my body? What alterations need to be made?
- How am I going to wear and move in it? What is the most efficient (in terms of how long it takes to put on) and secure way? How can it be made as comfortable and flexible as possible? - Mock ups are essential to test proportions and fitting.
- Always do a scrap test before gluing, painting, new technique, etc.
Costume parts summary:
Chest armour: MDF silhouette base, filled in partially with expanding foam, sculpted with WED clay, that cracked badly, repaired with Klean Klay, molded with Ultra Cal 30 and cast with tinted brush latex which was reinforced with Chux and eva foam. Upholstery foam was used for the edge of the inner layer. Base colour was sponge-brushed with Angelus leather paints then I airbrushed a mottled effect with transparent blue Createx.
Rest of the armour: Made eva foam templates in Illustrator of some parts (tracing reference images), for the side + outer back piece I half sketched the shape on paper and made mock ups to test it. Head templates created from a card + tape mock up around a cast of my head. Heat gun shaping involved. Same paint treatment as chest.
Body suit: Bought a spandex zentai suit then airbrushed it with Createx. Wearing a 2nd body suit (cotton) underneath. Upholstery foam shapes shoved underneath the outer body suit for muscles.
Eye: Is an animation displayed on my iPhone. Created it from scratch using Illustrator, Photoshop and After Effects.
Head flap movements: Micro servo mounted under each flap, all controlled by a Pololu Maestro controller. Used their software to program sequences, synchronizing them to an audio track of his voice (extracted some original audio files from the game series then made a single track containing them all with 10 second gaps using the program 'Reaper') which were then saved as a script and uploaded to the controller, plays on start up. Unfortunately they haven't stayed in sync, this could have been caused by the flaps getting stuck. Now regretting not experimenting with the idea of mounting them further back in the head with push rods, springs, etc. First time I had worked with servos, am an electronics novice.
Feet: Jika-tabi boots as a base, upholstery foam to make toes, covered in spandex then gesso (completely forgot about latex at the time, should have tried that instead). Createx and Angelus paints used.
Gloves: Tried to keep these as simple as possible because I hate sewing. Traced around hands with fingers in pairs, added seam allowance, transferred template to spandex (black matte metallic because it was left over from a Liara costume) with silver marker, sewed along the line with an overlock stretch stitch then cut it out. Tips stuffed with pillow stuffing. For the detailing I taped paper templates to a glove whilst wearing it to check length, alignment, etc, cut out the shapes from eva foam, beveled the edges with a dremel then hot glued them on whilst wearing. Sponged on paint to give the fabric texture.
Tubing: 2 larger ones are 'poly drain pipe', thinner ones are 'gap filler/backer rod' with twine wrapped around. LED strings are inside clear vinyl tubes defused by wrapping tracing paper around.
Hole-through-chest illusion: Achieved by a very bulky field monitor with a spy camera mounted on my back. I wanted to use a thinner tablet as a monitor but based on some research this didn't seem possible (even with a web cam). I've seen someone set up a video chat between 2 iPads for this effect (that is what inspired me to do this) but I didn't want to buy 2 tablets. Wasn't fully convinced about the monitor but kids were entertained by it when I wore this briefly at EB Games Expo. It looks better during daylight. (Also made appearances at PAX Australia and D*Con, so many malfunctions there, would have been a nightmare without assistance!).
Gaming pad: Inspired by the ME3 data pad design. Last minute idea before a con, regret making it in such a rush. Ideally the screen should be laser cut. I scored and snapped the edges of a clip board, broke part of it. Had trouble etching the small lettering in with a file. First wired up some left over LEDs to a button cell battery holder which I stupidly just taped on because I wasn't sure about it, fell off at a con. Currently has a 2xAAA pack glued on which is too bulky - that should be completely concealed inside the frame which is eva foam, should have at least covered/disguised the tape. If I were to make this again the frame would be a rigid 2 part shell and I would try surface mount LEDs.
How it is worn: Chest & back is like a vest, one side is permanently attached (explained later). Secured by 2 kinds of buckles and velcro. Shoulder armour, N7 chest plate and monitor are attached to it with more buckles and velcro. The head is held in place by the 'spine' tube which has a large neodymium magnet epoxied into an eva foam plug; easy to put on/take off but the head is no longer flush with the back - before it was secured with snaps and velcro but it was too difficult attaching and detaching whilst wearing.
All battery packs and the iPhone are held in place by taut elastic.
Some of what I would do differently on a 2nd version:
- Stilts with head inside an extended chest perhaps? Having trouble imagining it. BTW my height is 160cm.
- Attempt to make the head in a way that allows it to flex like a human neck or at least some flexibility. Have some vague ideas on that but haven't tested them.
- Not have one side of the chest permanently glued to the back/side. Reason why this happened is because I got fed up trying to make snaps underneath work; cut out an area so the flap wouldn't be sitting on top but it wouldn't stay flat/flush. Perhaps if I had sculpted a tight-fitting dip for it snaps could have worked.
- Sculpt and cast the feet.
- Source more durable tubing or cast my own to replace the gap filler/backer rod. Some magnets epoxied and super-glued on were easily ripped off.
- Spend more time on making the eva foam geth armour parts look exactly the same as the latex parts in terms of smoothness/finish. Also make sure all joins are clean with seams completely disguised.
I don't have a build thread here (now regret not posting one) but here is one elsewhere: N7 Elite ? View topic - Dashy's Legion build
Also documented parts of the build on my FB page: Dashy
Testing the servos and phone:
*EDIT* UPDATE: Here's some more recent photos of the costume, have made some improvements (the attached thumbnails at the bottom are the original / older photos).
Photography: Ryan Daquioag
Photography: Sarah Hillier Photography
Photography: Bree Lee
Tali: Lady Juna Cosplay
Planning to improve it further to wear again at Dragon Con (2015). Needs an overhaul. Going to try re-making the head smaller somehow. Not happy with the feet so those need to be re-done, will use wedge heels as a base for extra height.
Attachments
Last edited by a moderator:
")