Update 10.10.2020 - (Pic-heavy)
Phew, it’s been a hot minute. This project has spent most of the time since my last update on the shelf but some progress has been made. *some*. I’ll try to keep this concise
All of the hilt parts were printed in resin on the Anycubic Photon. This was my first time using a SLA/DLP printer for prop making and they turned out well
But the primary reason this was shelved was that the molds failed (epically I might add). After I modeled the hilt I also modeled mold jackets for these pieces in attempt to make the molds cleaner and use less silicone and it was certainly a fun experiment. Most of the molds aren’t noteworthy and were simple with 2 part shells with 1 or 2 part silicone jackets. These didn’t cause many problems


The main “cylinder” part was a little different. It has a clean and specific wall thickness of about 1.7mm so I didn’t feel like a slush cast would cut it. Instead I designed the mold with a silicone core (forgot to take pictures of this) so the part could be cast with that specific thickness. I probably over-engineered this a bit and designed the core to be hollow with a FDM printed plug that could be inserted during casting. This first version was quite bad as I didn’t cut many air vents for the high spots so getting a decent casting was impossible. This was very early in my mold making skills so although air vents seem like a common sense thing to do now, it wasn’t back then. I also didn’t account for some of the details the protruded so the silicone was too thin in some spots causing the castings to come out warped


So I made a V2. Talk about over engineering, this time I added an “arm” mechanism (again forgot to take pictures of this) that would attach to FDM part in the silicone core that slotted into the sides of the mold jacket. You see at the time I still hadn’t realized I just needed more air vents and thought the solution was to run this as a squish mold, dumping the resin into the out silicone part and then inserting the core. This was arguably a bigger disaster, on the first pour I over filled the mold and the resin that poured out of the top fused the arm to the jacket. After this I threw out the mold jacket but kept the silicone parts for scrap filler (more on that later)
That wasn’t all, the mold of the emitter failed because of cure inhibition (using platinum cure silicone on a SLA resin part that wasn’t washed well enough) and the main body mold was almost successful except I tried to go fancy on the seam line and ended with a seam that didn’t line up
At this point I was frustrated and not really ready to put more money into this project after wasting the silicone on the first molds (but that’s what happens when you’re learning) so I resorted to just reprinting all of the parts of the hilt from TLJ to finish for my own collection. Then those parts sat in a box. For a full year (I’m really bad at finishing things). Just a few weeks ago I finally picked the parts up and set out to finish them. I didn’t take many photos of finishing it as I was really enjoying just working on the prop and didn’t think to grab my phone to take pictures, but here’s a quick rundown.
The parts off of the Photon were fairly clean, I hit most of the parts with 220G sandpaper and them some Rust-Oleum primer to remove the bumps left by supports and knock back the layer lines. I should’ve spent more time on this process, the OG Photon I have suffered from some of the QC issues Anycubic had when they launched that printer so the pieces weren’t quite as clean as they would’ve been from a laser SLA printer or even some of the never LCD printers out there today. But I wanted to just finish this prop so I skipped some sanding. The main parts of the hilt that are black were painted with Createx Opaque black. The internal chrome parts were first painted with Alclad II gloss black and then painted using Molotow liquid ink. After drying for at least 72 hours this was top coated with Alclad Klear Kote gloss, which is only think I’ve tested that keeps Molotow’s chrome look


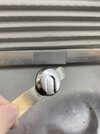
The cross guard parts were done in a few steps. First they were given the same Alclad gloss black treatment but then I just used Alclad polished aluminum and then sealed them with Alclad aqua gloss. I used Alclad hot metal blue, red and sepia to do the heat scorched effect. It turned out okay, though the pigment in the hot metal paints is very light (which is kind of by design) so I think it’s a little more washed out than I was going for. Lastly I painted the bottom of these parts with the Createx black
The red disk on the bottom was also done with the Alclad black and polished aluminum but then it was top coated with Createx Wicked red. The Wicked line is partially transparent, this allowed the Alclad to show through giving the part a subtle anodized look instead of just a glossy red (this is more apparent in person than in the photos).
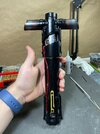
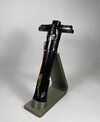
After assembling all of the parts it was finally done! I used some 30 gauge blue wire I had lying around for inside the cylinder. I couldn’t find the transparent red wire to use for the wire that runs down the side of the hilt so I used clear 18 gauge audio wire that was tinted red with more of the Createx wicked red for that and I think it worked pretty well. Overall I’m quite happy with the finish, it’s not perfect but this still looks pretty rad sitting on my shelf
But that’s not all! After finishing this version I felt motivated to work on the TFA variant of the hilt. So I went back in and made some small changes to my model to make more accurate to the Prop Shop lightsaber that released shortly after TFA was released
On top of that, I dug out the old cylinder mold (without the jacket now) to see if I could figure out what went wrong and if I could possibly make it work without pressure casting the part (probably should’ve mentioned earlier I don’t have a pressure pot so that was never an option). It turns out the mold actually did work, I just never opened up most of the air vents I planned out. So I widened all of the existing vents and adding in a few more for good measure, and then ran a test cast which came out surprisingly well! The only bubbles I could see collected on the top of the switch on the back, which is to be expected and are super easy to fill.


So with this in mind I’ve made it a goal of mine to give these molds another shot. I have no expectations to complete this anytime soon as I have a number of other projects keeping me busy at the moment but one day I intent to return to the TFA variant and complete the molds for it. When I get there I’ll probably start another thread on that. That’s all for now!


")