Kosh Play

Attachments

  • 20240823_123911.jpg
    20240823_123911.jpg
    1.9 MB · Views: 77
I clamped another right angle on both ends of the sculpt, then poured in Sorta Clear 40.

Make sure it is level

Clay packed on the front and rear to keep thw Sorta Clear contained

After demolding, I can use the clamped U channel to pour the flipped-over mold.
 

Attachments

  • 20240828_112515.jpg
    20240828_112515.jpg
    1.9 MB · Views: 67
  • 20240828_124018.jpg
    20240828_124018.jpg
    2.1 MB · Views: 67
  • 20240828_124752.jpg
    20240828_124752.jpg
    1.5 MB · Views: 71
  • 20240828_124104.jpg
    20240828_124104.jpg
    1.2 MB · Views: 68
So, lining up several projects for Task 16. Once opened it brown's and half of it hardens.

EDIT: Once poured, it maintains its color
 
Still going...

Working on stained glass attachmentvto frame.

The vents/grill on the body piece.

Finally have the smooth contour I want on the head and body.
 

Attachments

  • 20241124_095321.jpg
    20241124_095321.jpg
    1.1 MB · Views: 61
  • 20241124_095329.jpg
    20241124_095329.jpg
    3 MB · Views: 62
Sculpted the hot rod pipes perfect, only to etch them up.

Made the wrinkles for the pipe mouths with the same string-through-a-center-hole technique.

I will make a mold out of dragonskin then slush cast in Task 16. The pipes need to be firm, but not totally rigid. They stick out the sides of an already large body and I dont want it catching on a doorframe. If it does, a little give is safer than falling or breaking the piece.

I've been doing more. Stained glass is ready for colored resin, stained glass effect.
The sashes need to be stuck together.
The helmet is going to be in two pieces, lookibg for a perfect, reproducivle fit.

More to come when Im in da mood
 

Attachments

  • Screenshot_20250306-214901_Gallery.jpg
    Screenshot_20250306-214901_Gallery.jpg
    373.4 KB · Views: 53
  • Screenshot_20250306-214923_Gallery.jpg
    Screenshot_20250306-214923_Gallery.jpg
    293 KB · Views: 49
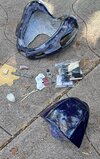
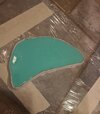
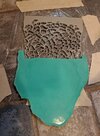
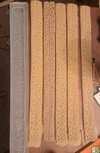
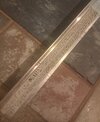
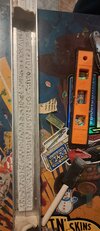
So, the bibs are done.
They were 3D printed then cast in Mold Star, I believe.
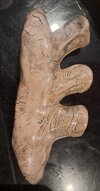
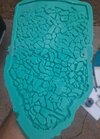
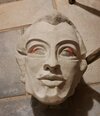
The center bib was printed in 2 pieces. I just printed 60% of the top and 60% of the bottom, made a mold out of the 60% piece and then interlocked the second half of the piece to make one, complete mold.

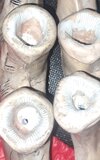
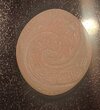
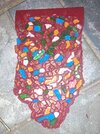
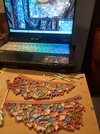
I have been playing with pigments and powders for the stained glass pieces. I really like "Interference Powders." I got a kit with samples of 6 different pearl Interference powders and ran some test on Moana stones

If you are interested in how to make a pearly look, just use two or three interference powders, like violet, green and pink. Mix each in their own portion of clear resin, then pour them in seperately.

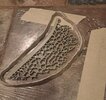
The white stained glass has the same effect, so now I am pretty confident about being a solid 47% accurate on these.

Next, I need to do the exciting color match of stained glass in refernece pics to the bib. I think DarhPope's pics show an old costume. I will make them look bright and pretty, and, as usual, if it needs to got from pristine to lived-in look, I will weather accordingly.
 

Attachments

  • Screenshot_20250312-212957_Gallery.jpg
    Screenshot_20250312-212957_Gallery.jpg
    345 KB · Views: 53
  • Screenshot_20250312-213008_Gallery.jpg
    Screenshot_20250312-213008_Gallery.jpg
    325.5 KB · Views: 45
  • Screenshot_20250312-213026_Gallery.jpg
    Screenshot_20250312-213026_Gallery.jpg
    314.2 KB · Views: 45
  • Screenshot_20250312-213057_Gallery.jpg
    Screenshot_20250312-213057_Gallery.jpg
    392.1 KB · Views: 47
  • 20250315_214027.jpg
    20250315_214027.jpg
    689.2 KB · Views: 50
The sash stuff be poured.

I theee-eenk the images on it are supposed to tell a story, but the patterns are also very close to looking repetitive, except for neato stuff like the spider.

So, I will prolly flip the designs so that they line up differently.

Something like

TOP
BOTTOM
***connected to***
BOTTOM
TOP

and

BOTTOM
TOP
***connected to***
TOP
BOTTOM

I will connect pieces with some Sil-poxy and then a light coat of dark brown/black resin to help the colors match better. If they are too floppy, maybe a thin aluminum right angle to add rigidity.

The Kosh costume appears to have a sheet of styrene behind the fabric, so that the fabric didnt back up into the actor when they moved forward.
 

Attachments

  • Screenshot_20250324-134046_Gallery.jpg
    Screenshot_20250324-134046_Gallery.jpg
    451.5 KB · Views: 43
Back
Top