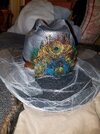
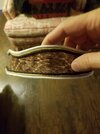
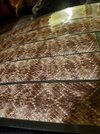
Earlier in the year, I put together this Kid Rock impersonation cosplay. I purchased a Stetson hat and then dug through my mom's incredible pile of craft feathers and furs. The hat work was extremely intense and much of it was new to me. The first layer of feathers was hotglued to a 2 inch square of felt cloth (not to the hat) that also had its own elastic band added to make it a removable part. Cloth beading/roping (boot lace) was glued on the edge of my laser prints (laminated) of rattle snake skins. I found the snake skin pattern online and printed it on a high definition laser printer at our local shipping store.
I did not want to damage the hat so there is some intricate straps and magnets involved. I first wrapped the entire hat in an amazing, non destructive wrap, Reynold's brand Press and Seal.
The laminated snake band had an elastic cloth band hot glued to connect the ends, making a removable hat band. The center piece medallion was cut from a soda can bottom and embossed with a steel round tip stylus then painted with a custom mix of black and clear nail polish. It was hot glued to a two layer stack of suede leather, one off white, one black, that had been star edge cut with crafter's scissors. This was backed with hairs from a dollar tree paint brush (dyed to match the original). A magnet set was hot glued to add this onto the bottom layer of feathers and felt.
Then I could not find all of the beads I needed so I sanded down some larger beads and painted them. I attached these with a leather cord and then hotglued these to the center medallion from the back by the magnet.
Making it this far was two months of effort and numerous shopping trips.
Attachments
Last edited:

")